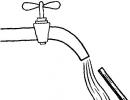
Fastening corrugated board to beams. How to properly fasten the corrugated board to the roof with self-tapping screws: instructions on how to fasten the corrugated sheet. Adjoining corrugated board to the wall
The strength of any structure mainly depends on the use of quality materials and correct installation... Any errors in the installation of the profiled sheet to the crate will negatively affect the further operation and durability.
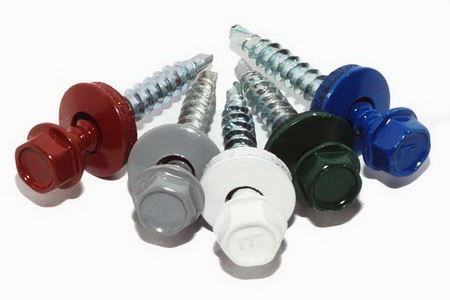
What kind of fasteners is the corrugated board mounted to the crate?
Hardware - special fasteners designed for the installation of corrugated board. Currently, industrial enterprises produce a very wide range of fasteners. Between themselves, they can differ in strength and installation method.
The product range consists of rivets, screws, self-tapping screws, wall plugs and roofing nails. They are all made from various materials, differ in design and scope. An incorrect ratio of the fastener and the material that is attached to it will lead to breakage or instability of the structure being erected.
Metal purlins and corrugated board are connected with rivets and self-tapping screws for corrugated board... The differences between them are significant. The advantages of a self-tapping screw over a rivet in its shape. The sharp tip, like a drill, makes a hole in the surface, so there is no need to pre-drill a hole during installation. It does not require the use of any additional tools and work experience. Even an inexperienced builder can handle the installation. Also, if handled correctly, its lifespan can be quite long.
If you need to dismantle the structure, the self-tapping screw will be quite suitable for reuse. The color variety of the self-tapping heads allows you to select the fasteners in accordance with the color of the profiled sheets and thereby mask the joints with each other.
Installing a rivet requires a hole and an additional tool such as a drill. In an uncomfortable position roofing material installation may cause inconvenience. For this, the corrugated sheet is bent to the required angle, which can lead to its deformation and damage. Reuse rivets are impossible, because if disconnected, it disintegrates and loses its working ability.
Taking into account the peculiarities of hardware in the form of a rivet, the method of riveting in installation has a narrow focus. Basically, it is chosen when other methods are not available, for example, in connecting the profiled sheet to metal hollow girders in the form of pipes and corners, where fastening can be made from one side. Despite the fact that rivets are less popular, installation with their help is quick, and the structures are durable and waterproof.
Rules for fastening corrugated board
The fastening of the corrugated board to the metal profile is carried out with self-tapping screws with rubber gaskets. This will ensure a tight seal at the junction. The sheets are overlapped by 1-2 notches. For wall and roof cladding, sheets are vertically stacked on top of each other by about 10-15 cm. The joints are fastened together, and when mounting, the screws are screwed into the concave part. This mounting option provides the most snug fit and eliminates the formation of leaks at the joints. As additional protection from the ingress of moisture from the outside, the joints are laid with silicone sealant.
Wall and roof cladding performed in any convenient direction. The calculation of the number of hardware is based on the length of the covered area and the number of waves. On average, this is 21-25 pieces for the entire surface. From below and from above, fastening is performed in each concave part of the sheet, in the middle part, gaps of 2-3 waves are allowed. On average, the consumption is 7-8 screws per 1 sq.
After the completion of the installation, the shavings that remained after the installation of the hardware should be removed. Otherwise, it will rust and damage the surface of the corrugated board.
Fastening of sheets to the roof is carried out in accordance with some rules. Take into account the pressure on the screw when screwing in. Too much load can damage the deck surface. Loose twisting will leave gaps and the roof will leak.
Profiled sheets are laid, starting from the bottom and gradually moving upward. The protrusion of the end of the first sheet beyond the level of the roof should be 5-10 cm.
How to fix the corrugated board with self-tapping screws?
Self-tapping screws as fasteners are designed for mounting corrugated board as on metal carcass, and on a wooden one. Before screwing in the self-tapping screw, you need to bait it. It is strictly prohibited to use drills or screwdrivers without a regulator of rotation and speed, this may damage the fasteners or the surface of the profiled material.
The maximum speed of screwing the metal sheet into the girder is 1500 rpm. It is necessary to monitor the angle of inclination of the hardware. Curvature is not allowed, the location of the screw to the surface must be strictly perpendicular, otherwise there will be a shift to the side and it will not twist.
The use of self-tapping screws for mounting profiled sheets to purlins without drilling is carried out only if the thickness of the latter does not exceed 2 mm.
From where the fastening work will be done, choose the size of the screws. Diameters vary from 0.48 to 0.63 cm, length, respectively, from 1.9 to 25 cm. outdoors they are subject to greater stress during operation. This is influenced by various external factors and weather conditions such as strong winds, thunderstorms, etc. When installing profiled sheets on the roof, you should choose fasteners of a smaller diameter, due to the likelihood of shifts. For a fence, on the contrary, a large diameter is suitable due to the possibility of rupture.
How to fix corrugated board with rivets?
The rivet consists of an aluminum sleeve with a metal core. The installation process with rivets is not difficult. Installation is carried out on one side only and does not require much effort on the part of the worker.
To fasten the profiled sheets to the girder or to each other with rivets, it is performed using a special riveting tool, having previously drilled the inlet holes. By squeezing the sleeve at the attachment point, an influx of the cap is formed. Pulling into the inside of the pistol, the attachment head is formed in the required position and holds the elements together.
The rivets are made from aluminum and galvanized steel. They are lightweight and easy to handle. The diameter and material of the rivets is selected depending on the thickness of the metal sheet.
Fasteners with a larger diameter will provide a more secure attachment, which in turn will have a positive effect on the overall structure and extend its service life. Collar rivets are available in the following assortments:
- secret - after installation, they are invisible on the surface;
- wide - to obtain a strong connection;
- standard - universal and suitable for any type of fastening.
The correct fastening of the profiled metal sheet to the purlin or purlins also depends on the rivet length. Its selection should be carried out in such a way that, before installation, the end of the rod protrudes beyond the attachment by at least 1 cm.
Larger protrusion will cause flaring further from the attachment point and will not achieve proper tightness. A protrusion that is less than a centimeter will not provide a sufficient inflow of the cap. The required rivet length is determined by folding the thickness of the profiled sheet and the thickness of the purlin.
An important point is the choice of rivet color. For the integrity of the structure, an aesthetic appearance and invisibility of the bonding point, it is better to select fasteners in the same color as the corrugated board.
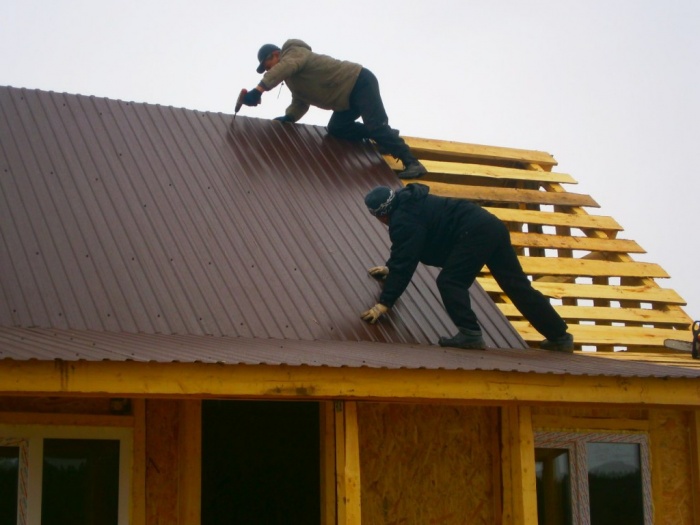
Probably, corrugated board is one of the simplest roofing materials in terms of its installation and fastening. Two people who do not have experience in carrying out this type of installation work will quickly and efficiently cope with it if they follow the recommendations of specialists. Honestly, the installation of corrugated board on the roof has its own specific nuances, and when carrying out the installation, it is imperative to know about them. Therefore, the question of how to properly fasten the corrugated board to the roof can often be heard today on construction forums. After all, private developers want to know exactly about the nuances.
Fastening corrugated board
Let's start with the fact that the corrugated board is attached to the crate installed on the roof truss system. The crate itself is assembled or from wooden beams with a section of 40x40 or 50x50 mm, or from boards 100 mm wide, 32-50 mm thick. It should be noted that the entire wooden structure is treated with fire retardants and antiseptics before installing the corrugated board.
Sometimes the crate is also made from a metal profile. For this, profiles are usually used with a thickness of no more than two millimeters. Thick metal is an increase in the load on the rafters. And, of course, the thickness imposes certain restrictions on the fastening process. This is especially true for the installation of self-tapping screws, because in the design of the fastener at the end there is a drill that can pierce a metal product 2 mm thick without preliminary drilling. Although experts assure that it is also not a problem to fasten the corrugated board to thick metal profiles. But this process is not so simple, and besides, it is costly and laborious.
The elements of the lathing are attached to rafter legs with an interval of 30-100 cm. If lightweight corrugated board is used, then a solid crate is mounted.
What should you pay attention to when attaching the corrugated board to the crate with self-tapping screws?
Fastening a roof made of corrugated board means not only laying the material and fixing it with self-tapping screws, but also your being on the roof. Roofing material painted or coated with polymer requires careful handling. It is easy to damage the protective coating, and this will lead to a decrease in the life of the roof due to corrosive processes on the surface of the metal sheet. Therefore advice.
Advice! Wear shoes with soft soles on your feet, on which there are no design elements and spikes, especially metal ones.
Try not to put tools on the decking. It is best to use a cloth or foam pad underneath. The best option- keep everything in a box.
Of course, no one is immune from troubles, so if for some reason you scratched the profiled sheet, then you should not despair. Everything can be corrected. To do this, you first need to treat the place of the defect with an anti-corrosion compound, and then paint it in the color of the corrugated board. But it is better if you use solutions with improved sealing qualities for this. They are usually black in color, so you will need to apply another coat of paint on top of this solution.
All the same will have to be done if holes were made in the corrugated board for self-tapping screws. As mentioned above, this is done only in cases where metal profiles are used in the roof structure for lathing with a thickness of more than 2 mm. Usually the heads of self-tapping screws are poured with a sealing compound.
Attention! Two to three months after the end of the installation of the corrugated board on the roof, it is necessary to tighten all the screws.
As practice shows, the fastening begins to weaken, because the corrugated board on the roof is exposed to temperature changes.
A few words about roof sealing. The overlap of sheets of corrugated board on flat roofs does not guarantee one hundred percent protection against leaks. Therefore, in the technology of stacking profiled sheets there is a point that must be followed without fail. This is the processing of the joint areas of the panels with special sealing mastics. Some craftsmen use silicone sealant.
What is forbidden to do
It is actually very convenient to work with corrugated board. But there are several prohibitions that must be adhered to. For it is they who determine how long the corrugated roof will serve. So what can't you do?
- It is not necessary to fasten the corrugated board to the crate with ordinary nails. When a metal sheet breaks through, a torn hole is formed on its surface, which will begin to rust over time.
- In no case should gas or electric welding be used in the installation process. All undercuts can only be made with mechanical or electric scissors.
- You can not use a grinder either. The abrasive disc will cut the sheet unevenly. In addition, it will ruin the zinc coating, because a high temperature is generated when cutting around.
If you like a neat and stylish roofing sheeting, then this article is just for you! After all, it is important not only to correctly choose a high-quality coating, but also to fix it correctly. Then the metal roof will serve for a long time without disturbing the periodic need for local repairs.
But how to fix the corrugated board to the roof with self-tapping screws and how difficult is it? There are really a lot of subtleties and nuances here: starting from the choice of suitable self-tapping screws and ending with a puzzle, in which wave of the sheet to fasten them - upper or lower. Shall we figure it out?
In order for a roof made of corrugated board to be durable and flawlessly operated for at least tens of years, there is a special technology fastening. Just imagine for a moment that some people really think of thin metal sheets to simply nail them down! Straight to the wooden support!
As a result, water easily seeps into the holes and there is no sense at all from such waterproofing:literally in a month or two, the first traces of rust will appear in these places, and there will be chronic dampness under the sheets.
Further, rust will corrode the entire roof until it completely destroys it. That is why it is highly discouraged to fasten the corrugated board with roofing nails, especially since they simply will not hold the sheets under the influence of strong winds.
Specifically for modern metal roof today, professional roofing screws are produced - with a rubber gasket, which, when compressed, completely blocks the path of any drop of water:
We are talking about special plumbing screw screws High Quality! And even self-tapping screws that are similar in appearance are not suitable for arranging the roof, because such screws can soon significantly loosen the fasteners and become covered with a corrosive coating.
By the way, in the most extreme case, if you used screws that were not the most suitable for the roof (or they were screwed in by careless workers), then do not rip them out with meat!
Even if there is a rubber gasket, be sure to seal all holes around the fasteners with sealant. But nevertheless, it is better not to resort to this method at all.
Professional roofing screws are always made of galvanized alloy steel. It is the material that directly affects the final quality of the roof fastening, ensures correct fastening and eliminates the violation of the metal structure around drilled hole... What does this affect?
First of all, will corrosion appear on the roofing sheet near the self-tapping screw. If you've ever seen a roof with cheap self-tapping screws, you probably recognized it precisely by the rusty streams from the washers. Heading down, these simultaneously destroy the entire sheet!
In the case of using the correct roofing screws, this does not happen. Indeed, even in the factory, they are electrolytically galvanized with a layer of at least 20 microns.
Next, the hat is covered polymer paint immediately from all sides, in order to also protect against corrosion. For high-quality self-tapping screws, it is polyester powder paint, which has a color according to the RAL catalog. And the rubber rubber gasket is resistant to temperature changes, ultraviolet rays and changes in loads.
By the way, among the most suitable for the profiled sheet, it is recommended to take self-tapping screws from Essve, Gunnebo and Sfs-intec.
For metal and wood lathing: how to distinguish a drill
Depending on which base the corrugated board will be attached to, you will need different types of self-tapping screws. And they shouldn't be confused!
You will also find on sale roofing screws with an enlarged drill, which are capable of passing metal up to 12 mm thick. Therefore, the very first step you need to take is to ask the seller of the roofing material for the enclosed installation instructions.
Any certified material has one. Otherwise, we do not recommend anything in this point of sale do not purchase, otherwise the roof will last a relatively short time.
Of course, the installation of corrugated board from different manufacturers practically does not differ, but in this manual you will find valuable advice on the selection of the most successful self-tapping screws for a specific metal thickness and coating.
So, today two main types of self-tapping screws are produced for lathing from different materials: fasteners for metal and wood. So, for a wooden lathing, self-tapping screws of 4.8x28 mm or 4.8x35 mm are needed. For metal purlins, self-tapping screws are taken for metal:
- 4.8x19 mm for metal with a thickness of 3 mm;
- 5.5x25 mm for metal up to 6 mm thick;
- 5.5x35 and 5.5x50 mm for metal up to 12 mm thick.
This mount looks thicker than its counterpart for wood:

All of these self-tapping screws are similar in that they have a hex head, a sharp drilling tip and a strong threaded rod. And they differ only in the thickness of the rod.
Also, the thread pitch for wood screws is more rare than for metal screws: the difference is from 1 to 1.5 mm and can be seen by eye. The thicker the metal base to be drilled, the more frequent the threads and the longer the drill.
Usually, in order to find out what thickness of metal a self-tapping screw can drill, it is enough to measure the length of the drill. It is logical that the thickness of the metal base, in total with the thickness of the screwed metal, should not exceed the length of the self-tapping drill:

Also, according to general rule, the thicker the corrugated sheet and the denser the crate, the sharper and longer the drill should be.
By the way, experienced roofers have their own technology for selecting the length of the drill. Often they take long and short drills in this proportion - 80% short and 20% long.
You can, of course, take all the long screws to play it safe, but the short ones twist more easily and break off the drill less. In general, it is correct, if we are talking about a wooden crate, then with short self-tapping screws you need to fasten the profiled sheet in the lower ridge, and with long screws through both sheets. Just select screws of such length that they come out a little with back side run.
How to calculate the number of screws for one sheet?
In total, there are two main schemes for fixing corrugated board:
- vertical, which is ideal for corrugated board with a drainage groove. In this case, first they put the first sheet in the first row, fix it for a while, and then the first sheet of the second row. This should result in a block of four sheets, which should be aligned and secured to the roof. All other sheets are laid according to the same scheme.
- 3 sheets each suitable for corrugated board without gutters. In this case, first the first two sheets are laid in the first row, a sheet of the second row is attached to them, and after alignment along the cornice, the block is already securely attached to the roof.
The fastening scheme also depends on the length of the purchased profiles:


We will separately dwell on what should be the overlap of the corrugated board:
- At an angle of less than 15 °, the overlap should be at least 200 mm, and preferably in two waves.
- At an angle of up to 30 °, the overlap is made from 150 to 200 mm, depending on the width of the wave.
- At an angle of more than 30 °, the overlap can already be from 100 mm.
If the profiled sheet has horizontal overlaps, then they need to be done at least 20 cm, with the obligatory sealing of each. To do this, use bitumen mastic or silicone sealant, which are also suitable for vertical ones.
To calculate the number of self-tapping screws for a modern corrugated board, you need to add up the entire coverage area in square meters plus the number of all additional products that will be used (these are strips, bypasses and overhangs). V from the most rational mounting scheme:

Also keep in mind that the step of fastening the corrugated board for different brands of corrugated board is different:

After that, we multiply the finished figure by 6 or 8, depending on how worried you are about the final quality. The more, the stronger the profiled sheet will be mounted on the slope, but at the same time, you will have to pay more for fasteners and for rainwater there is already a higher chance of finding its way into the under-roof space.
Simply bring the received number of self-tapping screws to a multiplicity of 250. Why? The fact is that self-tapping screws are sold in packs of 250 pieces or boxes in which they are placed from 1000 to 4000 pieces.
Therefore, make your figure such that it is integrally divisible by 250, and at the same time increase the figure upwards - let there be a small margin.
In what wave should the self-tapping screw be fastened? Rules and practice
Now let's move on to the most sensitive issue. The fact is that as long as corrugated board exists on sale (and this is a lot of time), so many disputes about its installation do not subside.
Still, how to fix the self-tapping screw correctly, in the upper or lower wave? Why do such questions even arise if the manufacturer clearly indicates what exactly is in the bottom?

In fact, it makes sense. The self-tapping screw in the lower wave reliably presses the profiled sheet to the crate, and the roof itself looks protected. But, at the same time, the water along the slopes always goes along the lower wave, and such an attachment is always in the water, unlike the upper one.
Any error during the installation process - roof leaks and rapid corrosion of the roofing material. Therefore, the most ridiculous and at the same time correct in practical terms solution of the issue is offered by the roofers themselves:
- If the roof is being assembled by professionals in whom you are sure, then let them screw the self-tapping screw into the lower wave;
- If the brigade is unreliable, consisting of guys who don't speak Russian, it's better to go to the top. This method will not affect the overall strength of the roof in any way, but during the rain problem areas fastenings will not create problems.
It is worth listening! But remember that the guarantee for the roof is given only when it is fixed in accordance with all the manufacturer's rules, without violating them. But then the conscientiousness of the guarantor and the durability of the roof itself are on the scales. You decide.
We analyze popular editing mistakes: there is a lot to learn!
Let's take a look at the main mistakes - the more you know about them, the better, and the more reliable the roof itself will then be:
- Drill too large... The result is no tightness and bearing capacity of the connection.
- Drill too thin... This will most likely lead to either broken fasteners, or thread biting - its partial destruction. And such a mount, of course, cannot be called high-quality.
- The self-tapping screw is too loose... In this case, the rubber pad will not adhere tightly to the surface of the metal sheet, and moisture will easily get under it.
- The self-tapping screw is too tight... In this case, due to overvoltage, the rubber gasket will quickly crack and water will pass through.
The following illustration will help you figure it out:

To avoid overtightening the washer or breaking off the drill, you need to know which tool is best for the corrugated board. For this purpose, a screwdriver with a low rotation speed is suitable, which allows you to control the angle of entry of the self-tapping screw into the roof.
Be careful: special self-tapping screws for corrugated board are completed with a washer, which reacts sensitively to overtightening when screwing.
But what to do if you screwed the screw in the wrong place (for example, did not hit the crate), and twice? After all, after this it is almost impossible to pull it out! There is a way out: you just need to close it up so that the wrong fasteners are not visible on the new roof:
One more good advice on the same issue:
As you can see, messing up is not difficult, but if you know about all these points and prepare, then missteps can be avoided.
Installation process in detail
It is customary to lay the corrugated board on the roof with the distance between the rafters from 600 to 900 mm. In the process of screwing in the screws, always make sure that they enter the corrugated board only at right angles, and the rubber washer of the screw is compressed by no more than 1 mm. If one of these rules is violated, then moisture cannot be avoided directly into the attachment points.
To make it convenient to screw in the roofing screws, use a screwdriver with a hex socket. In this case, it is already necessary to specially drill the corrugated board in advance:

The self-tapping screws themselves are evenly distributed at the joints of the sheets along the waves, at the joints of the sheets,when approaching the ridge, ridges, along the gables and on the line of the cornice.
Adjust the limitation of the rotating screwdriver in advance - so that in the process, when you press the corrugated sheet against the crate, the rubber gasket is only slightly pressed. Only slightly! Here is an example of incorrect (left) and correct (right) compression of a rubber gasket:Here, just increase the limitation of the rotating element, tighten the screw and return to the previous settings.
Try with all your might to get the self-tapping screw exactly into the center of the crate - this will ensure that there is no likelihood of deformation of the corrugation.Then tighten the screws in a checkerboard pattern. Place the attachment points for high profiles through one wave, and low profiles through two - this will increase the reliability of the roof.
Advice: if the corrugated board is too long, like that of the roofs of industrial facilities, and the profile is high, then with a run step of more than one meter, attach the sheets to each lower corrugation.
As soon as you finish installing the corrugated board, carefully watch the roof. Its general visual appearance, reliability of transverse and longitudinal joints, dents and correct fastening with self-tapping screws.
Fixation of additional elements with self-tapping screws
But the fastening of additional elements has its own technology. So, as a ridge strip, smooth ridge elements are used, which are laid with an overlap of 10 cm and a step of up to 30 cm.
Additionally, a seal is placed between the planks and the corrugated board. If the sheets have a small wave, then the usual seal will be enough, if the waves are large or trapezoidal - then the seal needs to be ventilated:

At the same time, for the slats, take the self-tapping screws themselves of a greater length than for the crate, because sometimes they will have to be fastened through the top of the wave. That is why the length of the self-tapping screw should be chosen so that it exceeds the thickness of the material with the wave height of the profiled sheet.
The technology is as follows:
- Step 1. Apply sealant to the seal and press the strip.
- Step 2. Fix the bar with self-tapping screws with a press washer.
- Step 3. Trim and fold the ridge strip, then attach it to the roof as well.
- Step 4. Now, if you have hip roof, then you still need spine strips.
- Step 5. This is the order in which you need to work with the endowment.
- Step 6. And in this order, the roofing material is fixed at the eaves.
So you know all the secrets of professional roofers. Ask questions, share experiences and thoughts on how to properly fix modern corrugated boarding.
Building a house in the country is a very laborious task, but its result is worth all the effort expended. Partial or complete performance of work independently is in a good way save money. The article will talk about laying the roof with your own hands. Let's consider how to fix the profiled sheet on the roof.
Profiled sheet characteristics
Profiled sheet (also called corrugated board) is a very common material in construction. Among its advantages are lightness, durability, strength, safety for environment, reliability, as well as ease of installation. The material is excellent for roofing, finishing works, as well as the installation of fences.

The professional sheet does not need to be painted regularly, the color will not fade under the sun. For the manufacture of the material, galvanized steel is used. Sometimes it is applied over it polymer coating... In appearance, the profiled sheet is similar to slate. Products are produced in many variations, differing in performance and size.
Material grades
Existing brands of corrugated board:
- "C" - used for the construction of small floors, the height of the corrugation in the range from 8 to 44 millimeters;
- "NS" - used as roofing, the height of the corrugation in the range from 35 to 44 millimeters;
- "N" - corrugated board with reinforced stiffeners, used as a permanent roof, the height of the corrugation in the range from 57 to 114 millimeters.
It is best to cover the roof with profile sheets with a height of 20 to 60 millimeters, which have a special groove for draining the liquid. The thickness is selected based on engineering calculations for various loads.

The kit for the product should include the instruction "How to screw the corrugated sheet to the roof correctly". If it is missing, you should ask the seller for it.
For the owner country house it is important that the roof covering is durable and also has a pleasant appearance... Therefore, when choosing a material, it is necessary to take into account climatic conditions region. For areas with increased snowfall, it is worth buying a profiled sheet with a corrugation from 20 millimeters, and the angle of the roof slope should be made from 15 degrees. Profiled sheets with the designation "НС35" and "НС44" are intended for private construction.
How to screw corrugated board to a wooden crate
Laying of corrugated board is carried out with overlapping sheets, like other roofing materials. In this case, the spacing distance is determined based on the slope of the roof.
The size of the profile overlap for fixing the corrugated board on roofs with different slopes:
- If the roof slope is no more than 14 degrees, a horizontal overlap of about 20 centimeters is performed.
- For a roof with a slope of 15 to 30 degrees, an overlap should be made from 15 to 20 centimeters.
- For a roof with a slope of more than 30 degrees, an overlap should be made from 10 to 15 centimeters.

Profile sheets are laid parallel to the cornice. Parallel sheets are fixed with one self-tapping screw. In this case, it is necessary to take into account the size of the eaves overhang, which is calculated from the height of the profile.
The size of the eaves overhang:
- If the wave depth of the profiled sheet is 8, 10 or 20 mm, the overhang should be made from 5 to 10 cm.
- In other cases - more than 20 cm.

Self-tapping screws with a length ranging from 2 to 25 cm and a diameter of 4.9-6.3 mm are used to fasten the profiled sheets. EKT, Hilli, Fisher fasteners have drill bits. Such self-tapping screws can be tightened without preliminary preparation. High-quality self-tapping screws have special gaskets that protect the holes from liquid ingress.
Recommendation: when choosing self-tapping screws, it is worth considering the length of the cylindrical thread. In high-quality fasteners, this indicator should be at least 5 mm greater than the width of the sheets to be joined. An average of six to eight self-tapping screws are used per square meter of roofing.
It is also worth remembering that rubber sealing washers must be used to attach the corrugated board to the crate. Self-tapping screws with a size of 28 × 4.8 mm are screwed into the lower sections of the product. But the ridge is attached to the upper "waves" (in more detail: "How to install the ridge on a roof made of corrugated board").
Isolation device
You need to know not only how to fix the corrugated board on the roof with self-tapping screws, but also about the correct insulation device - a very important stage in the installation of roofing material. The fact is that moisture forms under the roof. Condensation will gradually erode the coating and will require replacement. Insulation protects the roof from moisture build-up. The task itself includes the device of heat and vapor insulation, as well as the adjustment of ventilation.
It will be possible to increase the service life of the roof if a gasket is placed under the profiled sheets that protects against the formation of moisture. It is preferable to choose a vapor-waterproofing membrane. It is mounted on large nails with a step of about 20 centimeters. It is worth starting with the eaves, going in the direction of the roof ridge.
The protective film is laid with a slight overlap (from 10 to 15 centimeters). You also need to keep a sag of about 2 cm between the rafters. The sheets in the overlap areas are fixed with double-sided tape.

The counter strip must be taken with a thickness of 4-5 cm, it is used to protect the membrane during work. We must not forget about ventilation. A free space of 5 cm must be left between the spacer and the first board. In this case, the edge of the spacer is tucked up towards the back side of the end board. The film can be easily cut with an ordinary knife. See also: "How to put corrugated board on the roof - installation rules, step by step guide."
The ventilation holes are located closer to the roof ridge. They are designed for free air movement under the roof to prevent condensation. It will require adjustment of ventilation ducts, a small gap under the roof, as well as the presence of ventilation grilles, which are located at the ends of the building.
Advice: it is necessary to fix wooden slats on the protective film, they are designed to drain the resulting moisture and liquid. All places must be securely fastened. This is the only way to make high-quality ventilation gaps. This is the end of the roof insulation.
How to properly fix the corrugated board on the roof
Let's take a closer look at the task of how to fasten the corrugated board to the roof. When installing the profile, you must remember one nuance: the sheets must be laid so that the lower wave goes along the edge of the roof, and not the upper one. The capillary groove must also point upwards. Logs are used to transport the roofing material to the roofs.
Tip: lags can be replaced with a very fancy design. It is enough to take a long ladder and put it upside down to the roof. Then there will be an excellent route for filing professional sheets. See also: "Correct fastening of the profiled sheet with self-tapping screws on the roof - instructions."

Profiled sheets are laid in belts across the slope, while the first of them is laid with a 10-centimeter allowance on the visor. All of this is mounted on self-tapping screws with a hex head, in which there is a rubber gasket for sealing. The fastening elements are screwed in exclusively perpendicular to the sheets, without the slightest deviation. It is advisable to choose screws of the same color as the corrugated board. Then they will not stand out from the general background. Self-tapping screws are screwed along the edges of the sheet, in its center, as well as overlapping areas. At least 6 screws are involved in the fastening scheme of the profiled sheet on the roof. See also: "Rules for fastening corrugated board with self-tapping screws on the roof - the choice of fasteners and installation rules."
The subsequent rows must be laid along the slope, but already with a 10 cm overlap on the previous ones. Thus, parallel sheets are lined up. When one slope is covered, you can switch to another, the editing algorithm is the same.

To facilitate the installation procedure, you will need a small staircase, flush with the length of the roof. It will be used to move people across the roof. If such a staircase is not available, then it can be bought at a hardware store or hardware store, or you can build it yourself. This requires one longitudinal board - the base - and many small - steps. The structure is fixed to the corner of the ridge.
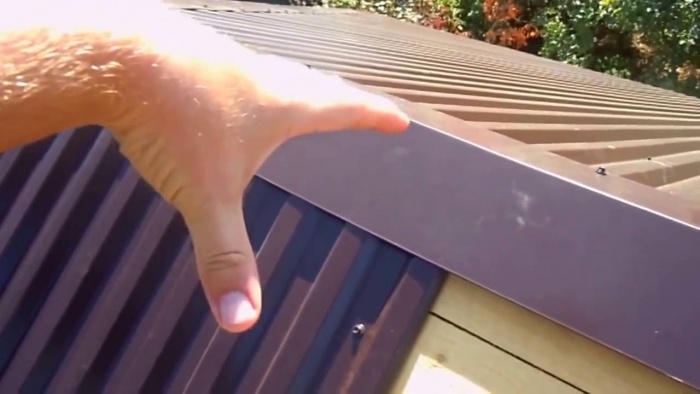
To overlap the ridge of the roof, you can use a galvanized strip or a profiled sheet, also fixed on self-tapping screws. When the installation procedure comes to an end, it is necessary to clean the roof of construction debris and shavings. Places where the profiled sheet is scratched or cut off must be touched up so that edge corrosion does not occur. After 3 months, it is advisable to pull the self-tapping screws. This is due to the fact that over time, the fastening is weakened.
Fastening the profiled sheet with self-tapping screws - possible mistakes
Possible mistakes and actions that cannot be performed when laying corrugated board:
- In no case should you fasten the profiled sheet to a wooden crate with nails. They can fly off in strong winds, such a connection is extremely unreliable.
- It is forbidden to carry out welding and flame cutting of profiled sheets.
- When cutting profiled sheets, you cannot use a "grinder". Friction will create high fever which will destroy the polymer coating with zinc. Such a profiled sheet will corrode and quickly collapse.
- The metal shears are only suitable for longitudinal cutting of corrugated board. Cross-cutting with such tools will deform the product. Correcting the resulting irregularities is a very difficult task. And there is no guarantee that it will be possible to completely eliminate the deformation. As a result, the sheet will be unsuitable for stacking.
Electric shears and a jigsaw will do a great job with cutting. For these purposes, it is also used a circular saw with large victorious teeth.
How to choose self-tapping screws for roofing from corrugated board and how to properly attach the covering to the crate
 Roofing sheeting - construction material sheet metal. Has in cross section a waveform of symmetrical ridges (corrugations) of a trapezoidal or rounded shape, giving lightness and strength to the structure.
The lower part of the profile is often referred to as the sole or bottom flange, and the top is called the ridge or top flange.
They are made of cold-rolled metal products with a thickness of 0.3-1 mm with various protective coatings.
In this article, we will look at how to properly screw the corrugated board to the roof and how many roofing screws are required per 1 m2 of corrugated board.
Roofing is considered a professional flooring in which:
- thickness metal not less than 0.7 mm;
- height corrugations not less than 35 mm;
- there is action-resistant coating solar radiation, precipitation and mechanical damage;
Unlike metal tiles, the corrugated board has a uniform profile along the entire length of the section and can fit on pitched roof with a small slope angle - 6-11 °.
Roofing cake device
The roofing cake consists of from the following layers:

Preparation of the lathing for covering
Before laying it is necessary make a high-quality crate... It is made from wood planks treated with an antiseptic compound. It prevents rotting due to condensation dripping from the inside of the roof. During installation, it is necessary to correctly determine the distance between the strips ( lathing step) and the distance between the screws.
- at height profile 35 mm(НС35) and an angle of inclination up to 15º - up to 0.5 m, more than 15º - 1 m;
- at height profile 60 mm(Н60) and an angle of inclination from 8º - no more than 3 m;
- at height profile 70 mm(Н75) and an angle of inclination from 8º - no more than 4 m;
What self-tapping screws are used to fasten the corrugated board to the roof?
Self-tapping screws for roofing from corrugated board are made of high-carbon steel and covered with high-quality galvanized. They are equipped with a special high-strength washer and a plastic gasket (EPDM), insulating the edges of the hole from water ingress and contact with the head of the self-tapping screw. The head of the self-tapping screw itself has a wide hex head with a metric size M8.
When installing the roof use three types of self-tapping screws with a diameter of 4.8 mm, differing in their purpose:
- for mounting in the bottom shelf(sole) of the profile of the corrugated board to the crate 35 mm long with a thinner tip in the form of a tapered drill and a wide thread pitch;
- for stapling sheets on the top shelf of the comb 20 mm long with a wide drill point and fine thread pitch;
- for attaching ridge strips- from 50 to 80 mm long.

Self-tapping screws for roofing
Consumption of roofing screws per 1 m2 of corrugated board
Usually fastening is done in 0.5 m increments. With sheet size 8  there will be 4 self-tapping screws per 1.1 meters per square meter. But the lower edge of the first row of the roof and the overlap zone of the subsequent rows are recommended to be fixed in each lower flange of the profile.
The edges of the sheets facing the roof gables are recommended to be fastened at intervals of 200-300 mm. Side laps, end and ridge strips also increase the amount of hardware required.
On average, 8 self-tapping screws of all sizes are consumed per 1 m² of roofing sheeting. Approximately four of them are 35 mm long, two are 20 mm, and two more are 50 mm or more. You should not use these values as final, since a lot of self-tapping screws are rejected during the installation process.
A more accurate calculation depends on overall dimensions sheet, the pitch of the lathing, the angle of inclination of the roof, the thickness of the metal, as well as the number of roof slopes.
How to properly fasten the corrugated board to the roof with self-tapping screws
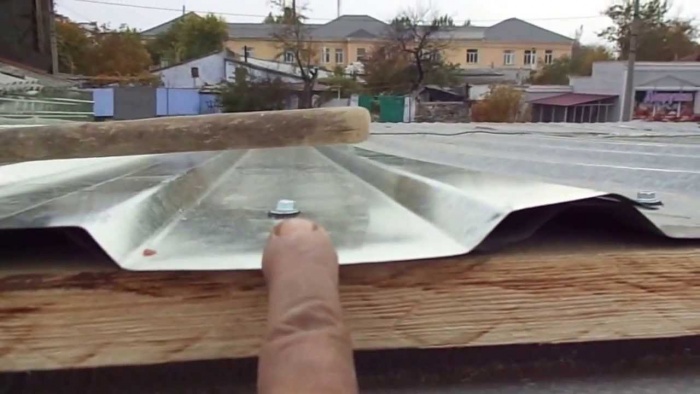
A well-screwed self-tapping screw does not deform the pressure washer in the opposite direction, but at the same time tightly presses the gasket to the metal, leaving no gaps or crevices. The axis of rotation of the self-tapping screw must be strictly perpendicular to the metal surface. So, let's take a closer look at how to fix the corrugated board on the roof with self-tapping screws:
- How to fix the corrugated board to the roof lathing? Fastening the first sheet of corrugated board to the crate starts from the left side of the bottom row... It is made with an overhang of 4 cm above the edge of the roof and an allowance of 15 cm for the next row. Fastening at the bottom of the sheet should be done "through the wave"- in each bottom flange (base) of the profile in contact with the battens - the strength of the entire roof structure depends on this. To avoid skewing, the sheets should be carefully aligned relative to the cornice.
- The next sheet is laid with a side overlap in one wave(for low-profile sheets - in two waves) onto the previous sheet, so that the edge passes through and is fastened with short self-tapping screws with a step of 300 mm along the crest of the wave (this prevents water leakage). It is also recommended to tighten the fasteners with a deviation of 50 mm towards the overlap for tight joining of sheets to the lower shelf of the upper sheet.
- The middle part of the sheet is fixed in a checkerboard pattern with a step every two waves, which corresponds to 500 mm.

- The second and subsequent rows are laid with an overlap of 10-20 cm on the previous one. Self-tapping screws in the overlap zone are also twisted through one wave. When determining the width of the overlap zone, it should be borne in mind that the higher the ridge of the roof and the greater the angle of inclination of the slope, the less the overlap is made.
- The upper edge of the last row of sheets adjacent to the ridge of the roof is fixed through the wave.
- At the second stage, additional roof elements are fixed - end and wind strips, chimney aprons, snow holders. At the same time, fastening is performed with self-tapping screws 50-90 mm long and an attachment pitch of up to 300 mm. If the end plate consists of several additional elements (which is highly undesirable), then an overlap of 100 mm must be observed.
- The final stage is the installation of the roof ridge. The ridge is a specially shaped profile with two shoulders 100-300 mm wide. Its purpose is to protect the roof from moisture penetration into the under-roof space and impart additional rigidity to the structure.
- Make sure that the mating edges of the roof slopes have a height difference of no more than 2%. Greater value leads to deformation under the influence of wind and the weight of the snow and the formation of cracks.

Laying the ridge begins from the end, opposite to the prevailing wind. The overlap of the additional elements is made the same as for the end strips. Rain and melt water gets under the ridge through the gaps of the lower shelves of the corrugated board.
Therefore, under the shoulders of the ridge, special sealing gaskets are placed, repeating the shape of the profile. Self-tapping screws up to 80 mm long twist along the lower edge of the skate shoulder with an indentation of 3-4 cm through the upper shelves(crests) waves of corrugated board in a crate.
It is applied on top of the final rows of sheets and using the "through the wave" method fasten with ridge self-tapping screws up to 80 mm long to the crate through the upper shelves(combs) corrugated board.
The use of special self-tapping screws as fasteners is the only correct solution. Correctly made installation does not deform the metal and does not damage the protective coating, thus preventing corrosion and moisture penetration. At the same time, the service life of the roof is significantly increased.
Useful video
For greater clarity, we suggest that you familiarize yourself with the video tutorial on fixing corrugated sheets:
How is the profiled sheet attached to the roof?
Decking is a popular material used for different types of work. It can be used for wall covering, fence or roofing. It has many advantages and is available in various forms. Installing it on the roof is considered a simple process, so many people prefer to mount the metal profile on the roof on their own. This will save significant money, as well as completely control the process, therefore, the absence of errors is guaranteed. 
Material parameters
Profiled sheet is often used to form roofing, as it produces a coating that does not have to spend a lot of money, and at the same time it is highly reliable and of high quality. Serves long enough, therefore it is effectively used in private housing construction.
Important! It is so easy to fix the profiled sheet on the roof that you do not need to use any specialized tools for this process.
The roof turns out to be quite attractive, but to get a really high-quality and durable coating, you need to follow exactly the right technology work, as well as take into account the numerous rules that allow you to secure the profiled sheet reliably and competently.
Profiled sheet is represented by special embossed metal sheet, which is produced using the cold rolling method. High quality galvanized steel is used to create it. A special coating of polymers or polyester is applied to it, which contributes to the formation of the material's resistance to the corrosion process. The material is produced in the form of sheets, which can have standard or unique individual dimensions. The shape of the profile resembles an ordinary slate. 
Important! The professional sheet is considered versatile material, since it can be used in different areas construction.
The material is presented in several forms:
- Wall. Sheets of this type are used for finishing the facade or creating small structures, for example, garages or other buildings. They are ideal for forming fences or other similar fences that do not have any significant dimensions. They can be effectively used for the construction of formwork. Wall corrugated board has different parameters, and its thickness is considered to be the smallest in comparison with other types.
- Carrier. This material is used to create a quality roof covering. It features excellent load-bearing capacity, and is also equipped with reliable stiffeners that increase the strength and resistance of the material before different kinds impacts.
- Universal. Sheets of this type have a low price and optimal parameters. Can be used to create a roof, but only if the roof has a slight slope.
Important! Before the direct work, it is required to correctly select the corrugated board, as well as prepare the base, which is usually represented by high-quality wooden crate, to which the sheets are attached. 
Choice of fasteners
The fastening of the profiled sheet to the crate can be carried out using various fasteners, each of which has its own characteristics and parameters. The strength and durability of fixation depends on the competent choice of these items. If the fasteners are chosen incorrectly, then the quality of the fastening will be at a low level, and this will negatively affect the service life of the roof.
The best options for fixing are:
- Galvanized self-tapping screws. They should be equipped with a sufficiently wide head. The products are formed using galvanized steel, which has excellent resistance to the corrosion process. Due to the presence of a wide head, the space under the roof is protected from moisture penetration. float: = "" left = "" margin: = "" https: = "">
Technology of work on fastening corrugated board
The scheme of fastening the profiled sheet with self-tapping screws on the roof is considered quite simple, so it is available to everyone. To do this, you initially need to create a roofing cake, consisting of a vapor barrier material, insulation and waterproofing. Only then is the sheathing for the corrugated board formed, on which the sheets are laid, which guarantees an optimal roof covering.
Important! To create waterproofing under the corrugated sheet, a film is used, which certainly fits freely on roof structure, since the presence of tension is not allowed, and after that it is fixed with a construction stapler or nails.
It is allowed to fix profiled sheets, both on a solid crate and on a lattice structure, but in the latter case, the distance between the slats should be in the range from 15 to 25 cm.
Fastening the corrugated board with self-tapping screws on the roof is carried out in sequential steps:
- alignment of the eaves of the ramp, since it is important to get a straight line horizontally;
- laying of sheets begins from the very bottom of the roof, and this process must be performed with an offset downward by a distance of 5 to 20 cm in order to form an optimal visor;
- to lift the sheets to the roof, it is recommended to use special structures or ropes to prevent possible damage to them, and if the integrity of the polymer coating is broken, it is advisable to replace the sheet or cover it with protective compounds;
- the first sheet must be positioned in such a way that the wave is not the first, therefore, a special groove is made first, designed to protect the under-roof space from moisture ingress;
- laying is done with an overlap, and one or two waves are taken, which protects the roof from rainwater flowing under the roof;
- to fix one sheet, at least 10 self-tapping screws are required;
- it is important to arrange fasteners around the perimeter of the sheet, as well as in the middle, and especially a lot of attention is paid to areas where there are connecting seams; https: = "">
Thus, fixing the corrugated board is not considered a difficult process, if you take into account the basic rules for its implementation, and also follow the instructions exactly. With high-quality performance of the work, a durable, reliable and durable coating is guaranteed.
How to fix corrugated board on the roof?
Decking is one of the most commonly used roofing materials. Roofs made of it are relatively inexpensive, do not require maintenance, and their service life can reach 40-45 years. But in order for the roof to serve long years, you need to know how to properly fix the corrugated board on the roof, and exactly follow the installation technology.

Perhaps the most important condition for the durability and reliability of a corrugated roof is precisely its correct fastening. At the same time, while working on the installation of roofing sheeting, special attention should be paid to the following points.
Fastening corrugated board to purlins and crate
A crate is a special frame, directly to which the profiled sheet is attached to the roof. Most often, the lathing is made of wood. It can be a bar with dimensions of 40x40 or 50x50 mm, as well as an edged board 32 mm thick and 100 mm wide. Wooden structures used for the lathing, it is recommended to treat it with special antiseptic compounds before installation. This treatment prevents wood from rotting and significantly extends the life of the roof.
The lathing can also be made of metal. For this, various metal profiles are usually used with a metal thickness of no more than two millimeters. The use of thicker metal unreasonably increases the load on rafter system... In addition, fastening the corrugated board to metal purlins and lathing with self-tapping screws also imposes certain restrictions on the thickness of the metal. The fact is that the self-tapping screws have a special drill at the end, which allows them to be screwed into the metal without pre-drilling holes, only if its thickness does not exceed 2 mm. Of course, fastening the profiled sheet to metal beams of large thickness is also possible - however, this greatly increases the complexity of the process.
Wooden beams or metal purlins are fastened perpendicular to the rafters in increments of 300 to 1000 mm. The step size depends on the brand of corrugated board and its bearing capacity. For a profiled sheet with a wave height less than 20mm, it is recommended to carry out a continuous crate.
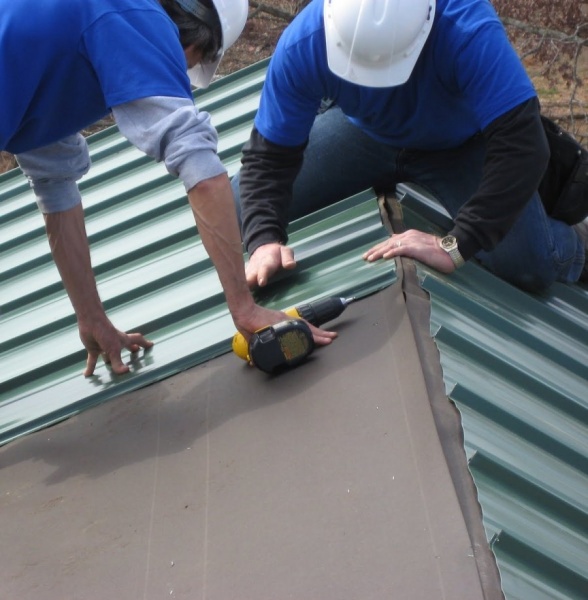
Fastening the corrugated board on the roof with self-tapping screws - what you should pay attention to
Fastening the corrugated board with self-tapping screws on the roof is the most critical stage in the installation of the roof. The tightness of the roof, as well as its durability, depends on how correctly the sheets of corrugated board are laid and fixed. If you do not know, or have not completely figured out how to fix the profiled sheet on the roof, in no case do not start work. Do not try to "figure it out along the way", as this approach is almost guaranteed to lead to material damage or a serious decrease in the performance of the roof.
To fasten the corrugated board to the crate, special self-tapping screws are used. They can be 4.8 to 6.3 mm in diameter and 20 to 250 mm in length. Roofing screws have a special sealing washer made of neoprene rubber under the head, which protects the roof from possible leaks at the attachment points. Flat head screws can also be used. In this case, rubber gaskets must be installed under the head.
Fastening the corrugated board to the girders, as a rule, is carried out with special elongated self-tapping screws, which is not always convenient. To avoid this, it is necessary to calculate the pitch of the sheathing based on the width of the bottom of the wave of the profiled sheet.
Particular attention should be paid to the quality of the screws, since drying out and cracking of the material from which the gaskets are made will inevitably lead to roof leakage. Branded self-tapping screws always have the manufacturer's stamp on the head. Usually, the fastening of the profiled sheet to the crate is considered reliable when using from 6 to 8 self-tapping screws per 1 square meter of the roof.
The fastening of the corrugated board to the crate is carried out in the lower wave. In this case, its most tight fit is ensured and the possibility of leakage at the attachment point is reduced to a minimum. It is necessary to lay the prepared sheets with an overlap of one or two waves in a row and 100-200 mm. between the rows. In the upper and lower parts of the roof, a sheet of corrugated board is attached to the base in each wave, and in the intervals, fastening through one or two waves is allowed. Between themselves, the sheets of corrugated board are usually connected with rivets. For this, special hand guns are used.
Self-tapping screws should be screwed strictly perpendicular to the plane of the corrugated sheet, since any misalignment will lead to a loose fit of the sealing washer and, as a result, to a possible leak. This is especially important when the profiled sheet is attached to the purlins, since in this case the length of the screw is much longer, which means that the likelihood of skewing is higher.
The ridge is attached to the crate through the upper wave of the sheet, which ensures the most tight connection of the ridge elements with the corrugated board. In addition, with small roof slopes, it is recommended to install sealing gaskets in the lower waves of the profiled sheet under the ridge. They prevent water from entering under the ridge in case of heavy side rain.
Why can the roof leak, even if the fastening of the roofing profiled sheet is correct?
Above, I told how to fix the corrugated board on the roof. However, corrosion and roof leaks can occur not only due to the fact that the fastening of the profiled sheet on the roof is incorrect, but also due to illiterate cutting of the profiled sheet. If you need to cut corrugated board, it is best to use hand or electric scissors, and for oblique cuts - a jigsaw.
The use of high speed power tools with cut-off wheels is not recommended. Red-hot metal particles flying around during cutting can damage the polymer coating of the corrugated board, which will subsequently lead to premature corrosion of the metal and a decrease in the service life of the roof. At the end of the work, the cutting points must be processed to prevent edge corrosion.
In addition, be extremely careful during work, since fastening the roof made of corrugated board using technology means that you are not only on the roof itself, but also directly on metal sheets. This means that you can easily accidentally damage the protective coating, which will lead to accelerated corrosion of the roofing. To avoid this, use shoes with soft soles, no spikes or metallic design elements. Also, try not to put tools directly on the corrugated board - use special boxes or foam pads for this.
If you nevertheless damaged the coating while attaching the corrugated board to the roof, then the damaged areas must be treated with special compounds. First, you should use special anti-corrosion compounds, then paint, and better - sealing mixtures of increased resistance.
Also, additional processing is required if the holes for the screws have been drilled. As already mentioned above, a similar need arises if the profiled sheet is attached to metal purlins or crate, whose thickness is more than 2 mm. I highly recommend avoiding this whenever possible, but sometimes you can't do it. In this case, it is imperative to fill the screw heads with a sealing compound.
2-3 months after you have fixed the corrugated board on the roof, it is recommended to re-broach the self-tapping screws. This will allow you to get rid of the possible weakening of the fastening density, which could arise when the corrugated sheets were shifted relative to each other. Such a shift can be caused both by the alignment and adjustment of the sheets during installation, and by their deformation during sharp fluctuations in the outside air temperature.
How to fix corrugated board on the roof with self-tapping screws - everyone who carries out work needs to know this
The article is devoted to the reliability and durability of the roof, which directly depend on the method of fixing the roofing material. Fastening the profiled sheet on the roof has its own characteristics, which must be studied before starting work. I will tell you about the technical nuances so that you can fix the material yourself and not worry about the final result.

Process features
We will analyze the process in great detail and break it down into the following stages:
- The choice of fasteners depending on the configuration of the roof;
- Fastening elements.

Stage 1 - selection of profiled sheet and fasteners
The type of fastener directly depends on the choice of profiled sheet, so first of all, decide on this aspect:
- The simplest version is marked "C", this is a wall version with a wave height from 8 to 44 mm. It is distinguished by its low price, but it is not very suitable for roofs. I advise using such products for sheds and small buildings;

- The HC grade is suitable for both walls and roofing systems. Their corrugation height is usually from 35 to 44 mm, but if the options are lower with a wave. This is the so-called "golden mean", which I recommend using on houses and other structures;

- The strongest version is marked "H" and has a wavelength of 57 to 114 mm. Such sheets are always made with stiffeners, but due to their high profile, they are most suitable for industrial buildings.

It is necessary to take into account the slope of your roof, the size of the overlaps at the joints depends on this.
Three main options:
- If the angle of inclination is less than 14 degrees, then the overlap at the joints should be at least 200 mm. Plus, it is recommended to additionally protect the connections with a sealant;

- To tilt the slope from 15 to 30 degrees, an overlap of 15-20 cm is required without additional sealing of the joints;
- If the angle is more than 30 degrees, then the overlap can be 10-15 cm.

Another factor influencing the choice of fasteners is the design of the lathing.
And here two options are possible:
- Fastening to metal girders is carried out using special self-tapping screws for metal with a large drill bit. Their length must be at least 25 mm for the main attachment and 70 mm for gable and ridge elements. Fasteners should be the same color as the main coating, everything is easy here, because the material is RAL marked;

- The fastening of the profiled sheet to the wooden lathing is done using self-tapping screws with a smaller drill. Usually, fasteners with a length of 29 or 35 mm are used to fasten the main elements, and a 70 mm version is used for skates and slats.

Stage 2 - fastening process
If you have everything you need at hand, then you can get to work.
Let's figure out how to fix the profiled sheet on the roof:

You need to work with a good screwdriver, for which you can purchase a magnetic attachment M8. With its help, it will be very convenient to mount.

- It is important to place the first sheet correctly. Firstly, it must be set according to the level, and secondly, the overhang must be set, it must be no more than 10-15 cm. You also have to figure out how to place the self-tapping screw correctly, the diagram below shows the correct and incorrect fastening methods, it is very important to immediately understand this aspect;

- It is important to understand that the professional sheet is always attached to lower part waves. You don't need to twist through the top of the waves as you can deform the material if you don't keep track of the twisting force. In the process of carrying out work, it is important to monitor the correct position of the screwdriver, it should be perpendicular so that it does not get distorted;

As for the consumption of fasteners, it usually takes 6-8 pieces per square meter. Fastening is usually done through a wave. The vertical distance between fasteners depends on the pitch of the lathing and is 40-50 cm.
- Remember that the fastening of the corrugated board to the roof with a slight slope is carried out using a sealant at the joints. From the edge of the sheet in the upper part, you can retreat 3-4 centimeters. If the elements are joined longitudinally, then the overlap should be at least 100 mm, and preferably 150-200 mm;

- Work continues until the entire surface is covered. If you have a broken roof profile, that is, the angle of inclination changes, then you need to pay attention to the connection of the sheets. The upper element must be bent so that it goes 30-40 cm beyond the bend, and under it the next sheet should be started. This is the only way to ensure a reliable docking;

- After the profiled sheet is fixed, you can proceed with the installation of the end plates. They must extend to the surface by at least 100 mm. Fastening is done in increments of 30-50 cm, the length of the self-tapping screw should be such that it fits into the frame by at least 30 mm. I usually use the 70mm option for fidelity;


- The ridge is attached last. I advise you to use this technology: a special vapor barrier tape is glued along the edges along the line of the element location, which will close the joint, but at the same time will not interfere with normal air exchange. Roofing screws are twisted along the edge in increments of about 20 cm.

It is necessary to fasten the corrugated board to the roof from metal trusses in the same way, the only difference is that the screws must come out of the metal from the back by 7-8 mm. This ensures reliable attachment of the material to the surface.

Output
From the article you learned about the best way fastening the profiled sheet using roofing screws. This review will give you the opportunity to get the job done right and get the perfect result. The video in this article will help you understand the topic even better, and if you don't understand anything, then write your questions in the comments below.
The roof is one of the most important parts of the house. It must be durable, with good thermal insulation and, most importantly, airtight - not a single drop of water from the street should get into the attic or living quarters through it. Therefore, much attention must be paid to the arrangement of the roof. There are many options for sheathing for it, one of the most common materials used in private construction is metal profiles. When used correctly, it allows you to make an inexpensive, yet reliable roof. In this article, you will learn how to fix corrugated board on the roof and what tools are needed for this.

To begin with, let's explain what a professional flooring is and what subspecies it is divided into. This material is rolled steel sheets with a wavy profile, the width and height of the protrusions of which are regulated by the standards. Due to this shape, the profiled sheet has significant rigidity with a low metal thickness.

To protect against corrosion, the corrugated board is covered from the outside with protective materials - galvanized or polymer film. The latter gives the material a certain color.
Important: there are several options for the protective coating of the corrugated board - polyester, the most common option, polyester with Teflon - is less common, but has improved protection against negative environmental influences. There are also steel sheets, PVC and PVDF coating on the outside - they are more expensive, but at the same time they have the highest possible resistance and durability for the material.

There are three main types of profiled sheet, each of which is suitable for the creation of specific structural elements of the building. Let's get acquainted with this material classification using the table below.
Table. The main brands of profiled sheet.
| Code designation of the brand of corrugated board | Function performed |
|---|---|
| Thin sheets with low profile heights. They are used in the construction of fences, simple sheds and walls that do not carry a significant load. It is undesirable to use it for roof cladding - the material is not strong enough and in winter it can bend under a layer of snow and ice. |
| Steel sheets, average in their strength characteristics, can be simultaneously used both as a wall and as a bearing corrugated board, but in the latter case there is a limitation on the permissible loads. It can be used as a material for roof sheathing, but only if the amount of snow falling in the area where the house is located is not too large. |
| Profiled sheets with high thickness and high profile. They are more expensive, but at the same time have increased durability. Used to create load-bearing structures. Recommended for roof sheathing. |


Important: after the letter designation of the brand of the profiled sheet there is a number - it indicates the height of the corrugation of the material in millimeters. When buying, pay attention to it.

The quality of the purchased material is one of the most important components of the strength and reliability of the roof. Therefore, we will give a few simple rules that will help you choose a good decking.


Important! If you are going to sheathe the roof with corrugated board, pay attention not only to the brand, size and quality of the material, but also to its color - it should be in harmony with the walls and basement of the building and at the same time not merge with the surrounding space.

Prices for corrugated board
Corrugated board
Rules for cutting corrugated board
In the process of laying a roof from corrugated board, many homeowners face a seemingly simple question - with what tool to cut this material into pieces of the sizes they need? Most often people use for this purpose angle grinder, better known as "grinder" - a tool that is in almost every home. But if you study the instructions for the profile steel flooring, you may find there an item that does not recommend or even prohibits the use of a grinder for cutting material. Otherwise, the guarantee for the corrugated board is considered invalid. Why is this so?

The thing is that the angle grinder gets very hot in the process. As a result, the metal in the place of the cut can melt, and with it the outer protective coating. The width of the damaged area can reach 3, 5 and even more millimeters. And this, at first glance, insignificant value is enough to start the corrosion process at the edge of the sheet and the gradual deterioration of the corrugated board. In addition, flying sparks can cause minor damage to the protective coating and far from the cutting edge - after a few years, red spots may appear in their place.

Therefore, it is undesirable to use a grinder for cutting a profiled sheet (if we are not talking about laying a temporary roof, for a couple of years, no more). But if you do not have other tools, try to use thin cutting wheels - in this case, damage can be minimized and the likelihood of material damage can be reduced.

Cutting discs for grinder - explanation on marking
There is another available tool suitable for the given task - hand scissors or metal saw... They are cheap, you can get them almost everywhere and when cutting they do not have the same effect on the corrugated board as the grinder. But they also have their drawbacks. Firstly, cutting a steel profiled sheet with a hand tool is a long and tedious task. Secondly, when handling a saw or hand scissors for metal, you need a certain skill and accuracy to make a straight cut line without burrs and similar defects.

A good option for a tool for cutting profiled sheet on the roof will be circular saw at low speeds and with a special blade designed to accomplish this task. There is another alternative - jigsaw with a metal blade... But with it, you can normally cut only corrugated board with a low corrugation height - otherwise the sheet will break and receive a lot of mechanical damage.

Important! When working with a grinder, circular saw and other similar tools, take precautions - work with protective goggles.
An excellent option in terms of cut quality and speed of work is to use special guillotines(quite expensive) and electric scissors for metal... But at the same time, they are a specialized tool that you are unlikely to use often.

Advice! If, before starting work on sheathing the roof with corrugated board, you carried out thorough calculations and you know exactly which sheets of what size are needed, then it makes sense to offer the seller to cut them up in advance using a professional tool - a metal guillotine. This will save time, save energy, possibly simplify the process of delivering material to your home and, moreover, eliminate the risk of damage to the corrugated board due to incorrect cutting technology.


Nibblers prices
Nibblers
Roofing technology from corrugated board
Now let's look at the whole process of roofing with profiled steel sheet, from the very beginning to the end. For your convenience, it will be presented in the form of step-by-step instructions with photographs.
Installation of heat and waterproofing and lathing
Work on securing the sheathing from corrugated board should begin with preparation. It is expressed in the creation of the first pieces of the "puff pie" of the roof:
- thermal insulation preventing the house from cooling too quickly.
- waterproofing, which does not allow moisture penetration under the roof.
- lathing- a frame on which there will subsequently be profiled steel sheets.
Now let's move on to step-by-step instructions that describe this entire process in more detail.
Step 1. Treat the rafters at home with an antiseptic. If you want to get a strong and durable roof - perform this action with all wooden elements of the roof in the future.

Step 2. After finishing the rafters, proceed with the installation of the roof insulation layer. It is advisable to use sheets for these purposes mineral wool or similar materials. But if you work with a non-residential or seasonal building (such as a summer cottage), then you can get by with the creation of " cold roof», Without insulation - the air layer in the space under the roof will act in its role.

Step 3. Above the layer of insulation and rafters, it is necessary to lay waterproofing. To do this, you can use a cheap roofing material or specialized building films that are strong enough and at the same time do not allow moisture to pass through themselves (some of them have the ability to “release” water vapor from the space under the roof so that the insulation does not damp over time). Secure waterproofing with construction staples and a stapler. At the same time, make sure that the individual sheets of material overlap each other, its value should reach 10 cm or more - this reduces the likelihood of violation of the integrity of the layer.


Step 4. Mount the counter-lattice - wooden slats with a height of 20-30 mm, nailed over the insulation and waterproofing above the roof rafters. The counter lattice performs two tasks, the first is to create ventilation gap under the roof, the second is additional fixation of the moisture-proof film. Due to the gap formed at this stage under the profiled sheet, air circulation and a timely natural drainage of water vapor will be ensured, which otherwise could harm the insulation materials and the roof sheathing.

Step 5. On top of the counter-lattice, steam and waterproofing, install the main lathing - a frame for the future roof made of corrugated board, laid perpendicular to the rafters. When building private houses, as a rule, it is created from wood - either boards 32x100 mm, or from a bar of 40x40 (or 50x50). Like any other parts of the roof made of wood, the lathing after installation must be treated with antiseptic agents to prevent rotting of the material.

Prices for various types of building boards
Construction boards
An important point that should be discussed separately is distance between battens... This parameter depends on the bearing properties and the wave height of the profiled sheet - the smaller they are, the more often the frame should lie under it. So, under the material of the HC8 brand, the lathing should be solid, and under the C21 - from 30 to 65 centimeters, depending on the angle of inclination of the roof. More detailed data can be obtained from the table shown in the image below.

Important! When building a house in an area where there are often strong winds or hurricanes, the distance between the elements of the crate should be halved and the parts should be placed more often.
Video - Installation of roofing from corrugated board
Laying sheathing from corrugated board on the crate
After arranging the protective layers of the roof and lathing, proceed to the most important part of the roof arrangement - the installation of corrugated board.
Step 1. Prepare the corrugated board for installation on the roof - lay it next to the house, remove the packaging, if necessary, cut the material to the required length (it is desirable that the length of the sheet is equal to the length of the roof slope plus the overhang from 5 cm to 20 cm). Also don't forget to prepare everything necessary tools and a ladder to climb up.
Important! It is advisable to work with corrugated board in shoes with soft soles and without metal elements - this way you will not scratch the protective surface of the material and do not damage it in any other way.
Step 2. Equip runners for safely lifting the corrugated board to the roof - make them from two beams or planks. Another option is wooden ladder, turned upside down steps to the ground. With the help of such runners, you can easily drag a long sheet of corrugated board upward without bending it, without dropping it or damaging it in any other way.

Step 3. Lift up on the runners and install the first sheet of corrugated board from the edge of the roof. If the length of its slope is too large and several rows of sheets are used, start with the bottom one. In the image above, you can see the order in which the corrugated board is laid on the roof.
Advice! If desired, install a cornice strip before laying the corrugated board on the crate - it will improve the protection of wooden roof elements from moisture. After completing all the work, it makes sense to supplement the bar with a gutter groove.
Step 4. Align the corrugated sheet, make sure there is a 5-15 cm overhang from the eaves. It is also desirable that there is an overhang from the end of the roof. Using a screwdriver, fasten the sheet to the crate with roofing screws, starting from the eaves or from the ridge. Roll them into the lower parts of the waves without missing any of them. When fastening to the lathing elements lying above, put the fasteners through one lower part of the wave, while observing a checkerboard order, as in one of the photos below.


Important! It is impossible to use nails for the installation of roofing from corrugated board! When using them, the integrity of the material is violated and, as a result, such a roof will be leaking and will quickly become unusable.

Step 5. In the same way as in the previous step, start installing and securing the following sheets of corrugated board. At the same time, joining them with each other, create an overlap of one, two or more waves of material, depending on the angle of the roof slope. This is necessary to prevent moisture from flowing into the joints between the roofing elements. If the corrugated board is laid in several rows, then there should be an overlap between them, at the same time very significant, from 30 to 50 cm, and in some cases - up to a meter.


Step 6. Install a ridge bar and other additional elements necessary to close and protect the joints of the corrugated roof with walls and other roof slopes.


Step 7. Seal up the joints of the corrugated sheets with each other and with additional elements with a sealant that is sufficiently resistant to sudden changes in temperature, precipitation and sunlight.
Prices for popular models of screwdrivers
Screwdrivers
After completing all these steps, fixing the corrugated board on the roof of your house can be considered complete - remove the tools and leftover building materials, clean the roof and on the ground next to it. After 1-2 months, you can go up and check if the roofing screws are loose - tighten them if necessary.
Video - How not to attach corrugated board to the roof