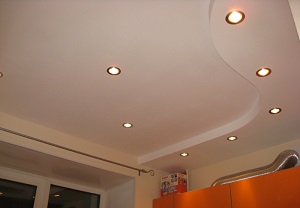
Projects of plasterboard ceilings in the kitchen. The ceiling in the kitchen of plasterboard is the best design options. Making a single-level ceiling yourself
Designs from plasterboard can be found in almost every modern interiorbecause it is practical, cheap and aesthetic. They can be created independently, enclosing in any style. Whether it is a classic or high-tech, the variability of forms allows to design unique design Ceiling of drywall in the kitchen, which will be the rawness of the room. On the peculiarities of this material - in our article!
Types of ceilings for kitchen
Plasterboard ceilings belong to the type of suspended structures, which are established to serve decorative or practical purposes. But due to the low stability of GLC to moisture, it is not recommended to mount it in the bathroom, where this indicator is high enough. But for the kitchen, this is an excellent solution that will help hide the shortcomings of the surface or hide communications.
Obviously, not only because of this, GLC products are so popular. The fact is that it is a very plastic, malleable material, with which you can form both curly decor and smooth, perfectly even partitions with a complex lighting system. Based on the form, the method of installation and destination exist three types of plasterboard ceilings, each of which should be part more.
Single-level plasterboard ceilings
This species is the easiest option that can serve as an independent element of the interior or base for more complex designs.
Single-level plasterboard ceilings in the kitchen consist of metal carcasswhich is firmly fixed, plating and luminaires of built-in lighting. To build this can even newcomer in repair workThe main thing is to securely secure the foundation.
GLC sheets are customized to each other, and all the joints are carefully putty - it helps create the effect of perfectly smooth coating. A blank space is formed between the plasterboard and the main partition in the height of the suspension, in which the built-in lighting is usually hiding.
In general, despite its simplicity, single-level ceilings look quite stylish and able to harmoniously merge with minimalist or modern style. To expand the design capabilities, you can "play" with flowers, patterns, make a coating matte, glossy or just stuck with wallpaper.
Single-level plasterboard ceilings have a number of advantages over other varieties. First, they do not lose their kind even because of the seed foundation. Secondly, allow you to visually align the original finish, not so much reducing the height of the room, which is especially relevant for small-sized kitchens. Thirdly, it will protect from too noisy neighbors, providing better sound insulation. Simple solution for simple design.


Multi-level plasterboard ceilings
Having learned how to create a single-level construction, you can dwell on it, and you can "attach" a second or third level to it (smaller in size) for a more complex look. The second option refers to multi-level ceilings from GLC and requires a certain skill at the creator.
The following plasterboard tiers can not only be direct, but also curved forms, for which it is necessary to use a special figured frame and sheets. At the same time, it is necessary to carefully consider each level so that it does not give to visitors to the kitchen, did not deform the space. Depending on the desired effect, a certain type of multi-level ceilings are chosen, which are only three:
1. Framework. This is a kind of box with steps, which is located all over the perimeter of the room. The center of the room becomes the highest point, so that it seems more spacious. Levels can be symmetric or asymmetric, completely changing space geometry. The impression is enhanced by point lighting.
2. Diagonal designs. Help to divide the kitchen into two parts, visually highlighting one of them. This is done as follows: the section of the section passes from the angle to the corner, on one side of which there is a protruding part, and on the other - no. Accordingly, they are at different levels. For a larger effect, you can experiment with colors or type of coatings.
3. Zone view. Suitable for rooms that combine several zones immediately. It is relevant for kitchens combined with dining room, as well as a living room. You can select any part of the room, building the second level of the desired form over it. Stylish will look such a ceiling above the bar or dining table, additionally illuminating this part.
Thus, together with complexity mounting work The functions of multi-level ceilings made of drywall are also complicated. With their help, you can visually change the size of the kitchen, make it more voluminous, highlight certain functional parts. But the main thing - your interior will become more diverse and unique.


Curly ceilings from drywall
Such ceilings are called even combined models, as they can align several species at once for the implementation of complex designer ideas. This is not just smooth bends or clear strips, but complex figures that result in the central object of the kitchen. There are practically no clear classifications here, since the "ball rule" unique ideas. But we will try to highlight the main motifs of combined designs to demonstrate their capabilities.
- Like the drawing on the canvas, the drywall figures "grow" on a single-level ceiling, speaking with an independent design element. Depending on the interior concept, it can be flowers or even silhouettes of living beings. To highlight the "Image" stronger, it is highlighted at the edges.
- Popular motif for modern style - abstract patterns that make the kitchen mystery and uniqueness. For example, you can create a spiral deformed structure, and when staining, apply a few shades.
- The effect of soaring over the kitchen UFOs can be achieved when using fitting sleeves and metal pins, which are attached to the base in a special way. The feeling is created, as if the construction of plasterboard is soaring in the air, not in contact with the surface of the ceiling.


Determine the form of a ceiling of plasterboard is one. But in order to fully reveal the entire decorative potential, it is also necessary to think about the lighting system.
There are two options for the backlight of the ceilings:
1. Open typeWhen the lamps are mounted in the hole or hang, constituting the separate part of the upper ensemble.
2. Hidden type when the lamps are hiding in special niches between plasterboard sheets and initial surface. This is a more popular option that creates a soft unobtrusive light, as well as the effect of a soaring design.
The most interesting begins when choosing lamps, since their range and opportunities are wide enough.
- Spot. The most common type of lamps intended for suspended ceilings. There are models with the function of controlling the direction of light, although they are more expensive.
— LED ribbons. Enough simply mounted in the resulting niches. You can control the strength and intensity of lighting using a special controller. The advantage of this species is also in the relative safety of the instruments, as they do not distinguish heat. To enhance the atmosphere in the interior, you can purchase multicolored backlights.
- Neon. It is a tube from neon, which, due to flexibility, can take a curved shape, smoothly delineating figures from GLC unusual light.
- Chandelier. The usual type of lighting, with the installation of which came across, probably, any owner. For plasterboard ceilings, the same principle is used. At the same time, chandeliers are often combined with other illumination options by placing it in the center of the ensemble.
Choosing the best illumination of the ceiling of plasterboard for the kitchen, keep in mind that the solution of practical tasks is more important than decorative. Unlike the living room, where most of the time we spend on vacation, it is important in this space that the work area is as high as possible without creating inconvenience during cooking. The ability to adjust the power of light is a very convenient feature.


Holders of small kitchens probably know that this space should be made with a minimum number of items, decorated with minimal decor and "painted" into light colors. But the ceiling design can also pick up meters or vice versa - save.
Of course, for premises with low ceilings it is not recommended to install additional items on its surface. But what if it is not perfect? Single-level plasterboard ceilings - perfect solution all problems.
For decoration it is recommended to choose bright shades, which are several tones lighter walls. Avoid drawings, patterns or lines that create ceiling boundaries, reducing it and kitchen in size. Acting on the principle of "the less - the better", you can take advantage of all the advantages of facilities from GLC and transform the interior.


Plasterboard ceilings are an excellent solution for the kitchen, which will allow to hide surface flaws or become the designer dignity of the room. Some may surprise the variety of constructive options, but in fact there are even more. Proof of this, as well as an additional source of inspiration - our selection of photos. Happy viewing!


Do you know that the ceiling in the kitchen can be not only an element of the decor, but also to perform certain functions? This part of the room can be made useful and functional, if you create it from drywall. How to do this, and how can the space under the ceiling construction serve the good service in the kitchen room?
Why is it worth installing a plasterboard ceiling in the kitchen?
Plasterboard is construction materialwho invented in the USA in the XIX century. He came up with His Augustine Sake, the owner of the paper making factory. Then this canvas was called a construction board and resembled a kind of pie made of plaster and paper. Improved material engineer Clarence Tsman, who created such a plasterboard, which we see it and apply now.

On a note! As part of one sheet of plasterboard, about 91% of the mass occupies a two-wheel gypsum, the remaining 9% is cardboard, starch and surfactant organic matter.


IN Soviet Union Gypsum Carton came around the 50s of the twentieth century and since then it is used in construction and design. The material is simple and easy to work, relatively cheap and not only allows you to separate (align) walls, but also suitable for the manufacture of window slopes. It is not surprising that the plasterboard began to use both for the creation of ceiling structures, including multi-level and complex.


The material has a large number of advantages and that is why it is ideal for the manufacture of a ceiling in the kitchen.

But the ceiling of plasterboard has its own drawbacks.
Prices for plasterboard
plasterboard
- The design "eats" at least 7 cm of the overall height of the ceiling, which is very uncomfortable for small kitchens.
- Installation of plasterboard ceiling - it's not five minutes. Perhaps you have to spend far from one day to collect it completely.
- After the installation is completed, the ceiling will require finishes, and these are additional temporary and financial costs. Depending on the type of external finishing, the design can be difficult to care.
- Such a ceiling does not like moisture and will not save the room in case of flooding neighbors from above.
- For incorrect installation, as well as during long-term use, in places of shuttering between plasterboard sheets, the surface finish can crack.
Nevertheless, despite all the flaws, plasterboard ceilings are one and most popular types of ceiling surface finish. Pluses him much more.

Types of plasterboard ceilings
Plasterboard - so "plastic" material, which allows you to create completely different forms, including in the kitchen. In order to purchase the required amount of materials, the necessary tools and start installation work, you should decide how your ceiling will look like. There are several types of ceiling designs from plasterboard.
Table. Types of plasterboard ceilings.
| Type of ceiling | Description |
|---|---|
| The easiest option of the plasterboard ceiling. Represents a smooth surface without additional elements. Easy in installation: metal frame is simply trimmed by plasterboard sheets. Such a ceiling "eats" at least from the overall height of the room, but it allows you to hide the draft ceiling completely. |
| Middle Painting Type of Ceiling Ceiling Plasterton. The main "subtlety" is to correctly calculate the location of additional levels and create a more complex frame as in the case of the ceiling in one level. Due to this, the installation is more complicated and lasts longer. But levels can be interesting to beat with the help of curved lines, as well as highlighting with the help of lamps or luminous tape. It is worth remembering that the ceiling in several levels "steals" even more room heights, so it is only suitable for spacious kitchens. |
| As a rule, such a ceiling will have a very complex design and any volume decorative element of its surface. For example, in the center of the kitchen can flourish a flower or a butterfly appears or any abstract drawing at all. Such a ceiling is difficult to mount those who do not have experience working with plasterboard. |


Look in more detail, consider ceiling structures consisting of several levels. The ceiling in the kitchen can be made by frame, diagonal or zonal.
Frame ceiling - This is the easiest embodiment of a multi-level ceiling. It is a surface with one or two steps around the perimeter of walls of the kitchen.
On a note! By the way, the stage around the perimeter of the kitchen is a great place to organize additional room illumination. As a rule, the lamps look there very organically.

Diagonal ceiling - Design where levels of levels are located only on one of the sides of the room and stretch from the angle in the angle. They are performed both perfectly even and wavy.

Zonal ceiling Allows you to clearly allocate a working or dining area. The main stage and will emphasize it. The rest of the ceiling space will be smooth. As a rule, such a step is not large and massive.

Design Tips for Little and Big Kitchens
To the ceiling in the kitchen pleased you long years and did not seem bulky, ugly, heavy, should carefully think about it appearance.
When choosing a type of ceiling design from drywall and its finishes, it is important to take into account several important factors:
- sizes and height of the kitchen;
- general interior style;
- the need for additional lighting equipment;
- the need to use decor.
Why is it worth paying attention to these factors? The fact is that the plasterboard ceiling with the wrong installation and the finish will not just "put pressure" - it will look very bad, and you will not be satisfied with the repairs.

Here are some tips, following which, you can very well work out the ceiling design and make it perfect.
- Use dot lamps for zoning the room.
- Hide corrugations and other kitchen communications under plasterboard.
- For decoration design, use bright shades - beige, cream.
- IN small rooms It is better not to make protrusions on the ceiling in the center of the kitchen.
- Zoning the room will also help both the game with color. Use different shades for this.
- In large kitchens you can create a soaring ceiling - in this case, it seems that part of the design is simply hanging in the air (attachments are not visible).
Attention! Remember that in a small kitchen, bulky multi-level structures will look very bad. It is best to make a ceiling in one level or to work out the frame of the ceiling of plasterboard.
Setting the ceiling
After you have decided on the design of the ceiling of plasterboard in the kitchen, you can start mounting.
For this, the following tools will be required, to acquire the acquisition of which should be in advance:
- perforator;
- shurpofert;
- roulette;
- building laser level;
- ladder;
- pencil for applying;
- putty knife.

Video - Plaster Ring Tool (Basic Set)
Materials that will be needed to create a plasterboard ceiling:
- plasterboard sheets;
- anchor wedges for the ceiling;
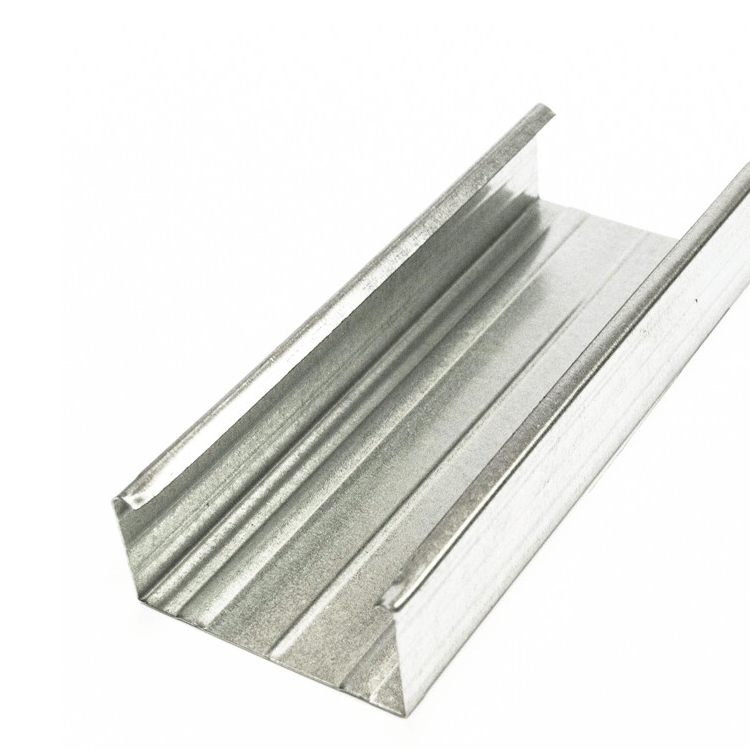
- metal profiles CD and UD;
- suspensions, thrust;
- putty and primer, finishing material;
- sealing tape, separation tape, serpent;
- screws for metal and plasterboard;
- dowel;
- profile extensions, "crabs" for suspended structures, "fleas".

Also purchase lighting devices in advance in the required quantity and wires to connect them to the power grid.
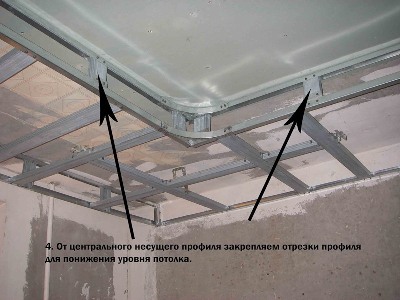
The procedure for performing the installation of a two-level ceiling.
Make a detailed attachment plan for all design elements. It will make it easier for the work and will calculate the required number of fasteners and materials.
Prices for screwdrivers
screwdriver

Start with markup. With the help of a roulette, determine the lowest angle in the kitchen, from the base ceiling down, make a mark at the bottom boundary of the first tier (this is about 10 cm). Make the same marks on other angles. Define them level with a laser level.


Connect the distinct points in the corners of one line around the perimeter of the kitchen. To do this, it is convenient to use the so-called chop cord.

On the drawn line, attach UD guide profiles using a dowel. Holes for profiles Make with a perforator. Do not forget to strengthen each profile at the edges at a distance of at least 10 cm from each end.

Attention! Before fixing profiles, proof by a tape seal.

Transfer to the ceiling that part of your scheme where the main profiles attached under the ceiling are marked. The step between parallel marking lines is approximately 40 cm. Perpendicular to them make marks in those places where the suspensions will be installed (step - about 50 cm). At the same time, extreme suspensions set up 25 cm from the wall.
Start installing the suspensions. Screw the anchors to the ceiling, secure the suspended design and turn it out the ends so that it does not have a free stroke.

Fastening of suspensions (here - Vibropodves for noise insulation)
Install the profiles on the prepared design, screwing them to the suspension by self-draws - first the edges, then the middle. At the same time, the profiles are attached to one side of the ceiling, then on the other, step by step.

On a note! The length of the entire profile should be less than 2 cuisine length. Short profiles can be connected using special connectors. Remember that the joints of several profiles in this case should not be on the same level.
Between the profiles, set the jumpers using "crabs". Jumpers install in those places where shelves of plasterboard sheets will be.

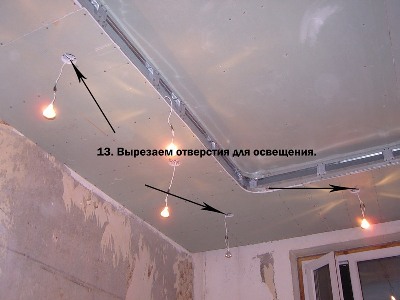
Make all the wiring, because after the plastering of drywall you will not be able to carry out this stage of work. Machine wires for lamps and check the entire network for performance.


Tip! In order not to look for later the installation site of the lamps, they can be mentioned in advance on sheets of plasterboard.
Start installing plasterboard. Before this, it must be processed - do trust under a small angle over the edge each sheet. This is necessary to improve the results of the shtclovation in the future. The plated ends of the sheets do not need.


Crepact sheets, starting with the angles of the room, self-drawing with a step of 20 cm. Make sure that the sheets are installed "in the dispersion".
Ceiling profile prices
ceiling profile


Attention! Hats of selflessness should not be written, they should be dried into a leaf of plasterboard for several millimeters.
After you have sewed the entire ceiling, proceed to installing the second level. Tensioning two threads from the corner to the corner of the kitchen so that they intersect. So you will find the center of the ceiling. It is from him and start to postpone equal distances to determine the borders of the ceiling levels. That is, now you draw marking on which you will roll profiles for another tier.

Screw the guide profile on the occupied perimeter. Repeat steps 2, 3, 4, oriented now to the second level.


Now apply the CD profile on the segments of the length that you plan to set the second level. This is the same length as the distance from the first level to the guide profiles of the second fixed on the wall. Cut on one side of segments special "tongues", cutting off the side parts of the profile.
Insert sections to the UD reinforced on the first tier at a distance of approximately 5-6 cm. Strengthen them with the help of Self-Self-Display.

Put on hanging segments another guide profile.


Prepare CD segments of profiles, equal in length distance from the received mini-frame to the wall, and install them, securing "flea".
Cut the frame of plasterboard.

Tip! To save the material, do not cover the one part of the first tier with drywall, which hits the second.

Make holes for lamps using a cutter the desired diameter or reinforced stationery knife. Installing fixtures after decoration of drywall.
Prices for spacure
shpaklevka

Video - two-tier ceiling with rounded sides
Finishing the ceiling
Now you can proceed to the ceiling surface finish. To do this, carefully treat the primer and prfasure all the joints, also use the sickle tape and then wake all the irregularities again, including the screws of the screws.
It remains only to perform the finishing surface of the surface. How to cover the plasterboard so that the ceiling in the kitchen looked harmoniously, was beautiful and served for a long time?
- You can paint the ceiling of drywall acrylic, latex, water-emulsion paint.
- You can under painting, but you can combine these two types of finishes.
- It looks good and.
Attention! Glossy paint can only be used if the ceiling was completely prospaclock. Otherwise, all irregularities will be visible.

Master Class. How to make a shape small height on a plasterboard ceiling
The figure is performed at the initial level of the ceiling of plasterboard made according to the technology described above.


Now the most complex and responsible part of the work is the installation of eaves. For this we need this tool. It saw in a universal stupid. It can be tilted almost at any angle. The slice is obtained smooth, accurate and slightly rough, which will improve its adhesion with glue.


The ceiling of plasterboard in the kitchen is one of the best finishing options for this room. However, covering plasterboard better paintSo that it was possible to wash it regularly. Wallpapers and plaster do not like water, and the ceiling in the kitchen is often exposed to steam, and the spray of fat falls often. Therefore, choose the most practical materials for finishing so as not to complicate your life.
The ceiling surface in the kitchens is subject to regular temperature differences with high humidity. By choosing the moisture-resistant plasterboard as the main material, it is possible to preserve its attractiveness for many years, so the ceiling of plasterboard in the kitchen can be implemented in fact in each design project. In addition, it is an excellent zoning method for large areas. Plasterboard allows you to create multi-level structures, cascades, all sorts of curly shapes Write the ceiling Reviews about ceilings from this material for kitchen premises are only positive.
Design and material
Arrange the apartment in accordance with the concept of stylistics is not easy, because it requires creative decisions, professionalism and creative approach. Building materials pick up with knowledge technical characteristics and properties. Today's consumer is demanding and does not want to be limited to a slight choice of ceiling finishes, because the diversity of modern building materials has a fantasy flight and fiction. It is possible to consider several ideas in the photo below.
As for the main types of finishes, there are several of them. They are divided according to the principle of used building materials. Each version of the design idea is endowed with its advantages and shortcomings, depending on the size of the room, creative preferences, the height of the room. Even having a very small area among many options, you can choose the optimal one.


Plastic panels
Using plastic panels - Excellent economic solution. The ceiling of plasterboard in the kitchen, combined with the panels, will become an excellent solution, look good in any performance. In addition to drywall, you can use wood for those who appreciate natural and naturalness, but it will be more expensive, but will create an excellent classic style or country.
The essence of this method of finishing is to form on the ceiling surface of the frame to which the panels are attached. Along the perimeter, special corners are installed, for which the plates are cling to the designer using the method. Examples of the finishing of the panel ceiling can be viewed in the photo.
Fashionable for today, the ceiling surfaces are perfectly suitable in the panel construction installation technology. Here, the main thing is to correctly think about their number and location of the dislocation. Although in any design project before the start of work is created technical task With detailed drawing, indicating the dimensions of parts and their location.


About tension
For large rooms stretched canvas - optimal choice. This method of finishing is very in demand today, although it is considered to be not cheap. Design suspended shelf Very interesting, endowed with many advantages, especially for residents of apartments in high-rise buildings, where every minute you can expect flooding from the neighbors from above. Suspended ceilings, such a phenomenon is not scary, since they are able to withstand about 100 liters of fluid per square meter of the canvas. The ceiling of plasterboard in the kitchen in combination with tensioning canvas is a certain plus. Design design - unlimited with the ability to create duplex, three-level and multi-level systems of any complexity. The photo shows a few ideas of combining tensioned canvases with plasterboard.


From drywall
An interesting and unique method of finishing ceiling surfaces for kitchen rooms. Pretty characteristics This building material has many. With it, you can implement a variety of finishes. A sufficiently flexible and moisture-proof material, provided that this subloba of building materials is selected. It turns out beautiful single-level and multi-level, curly and volume systems. Especially smart look with spot lighting, as in the photo.
Multi-level, as, however, and duplex structures are not suitable for installation in small rooms as the system will hang from above, depriving the room "air". To solve this problem, you can make redevelopment, for example, combine the living room and kitchen. In this case, the design will be perfect plasterboard ceiling In the kitchen with the effect of zoning.
For large areas, a combination is often used - a plasterboard ceiling in the kitchen with a tensionable web. Moreover, this tandem looks at each interior project, as evidenced by the photo.


Options of plasterboard ceiling
Mounted systems from drywall assume infinity of embodiments, as well as in combination with other building materials or various species decorating. The main installation requirements are a sufficient height of space. Often, the restrictions on the idea are often noted by this factor. By execution may be simple or constitute a complex cascade system. And the competent layout of light at levels can give the interior futuristic look. Multicolored LED ribbons look unique and unusually beautifully.
The surface of the drywall is painted with latex or acrylic water dispersion paint, using different shades, color palette. At the same time, more than two colors are combined not recommended. For low rooms, it is better to give preference to light tones, since the dark palette visually reduces the space.
The design of the kitchen ceiling, from the drywall involves the use of such decorative elements as:
- mirrors;
- vinyl wallpaper or flieslinic;
- glass;
- stained glass
- wooden decor.
 Mirror ceiling in the kitchen interior in classic style
 Suspended ceiling with stained glass
  Ceiling of plasterboard with wooden elements
 It is the decoration that helps to fully withstand the design style accurately accurately, and the functional zones are maximized as possible.
Criteria for design and requirements for them
Before starting work, it is necessary to decide on some criteria:
- initially, the configuration is determined, while the size of the room is taken into account, functionality;
- variation of finishing, illumination selection;
- most design projects from this material is due to technical requirementswhich must be fulfilled - the presence of an exhaust with an air duct over the cooking area.
As for the very design, it is worth remembering some of the required requirements:
- for a small room on an even ceiling, it is advisable to build spotlights with a weak light: starting soft and finishing with sparkling;
- the color is better to choose muffled, pastel. If it is decided to paint it bright tones, then the choice should not be done toward acid or screaming of poisonous, they badly affect the mood of households;
- marking is better and more correctly done using a laser level: a zero boundary with subsequent points is set according to the standard - 10 cm, provided that the ceiling surface is perfectly smooth.


Design options
Successful design should begin with the choice of design: single-level, duplex or nevertheless multi-level.
Single-level
This design method is considered the most economical, if we are talking about the use of plasterboard as the main material. It is easy to install, so you can install it yourself if desired:
- on the perimeter of the room, a plasterboard box is installed in standard rooms, separated by a cornice;
- for proper selection Color palette You can create a trendy masterpiece. The design will stylishly affect the overall interior, seemingly creating cozy zoning. The painted surfaces of glossy paint lights are displayed more, it is easier;
- visually divided the room with a single-level system using light;
- the devices are installed either only in the central part or exclusively around the perimeter. Raster lamps will give a unique atmosphere.


Two-level
A two-level or bunk ceiling of drywall in the kitchen consists of two parts: the first - the ceiling surface itself, the second is a convex geometric figure, placed either in the central zone or around the perimeter. Very often B. designer projects The combination of the figure is created - both in the center and around it. Today, abstract shapes and semi-rays approaching one to another of the angles of the room are considered to be a fashionable of fashion. The harder the two-level systems and the pattern, the end result becomes more interesting.


Multi-level
Incredibly interesting with many embodiments. Here are certain framework or borders of fantasy, location, light lamp colors. In comparison with them, even the stretch canvas are inferior, which were considered to today, as the most reliable and durable:
- modern high-tech lamps with the possibility of adjusting the intensity of the light beam, comfortably divide the room on the zone, emphasizes the advantages of the interior;
- a mirror finish will visually increase the room's exposure, make it solemn;
- the combination of shades painted by harmony among themselves, the levels are guaranteed comfort, comfort and individualism;
- assessed by wallpapers of different shades and textures, but a single topics, selected in the tone of textiles and furniture, will ideally decorate the ceiling.
Successfully created design of plasterboard kitchen ceiling - truly decent and budget way to finish. Which will absolutely bring the exclusivity in the interior, flavoring and beauty.


The mounted ceiling in the kitchen made of drywall will be the best solution for facing the kitchen ceiling due to the excellent quality of material - environmental friendliness, moisture and fire resistance, lightness and flexibility.
Pros and cons of plasterboard ceiling in the kitchen
Plasterboard ceilings in the kitchen have great potential and many pluses:
- Can hide or disguise communications - wiring and pipes;
- Defects and irregularities of the ceiling will also not be visible;
- This is a great way to divide the kitchen space on the zones - working and dining, especially relevant ceiling zoning for and apartment studio;
- You can come up with any ceiling design that can be an emphasis in the interior of your kitchen;
- When mounting plasterboard sheets, you can additionally be insulated and soundly insulated;
- You can reproduce the lighting of the kitchen - create niches to illumination, install in work zone, and over the dining table hang a chandelier, as is fashionable now;

- Plasterboard sheets are quite durable, so the ceiling design will not be crazy due to the movement of the ceiling or walls.
Disadvantages of plasterboard ceiling:
- Unfortunately, at least 7 cm of height will inevitably be lost, which means that such a type of finish will not fit;
- In addition, mounting with your own hands of the suspended plasterboard ceiling (especially two-level and with a complex design) requires some skills, as well as time, the presence of tools, assistance to the partner and forces;
- Over time, the ceiling can be deformed, crack in the joints.
Think about the design
To choose the right design, on the basis of which two-level ceilings from drywall will be created, you must estimate the following criteria:
- Configuration of the room and its dimensions;
- Ways to finish, permissible in the overall interior solution;
- Color and texture;
- Used lighting devices;
- Applied decorative additions.
- In the kitchen space necessarily uses hobs. The air duct required for this device is better hidden under the ceiling that decreases in this part.
- You can lower the entire ceiling perimeter, leaving the central part at the same level. Such option will suit Those who appreciate symmetry - elements with a decrease in height can be used for point lamps. Such lighting devices are easy to perform zoning kitchen space.
- To create a positive effect, the backlight in the kitchen can be added.
- As for color, it is better to choose pastel, muted shades for suspended structures. And the use of glossy textures will help make the room visually more spacious.

Suspension ceiling of drywall in the kitchen can be performed different ways. It may be single-level flat design, not different from the ordinary ceiling. Such a traditional design will fit into any interior.


The surface with protrusions and niches can distinguish between space and hide communications.


Hinged ceilings in the kitchen, if the room is allowed, often have a design of several tiers. Most often ceiling of two levels - base ceiling and convex geometric shape around the perimeter of the room or in the center.


Abstract angular elements are very relevant, as well as ovals, semicircles and other figures. Such a complex design is more like spacious kitchens with high ceilings.


However, on a small or medium kitchen, you can also select the dining area with ceiling plasterboard figures.


However, do not forget that any suspended design "Take" several precious centimeters to the height of the room, so for miniature and low kitchens, the complex design of the ceilings is not recommended - it is better to choose a single-level ceiling.

If you wish, you can create a combination of stretch and plasterboard ceiling.

How to choose materials: GK-sheets, putty and paint
- Ceiling sheets of plasterboard are easier than wall, and most often have a thickness of 8.5 - 9.5 mm.
- So that the ceilings from drywall in the kitchen rejoiced you as long as possible, you need to choose moisture-proof material. If you use the usual GK list, the design will be in disrepair very quickly, since the kitchen has a high level of humidity. And moisture-resistant plasterboard is not deformed by either water, nor with sharp temperature differences.
- So that the hinged ceilings in the kitchen retain their impeccability for a long time, it is recommended to carefully choose a putty and decoration Materials. They must also be moisture-resistant and differ in a long service life. A poor-quality putty can crack the "Ceatkin". As for the paint, it should be approached for zones with high humidity, it is easy to apply on horizontal surfaces and have resistant to ultraviolet.
Draw from your hand (with a scale of scale) or in the program of your ceiling plan and place the sheets of HCs, guides the perimeter of the kitchen, and the carrier profiles are across, then you will mark the crabs and suspensions.

Making a single-level ceiling yourself
To seize the ceiling with drywall sheets with their own hands first need to prepare everything required tools and materials.

The actual installation process of the ceilings includes 4 main stages:
- Creating a framework of special profiles;
- Fixation of plasterboard sheets;
- Plaster and painting (decoration) of the surface;
- Installing the lamp and backlight.
If you are planning to install the kitchen ceiling yourself, then invite at least one helper. After all, plasterboard sheets are sufficiently heavy in order to raise them alone.
To make a suspended ceiling in the kitchen with your own hands, perform such a sequence of actions:
- Find the lowest point of the surface and make marking on the walls. This will require a marker thread and water level.
- A UD profile is attached to the marked bands, after which the design is extended throughout the plane CD profile. Elements are fixed with special mounting straps and dowel-nails.
The distance between the fasteners should be 500-600 mm.
- Plasterboard sheets are attached to the created frame. To do this, screw screws with a step of 200 mm, not more. If the plasterboard during the installation process should be cut, for this, use a special cutter or knife.
- Fully embroidered GC ceiling putty - first close all the seams to ensure the tightness of the structure.

- The seams are covered with sickle and put sand again, after which they pass the entire surface.
- After drying the putty, the surface is decorated - stained or covered with wallpaper.
Today we have to find out how practical ceilings from drywall for the kitchen. We suspend the pros and cons of the decision, and also get acquainted with the features of the construction of structures from GOK in a wet room with the most likely pollution of the ceiling and walls. So, proceed.
Evaluation
First of all, we need to decide how appropriate is appropriate in the kitchen of plasterboard ceiling.
pros
- The suspension design allows you to hide the differences between the slabs of overlapping, traces of flooding neighbors and other ceiling defects. The size of irregularities does not matter: they will all remain invisible for the viewer;

- The ceiling of plasterboard to the kitchen does not require the preparation of the base. At all. You do not need to clean the old coatings and re-plastering the surface;
- , combine with tension inserts or plastering ceilings;
- Ceilings for the kitchen made of drywall allow you to mount the built-in lighting. At the same time, GLC, in contrast to plastic panels or PVC films, is not afraid of significant heating, which allows the use of lamps with low-cost halogens or incandescent lamps of significant power;

- Plasterboard ceiling in the kitchen allows you to hide the laid Ventkanal and other communications (air conditioning highways, local network, horizontal sections of transferred water supply risers, etc.);

- Finally, Glk attracts its price: a ceiling material sheet is 9.5 mm thick and a size of 2.5x1.2 meters will cost the buyer about 200 rubles.
However: on the purchase of plasterboard the costs do not end. In addition to him, for the installation of the ceiling, the profile, fasteners, putty and other auxiliary materials will be required.
Minuses
They also have:
- The plasterboard ceilings in the kitchen are poorly tolerated. Meanwhile, the kitchen is one of the premises where the fosters are most likely: the release of the neighboring shell of a rag or a seasalization zoom can be put into flooding;

- GKK has a fairly high hygroscopicity (ability to absorb water). Steadily high humidity can lead to its swelling, deformation and loss of mechanical strength ceiling;
- Like any suspended, the ceiling in the kitchen of drywall will make it below;
However: the height of the room in the case of the simplest single-level ceiling will decrease only 4 centimeters. The visual decrease in the volume of the kitchen can be compensated by increasing its illumination and using light colors in finishing.

- With frying on an open frying pan, fat splashes can fly over long distances. Including to fall on the ceiling. Fix them from the painted surface - the task is more than non-trivial.
Costs
When installing "turnkey", one-level plasterboard ceiling in the kitchen will cost the customer at least 800 rubles per square meter. Its installation with his own hands will reduce the costs of up to 300 p / m2.
For comparison:
- The price of the square of the tension vinyl film when installing "turnkey" starts from 260 rubles;

- Design from wall panels will cost a little more expensive - 350-400 rubles per square;
- The most expensive on our list: materials for their assembly cost at least 650 rubles per square meter.
conclusions
Plasterboard ceilings in the kitchen are quite appropriate, but with several restrictions:
- For the manufacture of crate or frame, you only need to use an exclusively galvanized profile.. A slightly cheaper bar is likely to be thrown in seasonal and daily fluctuations in the humidity in the room;

- The kitchen requires effective supply-exhaust ventilation : In this case, the humidity in it will not be high around the clock. To do this, it is enough to install instead of a ventilation grille exhaust fan or mount an exhaust umbrella over the stove;

- For mounting the ceiling, it is desirable to use moisture-resistant (green) drywall (cm. ) . It differs from intended for dry premises (white) anti-grapple additives in the composition of the core gypsum and a contact with a contact with a moisture cardboard sheath;

- For finishing, you need to use washable coatings (read - resistant paint-resistant paints based on silicone and acrylic resins).

Materials
What materials do you need to collect the ceiling in the kitchen of drywall do it yourself?
Here is the minimum set required for the manufacture of a single-level ceiling:
| Picture | Description |
|
|
Ceiling GLC (9.5 mm thickness) is purchased along the area of \u200b\u200bthe room with a reserve of 10-15%. The excess will go to waste during the lifting sheets. |
|
|
PP 27X60 mm profile is used to assemble the crate. The length of the profile must be equal to or slightly exceed one of the sizes of the kitchen. The number of PP is calculated for the shade of the crate of 600 mm. |
|
|
PNP 27X28 mm profile is needed as guides and is responsible for mounting the suspended ceiling to adjacent walls. The total length of the PNP should be equal to the perimeter of the kitchen. |
|
|
The suspensions are direct responsible for fastening the crate to overlapping. They are mounted along each guide with a step of 60 cm. |
|
|
Wedge anchors fasten the suspensions to the overlap and guides to the walls. Unlike dowel-nails, they reliably hold the ceiling construction even in a fire when plastic dowels can start melting. |
|
|
9 mm self-tapping screws are needed to connect PP profiles and PNPs with each other and with suspensions. |
|
|
25-mm screws will be attached to GLC to the crate. |
|
|
The finishing putty on plaster binder is needed for the ceiling spit after installing GLC. |
|
|
Serpentanka (fiberglass grid with adhesive layer on one of the surfaces) is responsible for reinforcing seams. Without reinforcement, the fluctuations in humidity and temperature will lead to the appearance of cracks after one or two years of operation of the finish. |
|
|
Penetrating primer on an acrylic basis will prepare the ceiling to painting. |


Instruments
Now let's prepare the tools.
What is needed to mount the ceiling in the kitchen with your hands from drywall:
- Perforator with a brown for drilling holes for fasteners;
- Scissors for metal. We have to cut the galvanized profile at the place;
Important moment: Using for cutting Bulgarian is extremely undesirable. Abrasive cutting leads to severe metal heating; At the same time, in the region of the cut, a thin layer of low-melting zinc is completely fused. In high humidity conditions, the profile without an anti-corrosion coating begins to rust quickly.

- Cross-bit screwdriver (preferably - with screw-in depth limiter) to assemble the crate and its plasterboard covering;

- Water or laser level and chalk cord for marking;
- Hammer for mounting anchors-wedges;
- Long metal ruler, roulette, pencil and a sharp knife for cutting plasterboard;
- Cord or thread. They will serve us as a guide when installing the ceiling cable;
- A bucket and a mixer or drill with a wrencher for the preparation of putty;
- Grater or grinding with abrasive grids for ceiling slicing;

- Brush, roller and a raner tray for primer and painting.
Technology
So, how to mount the ceiling of plasterboard with your own hands in the kitchen?
Assembling clamps
Here is a step-by:
- Perform markup by level. The ceiling line fits on the walls of a chalk cord. If the ceiling should not hide the built-in lamps, the markup must defend from the lower point of the overlap by 27 mm - the thickness of the PP and PNP profiles;

- Fasten along the markup line PNP profile. Fastening step - no more than half a meter. PNP is attached to jack, without overweight;
- Follow on the surface of the overlap with a step of 600 mm of the axis of the crate and secure on the markup with the same suspension step;
- Insert into the guides curved in the size of the PP, and press them to the ceiling bent the suspensions;
- Tension between the guides perpendicular to the cord or thread crate;
- Alternately, lower the profiles of the crate to the level of the cords and attract the sides ears to their side walls, then flex a speaker on the profile of PPs part of the ears up;

- Connect the ends of PP profiles with the guides. Ceiling frame ready.

Crashing claws
How to fix plasterboard on the ceiling in the kitchen?
Each sheet is aligned with the edge in the middle of the PP profile and is fastened to all overlapped it elements of the crate of 25-millimeter self-draws. Fasteners step - up to 20 cm.
Several tips, relevant at this stage of installation:
- Work with an assistant or using backups, clamps, etc. GLK - fragile material and easily breaks even under its own weight;

- Screw the fastener not closer to the pair of centimeters from the edge of the sheet. Otherwise the edge will crumble;
- Fasteners hats should be recessed relative to the surface of the sheet of plasterboard, without breaking through the cardboard shell. If you do not have a bits at hand with a screw depth limiter, adjust the ratchet of the screwdriver to trigger when the cap is immersed;

- With a cutting of GLC with a hack or electric jigsaw, a huge amount of dust rises into the air. In order not to breathe her and get rid of themselves from the need to make general cleaning throughout the house, drywall must not be cut, but to break down the pre-made knife to the cut;

- Do not be afraid to leave a 1-2 centimeter gap between adjacent sheets. It will hide a putty.
Reinforcement and putty
The tool is two spatula (10-12 and 30-35 cm wide).

Putty shutdown is performed in a wide capacity of at least 8-10 liters. The volume of the one-time portion should allow you to work out for 30-45 minutes: by this time, the gypsum begins to capture and become unsuitable for spatlement.
An important point: knead the plaster only in clean dishes, otherwise the clutched lumps will interfere with you, getting under the spatula. The gypsum mixture is covered in water and after a pause of 3-5 minutes on swelling is mixed to uniform consistency.

The seams between the sheets, chopped in size (read - with rectangular edges), in front of the spit needed in the frame - removal of the champers. The extension will make it possible to fill the seam without cavities in it and reduce the likelihood of cracks.

Then the seam is sickled, after which it is tightly filled with putty with the help of cruciform movements of a narrow spatula.

The second layer is applied by longitudinal sliding movements of a wide spatula after drying the first layer and hides the reinforcing material.

The solid putty of the entire surface of the flow is only in the event that the reinforcement of the seams is highlighted thick. The putty is applied with two perpendicular to each other by the layers of "on the sidier" or one layer of millimeter thickness.

Grinding and priming
How to prepare plasterboard ceilings into the kitchen to paint?
Preparation is performed in three stages:
- After complete drying of the seam plaster or the entire surface of the ceiling is grouped. For grinding it is necessary bright lighting, falling on the surface under the oblique angle: it will allocate all irregularities with shadows;

- Then the ceiling is vacuumed or driven by a brush from dust;
- The last stage of the premedive finish is primer. The soil is applied with a roller or brush in one layer. His task is to glue the remnants of dust to the ceiling, reduce the absorption of paint and ensure its durable grip with the surface.

Painting
There should be at least a pair of weeks between the spheeling of the seams and the painting ceiling: otherwise, the seams due to the unfinished gypsum hydration processes will be highlighted with a tint. The paint is applied with a roller of 3-4 layers.
When painting, the ceiling should be followed by a few simple rules:
- The first to score with the brush of adjustment to the walls;

- The entire surface is painted with one layer in one reception. Make a long pause - get the visible thickening of the coating on the border of the raised plot;

- Each layer is applied at right angles to the previous one. So less noticeable strips from roller edges;
- The last layer is applied parallel to the predominant lighting. The reason is the same.

Select design

There are several rules that should be followed when choosing a design of a plasterboard ceiling:
- Given the size of the room, its height and layout, decide which form and number of levels. When it is made of a stitched ceiling, less sheets, forces and time will be spent. If the area, and most importantly, the height of the room allows you to perform a two-level ceiling. In spacious premises, multi-level complex systems will be visually allowed to make space more compact;

- The design affects the finish finish - the complex ceilings can not be high-quality with wallpaper or tiles, such a finish is ideal for smooth surfaces, where it will make a variety. The complex system is made of print or too embossed finish can visually drag. It can be combined - it is important to consider all the nuances;

- The design affects the appearance and type of lamps that are supposed to be used. It is necessary to think over the amount and location of the location in advance. The latter depends on the placement of furniture and the location of functional zones.
Kitchen Square and Design Type - What is the connection?

Previously, it was noted that in many ways the area of \u200b\u200bthe room affects the type of suspension system, its color and complexity:
- Kitchen, having low ceiling can visually acquire an additional amount due to a single-level light design with a sufficient number of built-in luminaires;

- If the room is spacious, but the height does not allow you to install a multi-level systemthen you can use a few shades in the finish;

- As previously said, too spacious premises will look comfortable when using a complex multi-tiered system;

- In the free planning apartment or when combining the kitchen and living roomMulti-level systems are used to zoning space, highlighting a dining or working area.

Council. You can visually divide the room on functional segments using built-in luminaires, the forms of the protruding volume or the use of several colors and textures in the finish.
Conclusion
As you can see, make a ceiling of drywall in the kitchen quite forces even a newcomer. Attached video will introduce you to the original designs of the suspended ceilings and describes the technology in more detail in more detail. Successes!