Roof with her hands from Ondulin. How to independently make a crate to Ondulin? Video lessons Installation of the roof of Ondulina
Ondulin roof is the cheapest roofing material after rolling. As well-known consumers, there are no cheap and at the same time high-quality goods, respectively, on all operational indicators ondulin is much inferior to more expensive roofing materials.
The warranty period does not exceed 15 years, but in practice and this short time is not withstanding. The slightest deviations in the production of roofing works are extremely negatively affecting durability, Ontulin does not have a strength of strength that allows you to level small building mistakes.

The only advantage is a relatively low cost of coating. Why relatively low cost? Everything is simple. It follows not only the price of materials, but also the general operating costs of the building. And here there are big problems. Ontulin is made of waste paper, after crushing the mass is dried, soaked in bitumen and paints. To give a wavy form, sheets are pressed. Such a material cannot be durable and durable, over time, the extreme waves are rejected, snow flows in these places or water leaks appear. It is very difficult to repair the ondulin roof, sheets do not stand the weight of builders. In addition, the surface burns out, the skates lose their attractiveness.
Disadvantages of Ondul
- Mounting complexity. Even in normal temperature conditions, Ondulin does not have the required rigidity, while attaching it is categorically prohibited. And if the weather is sunny, then the surface dark sheets Very heats up, the strength drops almost to zero, even the nails to score with the necessary effort problematic, the ridges are immediately crushed. And at temperatures below minus five degrees, the material becomes fragile, which also complicates significantly roofing.


- High flammable. Paper and bitumen are perfectly burning, and we are very difficult to extinguish the flame. All assurances of manufacturers that, in terms of fire safety, Ondulin exceeds even metal roofing materials - a frank lie.

- Ugly appearance. Ondulin is attractive as long as the MAs are not beginning to grow on its surface, and they pretty quickly master new surfaces. The fact is that the surface of the sheets of rough, dust accumulates on it. Because of this, after a few years of operation for Movs are created excellent conditionsThey cover the surface of the roof with multi-colored stains. High design indicators are irretrievably lost. But this is not all the problems arising from the moss. Their roots penetrate the heads of Ontulin, its strength is critically decreased.

Experienced builders recommend using ondulin only in extreme cases and only for non-unique buildings: carports for cars, economic attacks, etc. Use material for arranging roofs residential houses It is economically impractical. Yes, and the appearance of such houses in a few years will call many questions. After a short time, the root will have to be changed, and this significantly increases the total estimated cost of the house.

Prices for various types of Ondulina
Step-by-step instruction laying ondulin
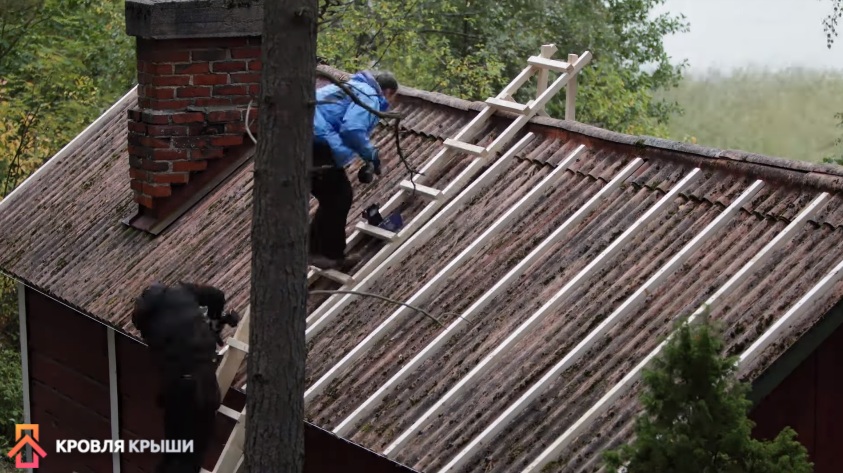
Consider example rapid repair Country building, it is the most optimal option Applications ondulina as roofing. Works will cost inexpensively, the root has no need to dismantle that even more reduces the estimated cost. And for such an old building, the service life is 10-15 years old is critical, Ondulin will calmly hand over this time. It is necessary to know that the dismantling of old coatings is very expensive, during these works is often damaged slinge system. Another problem - the dismantling work can only be done in dry weather, and no one can give an accurate forecast.
A small house is located in the forest on the shore of the Gulf, the roof of asbestos-cement slate, operated about 25 years. During this time, it completely lost its original appearance, mosses grow on the surface, many leaves and other debris accumulated. Although the tightness remained at the same level, the owner of the house decided to update the appearance of the facility. I decided to do it quickly and with minimal cost.

Practical advice. After the preliminary audit of the state of the slate roof, the masters decided not to dismantle the old slate, it is long, expensive and unsafe. One of the advantages of Ondulina - low weightAnd this makes it possible to install it on old coatings, the rafter system withstands minor additional efforts without carrying out work on strengthening carrier elements.
Another factor was taken into account - the roofing works are made in deep fall, during this period they often come rain. If there is an old roofing coating on the structure, then work does not depend on the weather. The roof is duplex, the area of \u200b\u200bthe slopes is 50 m2.
Step 1. Calculate the number of materials. For the crate, the 30 × 50 mm brown meters will be needed, it will take 36 sheets of Ondulin to cover the skates. The total weight of materials is only 220 kg, which allows them to transport them on an ordinary passenger car. For mounting ondulin, you must purchase 880 nails. 20 for each sheet, and the rest are required for fastening skates (12 pcs. One meter long). The lamp is fixed by self-drawers, for vertical bars the length of the screws of 80 mm (you need 240 pcs.), For horizontal 70 mm (300 pcs.). The dimensions of the sheets are indicated by the manufacturer on the package, and the amount is calculated by ordinary arithmetic formulas. If it is difficult to do this, then the sellers will always provide practical assistance in the calculation of the roof and all the challenges.
Step 2. Purchase roofing materials and accurately fold them on a flat site. To make it easier to take Ondulin's sheets, it is recommended to put them on bars. If the materials are stored for a long time, then they must be protected from sunlight.


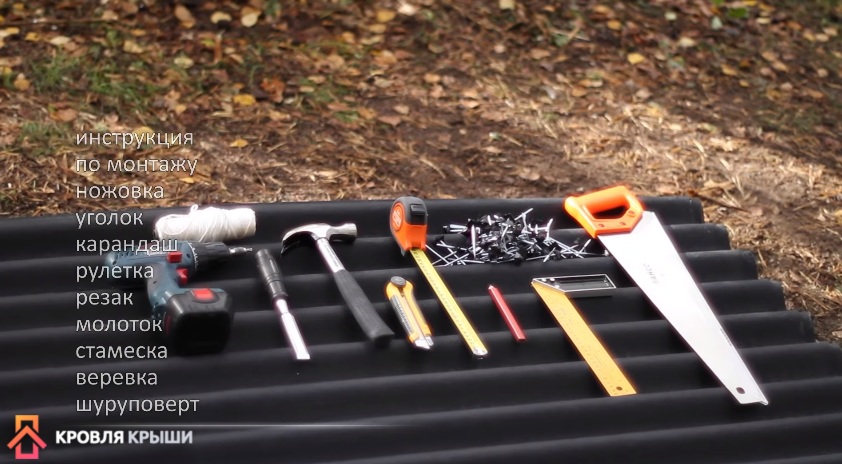
Step 3. Prepare tools. For the production of work, an ordinary hacksaw is required, a mounting knife, a hammer, a screwdriver, a roulette, a pencil, a chisel, a rope, building level. List tools elementary, such must be each owner. Be sure to read the manufacturer's instructions for installing Ondulin. These are general advice, the manufacturer cannot provide all specific situations arising during the roof coating, but general view You will have.
Prices for popular models of screwdrivers
Screwdrivers
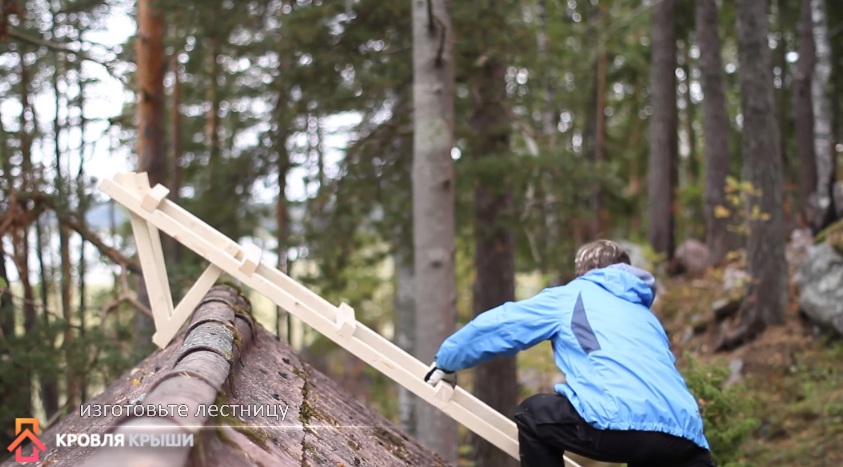
Step 4. Make two stairs from bars. One ordinary, and the second with a hook on the skate. Work on the roof is recommended very carefully in compliance with the safety regulations. In addition, it is not recommended to walk on Ondulina, and such a special staircase allows roofing works anywhere in the roof.
Step 5. Clean the surface of the old slate. To do this, you can use any prickly tools and brushes, there is no need for ideal cleanliness, but the main vegetation should be removed. The fact is that the MAs grow perfectly and in the most unfavorable conditions, if they are not removed, the elements of the wooden crate will quickly lose their initial bearing parameters.

On this preparatory work Finished, you can start setting the crate.
Installation of crates
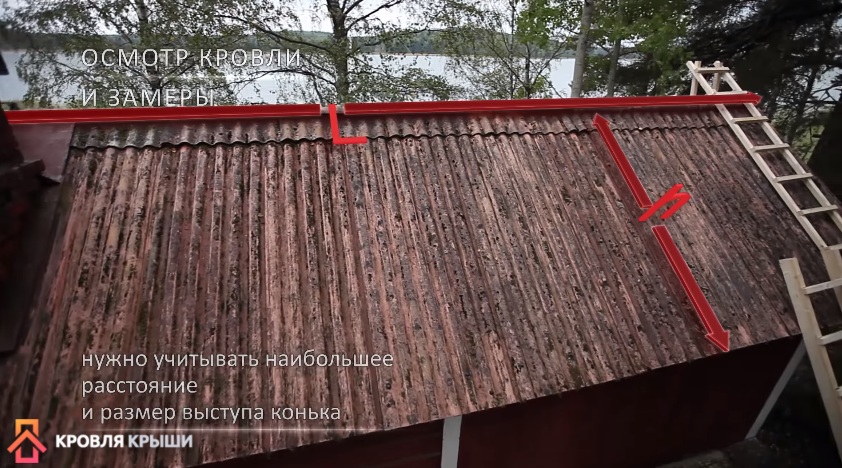
Works should be started from checking the size of the skates. If the house was built by responsible builders, then the edges of the rods are strictly parallel and are located at right angles. If there are inconsistencies, during the installation of the crate, you need to take into account the maximum dimensions. Immediately check the position of the corners of the rods. The crate can be eliminated by quite large deviations of the old rafter system.
Step 1. Prepare billets from bars for crates according to the size of the sizes.

Important. Under the horse on the old roof, they should be chopped, due to this surface of the structures will be located in the same plane. The depth of the filings should be equal to the height of the protrusions of the skate elements.

Step 2. Start fixing the longitudinal bars of the crate.

In order for the self-tapping screw to the old crate, pre-drill in the slate hole. These holes, by the way, will make it much easier for screwing the screws.
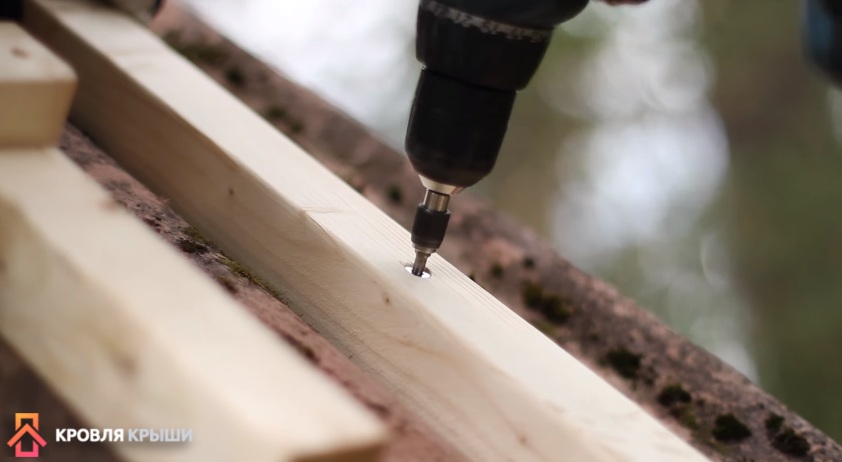
The strength of the slate is much higher than the strength of Ondulin, it is very difficult to screw the self-tapping screw. Attach the extreme bars, pull the rope between them.


It will be recorded all the remaining bars of the crates. Very to accurately check the elements of the crates there is no need for several reasons. First, the old roof is mostly flat, critical defamations are very rarely observed. Secondly, to correct the deviations of the position of each bar inexpediently. Thirdly, Ondulin is very flexible material and will bend without any problems in the right place depending on the position of the crate.
Step 3. Strengthen the timber in each fifth wave of timber, the lower ends align the stretched rope. The mounting scheme is the same - the holes in the bar and slate are first drilled, and only then the screws are twisted.

Important. Special bars are attached near the chimney, the distance between them does not matter. The main condition - bars should be in the last wavelength of the slate in front of the brick masonry.
Step 4. Start navigating horizontal bars. The joints should be done in the center of the vertical elements of the crate.

Practical advice. In the places of the allen two waves of asbestos-cement slate, you need to do drank in Bruke, due to it there is a difference in the height of the coating and the fence will be smooth. The depth drank should be equal to the increased thickness of the coating in the place of the adhesion. The data is taken after the measurement of measurements.

The bars are fixed by scams with a length of 70 mm, in the joints of the joints they are screwed up under the slope of 45 °. Due to this technology, the risks of cracking of the ends of thin bars are minimized.


The horizontal bars of the crates should be recorded in increments of 61 cm along the axes, these parameters are standard for ondulin sheets, but the skate has a step with the size of the skates.

To facilitate work, it is recommended to make two templates and with their help control the distance between the horizontal lines of the crate. It is much more convenient to work with them than roulette to check the distance between each Bru. The length of the template should be 61 cm minus bars width, in our case 61 cm -5 cm \u003d 56 cm.


Step 5. From the outside on the ends of the roof, bring the bars to which the wind board will continue to be recorded. Next them strictly at right angles to the rakes of the horizontal crate. This parameter must be accurately monitored, the position of the first sheet of the ondulin coating is exhibited according to it. And the first sheet is considered the most important, then the mistakes allowed is quite difficult.

Step 6. Screw the protruding ends of the crossbructure, it is done after fixing the bar.

The lamp is fully ready, you can start laying ondulin.
Montage of Ondulina
It has already been mentioned above that the roof has some limitations: it is impossible to work in too hot weather and for minus temperatures.
Step 1. Synod a first sheet of ondulin, so you can find out the length of the sheet, which will have to trim in the skate. During fitness, it should be borne in mind that the Svet must be within 7 cm, and the leaf outstage is about 14 cm. To fix the wind board, it is necessary to carry out the removal of one wave.

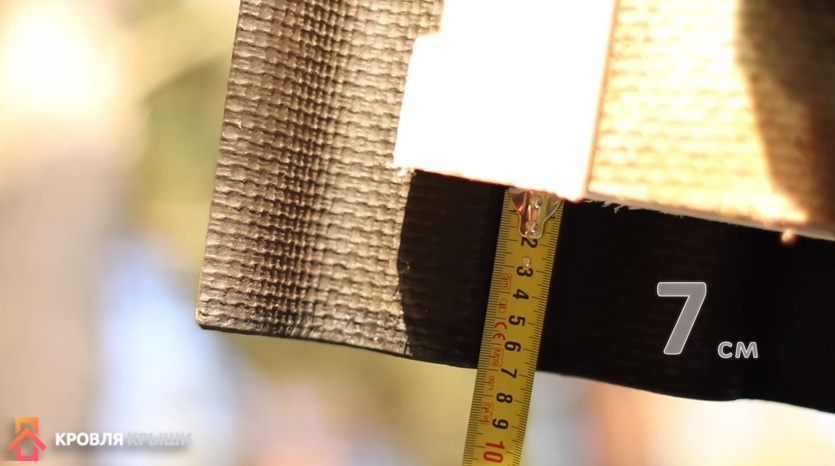
Step 2. At the edges of the skate, we temporarily screw the two segments of bars, the rope is attached to them. The amount of removal of 7 cm, have this in mind during the attachment of segments of bars.

Screw the screws into the ends and pull the rope between them, all the lower sheets of Ondulin are installed on it. Tension rope.


Installation of sheets should be started on the opposite side of the prevailing winds, in such a way it is possible to reduce the likelihood of the formation of the roof leakage.

We have already mentioned that Ontulin, when heated by sunlight heavily softens, if the wind will affect it, then the edges will bend up, in these places, the tightness of the coating will necessarily be impaired. Of course, the appearance of the roof will also suffer significantly.
Step 3. Scroll downline and prepare the top, they are shorter than the lower. Sheets across the waves are being seen by the usual hacksaw, and the waves are better cutting with a mounting knife. To reduce sticking, the canvas periodically be cleaned in water.

Important. The first top sheet must be doubled by the usual width, it is required to prevent the appearance of four angles in one place.
Step 4. Set the first lower sheet of ondulin, check it out by the rope.

If everything is normal, then lock the sheet. To do this, first you need to drive nails into two extreme waves of the lower row, then in the middle row. On three methols, the sheet is securely fixed, you can now drive all other nails. If it is difficult for you to get into non-bruises, you draw on the surface of the ondulin tags. To do this, use a flat board, put it onto the sheet and align the side surface with the middle of the bars. Make a pencil or marker on each wavelength. If the nail did not get into the rack of the crates - no need to be upset. Boldly pull it out and drive it in a new place. No noticeable leaks through a small hole in the upper wave crest will not be. If a few drops of rain fall into the underfloor space, they quickly dried.
Step 5. Drive the remaining nails in a checker order. Work carefully, do not damage the coating. The plastic part of the nails should touch the ridge, and not to fill it. Remember that Ontulin cannot withstand heavy loads.

List fixation, scheme
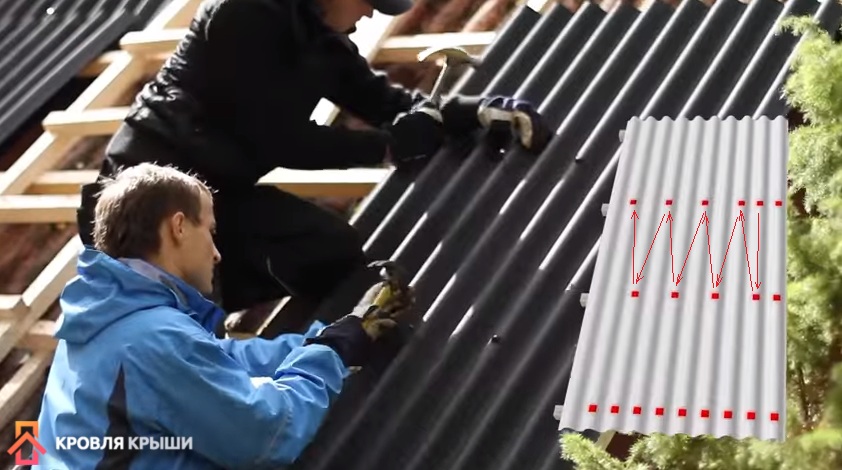


Montage of Ondulina, photo. Used 20 nails on the sheet
Night wave nailed into the back of the next row at the same time, remember that at least twenty nails should be used for each sheet. This quantity can increase in the places of the maximum possible gusts of the wind. The lower row is driven into each wave, then two rows through one. Manufacturers of Ontulin Complete their roofing material with nails from stainless alloys or galvanized, bottom part He has notches to increase the strength of fastening of hardware. All these devices perform only one function - increase profit of manufacturers. Ordinary nails are perfectly held not only ondulin, but also ordinary slate. Experienced builders are unknown cases when the roof has broken due to the fact that metal nails are fully kept. Especially under Ondulin, the material simply breaks over nails, and will not pull them out of a wooden bar.
And last. How can they rust if they are located under roofing material? If so, then in this place the leakage and it needs to be immediately eliminated. Remember that the backstage under the horse must be at least twelve centimeters.
Horizontal and vertical joints should be located on the same line along the entire length of the skate, periodically control their position. You can clog nails only after the sheet smoothly lay down on the crate, do not stretch it, do not disturb the sequel to drive the nails.
Step 6. Carefully measure the sizes of the cutting of the ondulin at the place of bypass chimney. Sheets must be brought to a pipe with minimal gaps. For strong fixation of the roof in these sites, install additional bars of crates.

Step 7. Enter the last sheet, find out the windows fixation location. It must be in the top wave of the sheet with back side. Screw the timber with ends of the crate, cut off the surplus.

Step 8. Secure the neighboring sheet of Ondulin, but you don't need to drive the last row of nails, it is done only after installing the wind board.
Step 9. Install the wind board and secure ondulin to it. Install on the spot the cornice boards.


Setting the skate
Prices for various types of roofing skates
Roofing horse
On this, the coating of the skates is complete, you can start mounting a horse. It should also work on the opposite side of the winds prevailing in this locality. The backstage of the skate is at least ten centimeters, the element is nailed to each wave of sheets.


Answers on questions
Due to the fact that the ondulin roofs began to be used relatively recently, some developers appear quite reasonable questions. We will try to give them professional answers.
Causes fear of a 60 cm shabby step, is there any foundations?
Yes, such a distance between horizontal slave racks cannot be considered reliable, especially in the summer period. There are cases when you have to work on the finished roofing, install antennas, ventilation equipment and other engineering systems. The material will not stand the weight of the installers at such a step, you should not trust manufacturers. Always navigate the rails more often, it will increase the stability of the coating. Sick the nails to all raids is optional, the scheme of placement of hardware can remain unchanged.
Is it possible to install ondulin coatings in the northern regions of our country?
You can, but not need. Although the coating and withstands significant loads, but at minus temperatures it becomes fragile. In winter, there is a lot of snow in these climatic zones, from a large weight, the rafter system is deformed. Such deformations are the cause of the formation of cracks in Osdulin sheets, as a result, the appearance of leaks, the need to perform repair work.

How to remove moss from the surface of sheets?
It is strictly forbidden to use metal brushes, and soft almost remove vegetation. You can try various pesticides, but it is necessary to work with them in compliance with all safety regulations.

Prices for removal of moss
Is it possible to align the deformed sheets of ondul on the roof?
No, it is impossible, you have to completely change the coating. The reasons for deformation are several: incorrect order of fixation, too heat Heating sheets in the summer period of time, violation of the installation technology. But the main reason is the low quality of the coating.
What is the real life of Ondulina?
Very difficult question, manufacturers provide a guarantee from 15 to 50 years. Practice shows that after 8-10 years of operation of the roof of Ontulin requires major repairs. Overhaul - Large material costs that completely level the low value of the material.

Video - Montage of the Ondulin Roof
Which can be mounted differently, depending on the roof purpose.
Layers of the roof that need to cover the roof call roofing pie. Each of the layers of roofing pie performs its functions and stacked in accordance with certain rules. In case of impaired stacking at least one layer of roofing pie, the principle of functional purpose of the entire roof is completely disturbed.
Depending on the design of the roof, from its purpose, the sequence, the laying method and the number of layers may differ slightly. In this article you will learn how to put onandulin And how to calculate the number of roof sheets.
The width and length of the erector sheet is equal to 95 cm and 200 cm, respectively. The area of \u200b\u200bsuch a sheet is 1.92 sq. M. The useful area of \u200b\u200bthe material is determined without coaching and maybe: 1.3 square meters. m, 1.5 square meters. M and 1.6 square meters. m.
To calculate the consumption of the material, determine the indicators:
- useful Square coating material. Depends on the angle of inclination. The multicate shape of the roof is calculated from the set of areas of each of the skates;
- roof area. Determined by the addition of the areas of all skates with mathematical formulas of figures (trapezium, square, rectangle, triangle);
- the number of sheets of material. Determined by dividing the area of \u200b\u200bthe entire roof on the useful area of \u200b\u200bone web material.
CAUTION!
The roof area is calculated exclusively through the line of the cornice, but not around the edge of the roof crate.
The correct calculation of the longitudinal adhesives is of serious importance, which can significantly reduce the number of cropping. The top row, if possible, should be laid by the sheets of full length, as its height will reduce the skate element.
There are still several additions to the correct calculation of Ontulina:
- when calculating, it should additionally add 10% or 15-20% respectively, to a simple roof or complex roof with different angles and transitions;
- additional elements (skate, endanders, nippers, aprons around chimneys and windows, places of adjoining) require additional coating ondulin;
- when calculating ondulin mixed color solving It follows schematically in a decreased scale to portray the design of the roof and calculate the consumption of sheets of each color separately.
Special programs for calculating the flow of covering material greatly facilitate mathematical calculations and help more accurately calculate the amount of eurosher to cover the roof.
Ondulin - Installation Instructions
When the lattice is mounted in accordance with the angle of inclination, it should be sticked up the coating. Mounting Ondulina by steps:


ontulin (Tile) Installation Instructions
Now you know in detail how to put onandulin. All stages of the roof covering provide an error-free laying of ondulin regardless of which roof design is provided. The sequence of actions provides a good result.
Waterproofing and vaporizoation under Ondulin
Firms producing ondulin will present material as a coating that does not require installation of additional vapor insulation materials or waterproofing. At the same time, it is recommended to equip the waterproofing layer of the room (or attic), requiring insulation. We also recommend the installation of a vapor insulation membrane from the side of the room.
Additional elements of waterproofing and ventilation devices:
- roofing cornice waterproofing is provided by a special box, which is attached to the base of the outlet of the sheet;
- ventilation provide ventilation pipes, which, like the window, are fastened with self-draws for each coating wave;
- to protect against insects, a ventilation comb is mounted into the lumen under the corve;
- ontulin cunning joints are sampled with a ribbon coating manufactured by the manufacturer (ONDUFLEX);
- connection locations, endow and other joints with roofing, eaves are also sampled by adhesive ribbon;

Laying ondulin do it yourself: step by step instructions
Vaporizolation is often provided by laying a special vapor barrier material. Such a layer should be staminated in roofing pie.
Useful video
Cognitive thematic video self-laying Ondulina:
Conclusion
It is possible to store the roof of Ondulin quite efficiently, if you explore the principles of work and take into account the nuances of the installation. The fact that the material is rather lightweight, it will be done under the power and one person.
In contact with
When choosing a material for a roofing device in the building materials market, sufficient options are suggested, among which you can choose classic coatings, which have proven its strength in the century of operation, and you can refer to coatings with modern, which also have good performance and have time to prove the target of their use. Such modern roofing material like Ontulin, the installation instructions for the installation of which are attached to the kit. Exactly following the instructions, it is quite possible to cope with the installation of the roof from Ondulin on its own, even having minimal skills in the construction work.
For a complete view of Ondulina, it should be first to know that it is an environmentally friendly material for a roof, manufactured using modern technologies. The basis for creating ondulin is the cellulosic fiber and mineral fillers. In the process of its production for impregnation of manufactured sheets, they use a thermotrancing resin and distilled bitumen. After impregnating bitumen, the finished sheets of the material are painted.
Ontulin produces two types - slate and tile. According to its quality, both material do not have differences, it differs ondulin the size of a sheet - 2000 x 950 mm, called slate and tile, produced by smaller sizes used in the case when the roof is installed from the ondulin complex configuration. Using tiles in this case reduces the amount of waste. Ontulin slate is used to cover the roofs of a simple design.
The advantages of Ontulin set - environmental friendliness, resistance to external influences, including atmospheric, light weight and low cost of installation of the product, as well as the ability to make an ondul montage with their own hands. The main disadvantage of the material is its flammability, but this property is significantly reduced by the processing of ONDulin with a special composition in the manufacture
When installing the roof of the ondulina, it is necessary to strict compliance with the installation instructions in which the characteristics of the material are carefully taken into account. To obtain a high-quality roof at the built building, all the recommendations given below. Must be fulfilled.
|
|
1. To perform the installation of the roof from ONDULIN, in the case of an angle of inclination of the roof, comprising from 5 to 10 °, be sure to manufacture a solid crate made of boards or plywood. The end toast should be 300mm, and the side of the two waves of the slate sheet. |
|
|
2. When mounting an ondulin slate on the roofs, at the angle of their inclination in the range from 10 to 15 °, the lap is performed from the boards, when it is manufactured, the boards are attached to rafters with a step of 450mm. The step is calculated on the axes of the boards. The terminal flaw is provided for by a size of 200 mm. The magnitude of the side alternation is one wave. |
|
|
3. In case the roof on which the slate installation is performed from ONDULIN, has an angle of inclination above 15 degrees, the interval between the boards from which the lamb is made is 600 mm between their axes. When laying ondulin sheets should be provided with an end overlap of 170 mm in size, and the size of the side adhesion is one wave. |
|
|
4. for the right location Brucks of the crates are fixed on rafters, given the distance between the axes. To locate the crate elements in a strictly parallel attitude to the eternity, use a wooden pattern of accurate size. |
|
|
5. By its form, the slate from Ondulina (having the name "EuroShorter"), has absolute identity with an ordinary slate. For the convenience of the marking of its wavy surface, a color pencil is used. If you wish to get a more accurate surface markup, you can use a leaf trim. |
|
|
6. If necessary, cut the ondulin sheet is very convenient to use the usual hacksaw for sawing wood. To prevent cloth jams in the material when working, it is slightly lubricated with oil. Even more convenient to use an electric saw, which can be both manual and circular. |
|
|
7. Montage of Ondulin is completely simple, due to its low weight. One sheet of Ondulina standard size Weigh no more than six kilograms. |
|
|
8. At the beginning of the fastening of Odulin sheets, the direction of the wind is taken into account, which prevails in the area where construction is produced. Currently from a skate that is in the opposite side of its direction. In the second row, the onset serves ondulin, the size of the sheet of which is half of the whole. With this method, to lay slate is more convenient, and the backstage on the side junction will be not from four, but from three sheets. |
|
|
9. For fastening the roofing erector, nails are used, which twenty pieces take place for each roofing sheet. They clog them at the end of the sheet, in the depths of each wave, as well as on the launches on each side. Fasten them to intermediate bars, skipping one slate wave. |
|
|
10. For the exact direction of the slate sheets in Brus, the crates use a stretched rope, its use will allow you to perform this work more quickly and gently. |
|
|
11. Elements of the ridge of the roof, like slate, begin to be attached to the roofing skate, located opposite the main direction of the wind. The skiing element is attached to nails to the added brushes of the crate on the inner parts of the euro wavelengths that are connected to them. |
|
|
12. End owners made from the Ondulin material are used to design. To mount the funds, it is initially set to install an additional crate. |
|
|
13. The forcepets is drawn up using the skate, or forcepid elements available in the product range of the products of Ondulin. |
|
|
14. Another method can be used to design a nipper that can only be used at the plus air temperature. An extreme part of the Ondulin sheet should be hooked and secured with nails on a plug-in board. |
|
|
15. When decorating the roaster roofs also use skate, or nipce elements produced by the company producing ondulin. |
|
|
16. Registration of the side joint of the roof, if it takes place to be adjacent to the wall located vertically in relation to the junction, is made with the help of an endune made from Ondulin. In place of the joint, reliable isolation is laid. |
|
|
17. In those places where the roofing and vertical wall is allowed, the coating of the apron made from Ontulin is used. The location of the junction is laid by waterproofing to eliminate the penetration of moisture inside. The apron is attached to a sheet with nails, as indicated in the figure. |
|
|
18. For optimal ventilation, roofing is used roofing fan. Mount the fan for each wave on the pairing with sheets. The top must necessarily have a filament over the base of the roofing fan. |
|
|
19. To access the roof surface, they make a roofing window, used as well as for admission to the attic room of daylight. This window is fixed with nails on the junction with the waves of Ondulin sheets. The euroshetor leaf, located at the top of the window, is placed on it with a falsestone. |
|
|
20. If you need to eliminate the lumen between eurosher sheets and a skate, or a cornice, a special filler is used. If in an attic room The device is not provided for its ventilation, then without a filler of the eaves you can do. |
|
|
21. Universal carnome box applied to better waterproofing roof cornice. Maximum Svet sheet on the eaves - 70 mm. |
|
|
22. When the channels for ventilation canal use ventilation pipes manufactured by the company producing ondulin products. The fastening of the pipe is made in each wave of the base with the help of nails, and its upper part stacked over the base of the brass. |
|
|
23. The ventilation comb is nailed on the eaves directly under the sheet and is necessary so that the birds and insects do not fall into the lumeges between the sheets. |
|
|
24. For fastening the sheets of Ondulin, in the case of the use of crate made of metal, screws apply. In this case, a drill is used for more convenient operation, accurately calculating the power with which the screws will be delayed to avoid damage to the material. |
|
|
25. Waterproofing of joints when installing the roof made from roofing material Ondulin, perform the self-adhesive tape onduflash, developed by manufacturers specifically for this purpose. |
|
|
26. Performing insulation places of connecting roofing windows with roof is performed using the Ondouflesh tape. |
|
|
27. To give the end of the finished species with simultaneous insulation of its joints with the roof, use tape onduflash. |
|
|
28. Roofing curtains look well and fully protected from moisture penetration to the wooden parts of the crate with the insulating tapes of oneflash. |
|
|
29. To perform waterproofing of any places where the roof configuration provides for the appearance of joints with its superstructures, the self-adhesive tape of Ondouflash is perfect for waterproofing. |
|
|
30. The installation of the ondulina roof is most often selected, in the design of which is used in the design of the ONDUTIS R70 type, used as a reliable vaporizolizing layer. |


Using ondulin when repairing roofs
When the roofing of the building comes into disrepair, with the help of Ontulin, you can quickly repair its individual sections, which will be perfectly performing their functions. but the best option will be full replacement Total roofing material on a new one. Application of slate Ondulin provides less radical solution - installing a new coating without removing the old, laying a new layer of roofing from above.
This feature is available thanks to the low weight of the euroshetor sheets, allowing to apply this roof repair technology.

Advantages of Ondulina, as a material for mounting and repairing a roof
The use of Ontulina will build high-quality roof in the shortest possible time. After choosing the installation of the roof from Ondulina, the owner of the house will be able to long years do not worry about the condition of the coverage
Application of Ontulina will provide the owner of the house:
- obvious savings when repairing the roof, the use of ondulin does not require the removal of the old roof;
- the presence of detailed instructions makes it possible to carry out the installation of Ondulin with their own hands;
- there is no risk of moisture penetration during repair, since the old coating is not opened;
- the use of an old coating, when installing a new layer of ondulin, improves the thermal insulation of the roof;
- getting different external view Material, choosing a roofing color.
The main stages of the repair of the roof when using ondulin

Roof repair with roofing high Quality, known as EuroShorter, or Ondulin, is divided into a phase of preparation for installation and the assembly stage.
First of all, the state of the old coating is checked - the ventilation system, insulating material. If there are faults, they are eliminated.

With elevated fragility of the old material, the lamp is installed by drumming and fastening on the self-tapping screw. When planning the installation of additional insulation, it is provided for its gap under the crate. To protect against condensate, the insulation is covered with a membrane ondutis SA 130, and on top of the crates are fixed vaporizolation film ONDUTIS R 70.
Performing a crate to make the installation of the roof from the ondulin, the bar is used, the cross section of which corresponds to the size of the euro wave. For installation and fastening of the skate and endanda, an additional doom is required.
When the roof is erected, or carrying out its repair using Ontulin material, the instruction on the installation of roofing should be observed completely accurately, only then it will last for many years, without requiring repair.
1.
2.
3.
The roofing coating ondulin is a fairly lightweight and at the same time a durable material that is widely used in construction. For most developers, these wavy sheets are an excellent opportunity to quickly erect a new roof, as well as dismantling the old slate. The main characteristics of the roofing of ONDulin include high reliability, operation over a long period (up to several decades), it is suitable for designs of any complexity, and can also be used when repairing structures of any destination, even in the most severe climatic conditions.
Ondulin installation technology is quite simple, and using the proposed instructions, work can be performed not only qualitatively, but also quickly.
If you decide to put roofing, it will be quite able to cope with it yourself, because the small weight of the euroshetor sheets allows to transport and mount the material without special equipment and construction skills. It is possible to use it when erecting the roof of houses, cottages, baths, arbors and other business buildings.
Ondulin Roof compared to other roofing materials has a significant advantage - sheets can be attached directly to old roof. Such Ontulin Mounting technology contributes to a decrease in the material expenses for the replacement of the previous coating, and also does not require the disclosure of the inner premises of the building under the roof.
Before the beginning mounting work It is recommended to familiarize yourself with the instruction attached by the manufacturer complete with ondulin and its components. In addition, the instruction is endowed with another function - on it, as a rule, it is indicated about the presence of a factory warranty. The consumer has the right to present any requirements in relation to the manufacturer only if all the conditions listed in the instructions are followed.
It is also important that the legally warranty applies to the original Ondulin, which was purchased from the official representative or partner of the manufacturer.

In the case of the installation of a construction team, the Customer also needs to know about the main stages of work for monitoring the quality of the installation of roofing.
List of rules for mounting an ondulin roof

As a rule, the installation instructions of Ondulina implies a minor deviation or implementation of actions at the discretion of the developer, however, with insufficient experience of such construction, it is better to abandon the amateurant.
FEATURES OF MANUFACTURE MANDATE ONDULINOV
It is proposed below detailed instructions on laying ondulin coating.

How to put ondulin to put on the roofing, the details on the video:
By installing ventilation issues through roofing, you can use special outputs. The basis of the construction passing through the roof is attached to all waves of the lower sheet, and the top
Cellulose-bituminous roofs are distinguished by a democratic price, a high service life and simplicity of installation. That is why the roof is increasingly being built with her own hands from Ondulin, and not from more complex in the processing of materials. Observing laying technology, you can be sure that the roof will serve not one generation!
The advantages of building the roof with their own hands from Ondulina
The reliability of the material says an unprecedented high term guaranteed for waterproof from the manufacturer - for 15 years! At the same time, bitumen sheets are not deformed in the sun and withstand high-graduate frosts. And the rough surface of the Ondulin gives the snow to grow straight on the roof, preventing the alignment of large layers.

If you have to overlap your home yourself, then only ondulin. And there are several reasons for this:
- the material is practically not a fuel;
- the roof calmly maintains a medium-sized hail;
- for mounting, only the hammer will be needed, a tree hacksaw and a construction knife.

Roofing types from manufacturer Ondulin
Before buying wavy bitumen sheets, you should familiarize yourself with their views and acquire a perfect suitable option:
- Ondulin Smart - sheets of 1.95x0.96 m and weighing 6.3 kg;
- Ontulin DIY - sheets of 2 waves already, which reduced their weight up to 5 kg;
- ondulin tile - sheets of standard size 1.95x0.96 m, imitating the real tile, weighing 5.9 kg.
Ondulin sheets thickness remains unchanged for more than 70 years and is 3 mm. So, in the case of reconstruction, only part of the roof can be confident in the interchangeability of sheets.

General rules of device roofs from Ondulina
By purchasing roofing, you should pay attention not only to the integrity of the sheets and the quality of their procession, but also on the accompanying documents. So, all the materials of Ondulin are attached by instructions on their installation and requirements for the device of the crate. Exact compliance with the instructions guarantees the durability of the roof and strength of fixtures.
Requirements for the crate
The first, with which it is necessary to determine if the roof is insulated and is it necessary for waterproofing film? If not, the crate can be stuffed directly on rafters.

If additional waterproofing of the roof is planned, between roofing and film should be made ventilation clearance. To do this, the waterproofing is rolled along the rafters, fixed over the counterclaim and only then fill the crate.

The frequency of the ONDULIN crate depends on the angle of inclination and the luxury of the roof:
- for the roofs with a bias from 1/11 to 1/6 and an angle from 5 to 15 degrees, a solid lamp is needed;
- for the roofs with a bias of 1/6 to 1/4 and an angle of 10-15 degrees, you can make a rarefied crate with a maximum step of 45 cm;
- for the rest of the roofs with a large inclination, the maximum step of the crate - 61 cm.
For flat roofs Ondulin does not fit. As a solid crate, you can use OSP plates, phaneur, fibrolite plates or boards, nailed. For a rarefied crate, you can use a 2.5 cm thick board or a thickness of 5 cm thick.

To increase the reliability of the roof, it is better not to use the maximum step of the crate and make it more frequent. This is especially important for locality with dangerous natural phenomena.
How to mount Ondulin on the roofs depending on the corner of the skate
Thanks to Ondulin's placed markup, no longer need to make it difficult to measure the distances to properly fix the roofing material. The applied markup is suitable for all the roofs with an angle of inclination more than 15 degrees, the installation process itself is extremely simple:

The top of the wave of the extreme sheet should have to be on the wind board. In order not to stretch or climb sheets, an additional external beam is attached to the protruding crate at the desired distance.
For the roofs with an inclination angle less than 15 degrees, the installation process is slightly different:
- side launch of sheets for roofs with a slope of up to 10 degrees - 2 waves;
- the terminal backrest (upper row above the bottom) for the roofs up to 10 degrees - 30 cm, for the roofs 10-15 degrees - 20 cm;
- it is not necessary to follow the marking on the sheets in this case, the distance between the rows of nails, fixing the center of the sheet, for the roofs with a slope of up to 10 degrees - 55 cm, for the roofs 10-15 degrees - 45 cm.
In other words, nails nails roofing sheets to the crate, so that for a rarefied crate, it is especially important to accurately calculate distances so that it does not work out that nails are clogged into the air. A more clear principle of fixing sheets is shown in the scheme.

Do not save on the number of nails! The bottom of the sheet is always fixed for each wave, otherwise it is impossible to guarantee the reliability of the roofing material fastening. Despite the fact that on Ondulina can be walking, in the installation process it is better to use stairs and construction roadments.

Otherwise, the flexible sheet can stretch under human weight during fixation and in the future collapsed.
Registration of individual roof elements
When the device is roofing, the main problem is to properly adjust the material to the chimney or to the wall of the house, as well as close the edges and lobes. But thanks to the finished enough elements and accessories, the roof completed the view is very simply even to people who have a hand yet on construction.
So, for the upper edge single Roof Well fit tongs or wind strap. After laying bitumen sheets on the end, a cornice board is nailed so that it will be lifted with the top edge of the sheets. The selected angular element is stacked on it, and the lumens between the forcep and the roof are closed with a special filler. After that, the tongs are fixed with nails for each wave. The sides of the roof with a wind board are also closed.

Konk can also be used ready. It stacked after the roof is fully covered with sheets on both sides. Its installation begins on the same side with which the laying of roofing material began - with the opposite direction of the wind. The fastening of the skate element is 12-15 cm, but you need to ensure that its end completely overlap the top of the sheet wave. After filling the slots between the skate and the roof, you can begin to fix the skate with nails into each wave.
If you need to seal the mix of the chimney pipe with the roof, you can use a special sealing ribbon and covering apron. For this, after Ondulin sheets are already laid, the apron is placed on the front edge of the pipe, so that it goes to the pipe for one wave on each side. The apron is nailed into each wave.
On top of the apron, the sealing ribbon is glued on top of the chimney. On the sides and behind the tape it is glued to close the bog of the roof and the chimney.

It does not need to lay the apron, just a tape is fixed with nails every 30 cm or at the top of each wave. The upper edge of the tape is pressed with a metal plate to chimney.

The drop of chimney is stacked and the additional sheet of ondulin is fixed, cut into width so as to go beyond the edges of the pipe for one wave.
Side roof adjoins to the wall are also sealed with ribbon for joints. The self-adhesive tape is starting to lay down from top to bottom so that its lower edge completely covered the wave of the sheet. The upper edge of the tape is pressed with a metal strip, and the lower node is naked to the wave in 30 cm increments.
But for the horizontal node of the roof connection with the wall, the covering apron will need again. It stacked on top of the roofing sheets close to the wall and fixed for each wave.

On top, with an apron itself, the apron is glued to the wall, and its upper edge presses the aluminum bar. What is interesting, the apron is unnecessary, it is a decorative element. The seams of seams ensures exactly a butyl rubber tape on an aluminum-based basis.

Restoration of the old roof in a couple of days
If the roof repair is constantly postponed due to the fact that the family has nowhere to remove and install a new roof, you can use the "Hood" technology invented ondulin. Due to the low weight of bituminous sheets, they can be stacked over the old roofing coating, without fear for the strength of the rafted.
Over the old roof a doomle is stuffed, and on it standard scheme Ondulin sheets are stacked. At the same time, in the house you can easily live, because the roof does not go anywhere! Detailed roof restoration process with old slate is shown in video:


