Projects of cabic brick furnaces Kuznetsova. Kuznetsov Kaminopovina: order, laying, materials and execution. Calculation of dome heating devices
Arrangement of the furnace B. country house Or at the cottage - the case today is very popular. Despite the appearance of modern heating devices on the market, many preferred an old-fashioned brick furnace, which for many centuries served as the only source of heat and cooking in the house. Particularly relevant such designs where there is no gasification.
Time does not stand still. For the change of old good "Swedes" and "Holland", new and more advanced - cap ovens came to replace, which are not inferior to their channel analogue. The design of the Cap Furnace features a fundamentally new method of using hot gas.
Kuznetsov cap oven (the people referred to as "Kuznetsovka") was called in honor of its creator - I.V. Kuznetsova, who engaged in the development of a new heating scheme at the beginning of the 60s of the last century. The unique technology of the "free movement of hot gases" immediately received recognition and began to enjoy great popularity around the world.

The feature of "Kuznetsovka" is that the heated gases pass and circulate through the pipe due to own power Severity, in contrast to the "forced" movement in the chimney. We all know from the lessons of physics, that warm air rises up, displacing cold. But, unlike channel prototypes, it does not leave the pipe here, but is going under the cap. Gradually, he cools out there, and his gusts of hot air bursts, rising upwards.
The main difference of the channel furnace from the Cap is considered the principle of movement of hot gas. In the first smoke, it would be drawn up on the pipe up, and in the hub, it is pushed out. The cap itself can serve as a container for heating water, cooking, dryers, etc. Thus, the cap can perform a double function.

Oven "Kuznetsovka"
That is, according to the functional characteristic, Kuznetsovka can be divided into:
- bath furnaces;
- food coating furnaces (bread, cooking, under Kazan, barbecue, grill, etc.);
- fireplace;
- heating furnaces;
- combined type.
The most common are exactly combined types With the possibility of cooking and heating throughout the house. Despite the possibility of variation of style and shape, the principle of operation of the cap remains unchanged.

To make it easier to understand the basic principle of work Kuznetsov furnace, imagine a bonfire, burned on open air. Due to unlimited air access to fire, the fire gives a little warm. Now let's try to cover this fire with a metal cap, leaving a small luxury from the bottom to not taking the flame at all. Hot air will go up, heating wall. Gradually cooling, the air will start to lower to the left to the opposite, while his place is occupied by a new portion of hot air. This is the principle of free movement of hot gases, which I.V. Kuznetsov successfully applied in its development.
Design features
Today in the network you can find more than 150 varieties of design, but no matter how form, the style of execution is neither, all the ovens are built on one method. The designer, creating a laying scheme of a cap, put two tasks: productivity and efficiency heating system.
There is not so easy to build this design. It is necessary to clearly follow the developed Kuznetsov I.V. Speares. The inventor has a big role and attention to the location of the internal channels of the cap.
The cap is a separate chamber for delayed the heated gas, which contributes to fuel economy and increase the efficiency of the furnace.
The standard design "Kuznetsovka" assumes the presence of two caps. The bottom is combined with the heat chamber, and the second cap is in the top of the furnace. The task of the first cap is to divide gases into cold and hot threads. This is where it distinguishes the cap oven from the channel, where the heated air, under the action of thrust, freely comes out. Here, the hot gas flow coming out of the furnace seeks upwards where it is delayed under the first cap and will accumulate heat for a long time.
Further, the stream strives through the passage to the second chamber, where it also delayed under the second ceiling, as the passage is at the base. Consequently, hot airBefore getting out the chimney, it will break warm in the oven for a long time. This gives a high efficiency - up to 95%. If you compare with the efficiency of the traditional Russian oven (channel), then it is more than 45-50%.
In addition to the free movement of gas, the cap involves and mechanical flow control. For this, the design valves are installed in the design. They, as needed, can delay and redirect hot streams. "Summer" valve is designed for warm season when the furnace is used as hobs For cooking. Opening the summer valve, the hot air flow rushes up the chimney without entering the second cap.

Benefits of a Cap Furnace
If you compare the Kuznetic furnace with other brick analogues, it has a huge deformation resistance. It is quickly heated and at the same time it retains heat. Even with a loosely closed flap, the resulting heat can remain in such a furnace for a long time.
- long-term operation;
- small formation of soot and soot (it is almost completely combusting, turning into ash);
- Efficiency - up to 80%;
- easy design that can be mastered even a newcomer;
- advanced heating system compared to channel analogue;
- simple and practical in care - there is no need to clean it often;
- does not crack;
- universality of the construction (in the house, apartment, bath, etc.)
- a large selection of shape and design;
- no need to take into account the height of the chimney to ensure good thrust;
- high driving speed;
- the design allows you to install a large heating element;
- there is a uniform heating of the furnace;
- the furnace cools longer compared to its brick prototypes.

Rosge "Kuznetsovka"
Basic Rules of Montaja
- The inner shell of the furnace from all sides should be surrounded by an empty space, since the brick during the operation of the furnace will be very hot.
- The location of the heat source of the furnace can be varied depending on the type and form, but it should always be in the bottom of the cap.
- Every third row brick masonry Must get a metal wire. This will increase the ligament and prevents further deformation of the furnace.
- The shape of the cap can be any shape and size.
- By mounting the oven, consider the fact that when heated, all metal elements (grille, door) will expand. Therefore, all these parts of the furnace system must be installed with a reserve to expand. Between brick and metal, it is necessary to install a fireproof.
- With the first extractor of the finished furnace, it is not necessary to immediately give the maximum temperature. The furnace must be frightened gradually starting from small temperatures.
- After installation, the oven refractory furnace should be processed.
Today there is a huge number of varieties of cap oven, because progress does not stand still. The Kuznetsov himself put only the beginning of this new type of heating system, and its followers around the world already make their adjustments and work on the improvement of the furnace. Of course, it is much easier to build a furnace at the construction stage of the house. But often people think about the need to place such a heating device after the construction of the walls. Here you will have to take into account the height of the beams, the location of partitions, roof, etc.
If the furnace is laid during the construction of the house, then it is better to have it in such a way that it is heated immediately 2-3 rooms.
Describe the instruction of the masonry of all varieties of cap furnaces is simply physically impossible, so in this article we will give the classic installation of a cap of the coil furnace with their own hands. Exactly following our instructions, you will definitely get a gathering a good, beautiful and functional furnace.
The size of the furnace, of course, can be different - from this, accordingly, the volume of material will depend on. But the order cannot be changed in any way!
What materials will be needed for mounting the oven
Before proceeding construction work, Burst all the necessary materials. In order for the cap baking to please you with its functionality and appearance long yearsMaterials must be a good quality.
| |
| Fireproof brick for firebox (chamoten) Sha-8. |
| Ceramic brick (brand not lower than M150). |
| Clay, sand and cement for brickwork and creating a foundation. |
| Plywood for formwork facilities. |
| Plate of steel. |
| Metal wire or reinforcing rod. |
| Steel corner. |
| Wooden bars (50x50 mm) - 4 pcs. |
| Doors and valve. |
| Foil under the first layer of bricks (based on the size of the foundation). |
| |
|


Cover Furnace Masonry Tools
- construction mixer or drill with a nozzle;
- circular Saw;
- pliers (for wire tightening);
- master OK;
- soviet shovel;
- building level;
- bulgarian;
- construction gloves.
Getting Started: Step-by-step instructions
Step 1. Thunderstand the design of the cap and the diameters on paper.
Before you start working, you should clearly know what width you have a stove. It must be drawn on paper, calculating all the necessary parameters.
- Calculate the size of the pit under the foundation. Consider that it should be wider than 10 cm than the heating structure itself.

Step 2. Layout the foundation
Before installing the furnace, you must take care of the bottom. It must be solid and perfectly even so that in the future it does not happen to cracking the design and deformation. Laying the foundation is a very responsible step, to come to which you need seriously.
For concrete floor, the foundation will be a kind of platform, lifting the furnace for 20-30 cm above the floor level. We carry out the formwork in the size of the foundation and fasten its corners wooden bars (50x50 mm). At the bottom of the foundation, we hide the sand with a thickness of 15-20 cm, we talked well, and then slowly fall asleep solution. One should not connect the foundation of the main house with the foundation of the furnace. They possess different weights, which means that the shrinkage will be different.

If you make the furnace in the wooden floor:
- Draw marker on wooden boards The size of the future foundation and disk saw around the perimeter cut the hole.
If the furnace is erected into wooden houseYou should consider the fireproof rules. It is necessary between the design of the furnace and overlaps to pave an asbestos sheet.

- I dig a hole with a depth of 80 cm and 1,5m * 1m width. Watch all the walls to be smooth. It is better to use bayonet shovel. I smell the sand at the bottom of the pit with a thickness of 15 cm, thoroughly trambam. It is necessary to wait for sand shrinkage (for 2 days).
- We proceed to the creation of a formwork. You can use any old formwork for mounting wooden doors, unnecessary boards, but, ideally, it is better to take Phaneur. Measure the length and width of boards based on the size of the foundation, omit in the pit and connect them with screws. If the formwork is not all immersed in the ground, then additionally connect the corners with wooden bars (50x50). If the formwork is immersed in the pit for all height, then you can not do that.
- Reinforcing metal rod.
In some wooden houses, the floor is raised above the ground by 50-80 cm. In this case, it will be necessary to dig a pit under the foundation for 20-30 cm. That is, you need to "blow up" anyway, but consider this difference already.
- Preparing cement mortar (Sand + Cement + Water) and slowly pour into the pit. Try to pour the layers, every time, slightly stirring the shovel. This will allow outwardly excess air and create a steady base. Leave the foundation to dry. It will take at least a week, but sometimes you have to wait for a complete setting of a solution of 20-25 days. In this case, it is not worth a hurry, since the operational properties of the furnace depend on the strength of the foundation.
- While the solution is still raw, it is necessary to clearly determine the construction level, how much the platform turned out to be smooth. If necessary, adjust.
- To do this, take the construction level and check the place where the furnace will be installed.
- When the solution is completely frozen and the foundation is ready, you can start laying the furnace. Do not hurry with the construction of the furnace. The foundation should be durable and solid, the further operation of the furnace depends on this.
- Stool under the first layer of brick masonry layer of reflective foil. This will prevent the heat loss and redirect the direction of the heat flux from the bottom up. Take the material a little more than the foundation perimeter. After laying bricks, then smoothly need to be cut off the edge with a knife.

Video. Laying brick "Capkin" oven
Step 3. Cooking the clay and sand solution for brickwork. As the basis, we will use the clay exactly, as it has a heat resistance to 1000 degrees.
On the video, you can see a visual instruction on the kneading solution.
Video. Preparation of the clay mortar for oven masonry
In a large metal tank, it is necessary to connect clay with water and soak it for 2 days. After that, we smear the sand into the tank and mix well with the engine with the nozzle mixer. When the mixture will be well mixed, and it will not separate 2 material in it, check the solution to the solution. If the mixture slowly slides from the tool, then the solution is ready. You can start brickwork.
Laying 1st furnace
Before starting to lay bricks on a cement solution, it is better to immediately each row, according to the co-container scheme, lay on the floor "on the dry". The scheme shows that some rows will have to divide bricks to ½, ¼. Where you have to grind bricks, use manual methodnot to break technical properties Material and its aesthetic species.
- Series number 1. Brick will evenly spread over the entire area of \u200b\u200bthe furnace. The first row is solid, observe smooth corners. Start with the side walls of "Kuznetsovka", laying out the spoonful method, move on the right left. (Figure 14). Brick is laid by a longitudinal part in length. Each next layer lay the edge in the center, and we repeat the missing part by beating the required size from the new brick.
- Put a number 2 of bricks. At this level, we establish a confused (according to the scheme developed earlier) and the window for cleaning the furnace (there may be 2). The design of the cap oven allows you to place the door for cleaning and pondered anywhere, but the window must be below the furnace. Here it will be necessary to divide one brick input and establish them so that they oppose the total number. When you put the second row, you should not connect them with a solution. Upon completion of construction work, you will need to clean the furnace from the fallen clay. And after you spend cleaning the furnace, then fasten them with a solution.
In order to properly install the doors, put the windows and the windows are necessary in the existing holes to turn the knitted wire, make a loop and twist the harness. Invest between bricks. If there are no holes in factory details, then you need to make them a drill with a nozzle drill on metal. Use the pliers to spin the loop as possible. While the doors for stability must be secured by bricks, but not to connect with a solution. Make it will need to be done after laying the third row.

- A number of №3 similar to the previous one. From the 3rd row, we begin to raise the fifthly self, laying it out of the heat-resistant brick. Between the front wall of the stove, laid out of the red brick and the most furnace (from fire-resistant brick), we deposit basalt cardboard or corrugated foil. After burnout, it will create a perfectly smooth heat gap of 5 cm.
The main feature of the Kuznetsov furnace lies in the "floating" furnace. That is, it should be a separate module separated from the furnace housing with dry seam. Fireproof brick (shaft) No protrusion should be included in the usual brick of the furnace case.

Features of masonry furnace "Kuznetsovka"
- Series number 4 are making a little (on 1, 5 bricks) to reduce the connector for the fond of combustion products (in the scheme it is seen). We construct in such a way that a partition leads to the top compartment in the far corner from the furnace.
- Series No. 5 lay out similarly to the 4th row, only over the rim of the discharge you need to put a grate. We put it without a solution, and the gaps fall asleep sand.
- Series No. 6 are placed similarly.
Here you begin to install a flue door with a gap of 5 mm. I exhibit it neatly on a plunder to control the deviation of the level. In the same way as in the 2nd row, when you installed the ashpan, it is necessary to secure the door in the brick with a metal wire.
In order not to move the door while you will further fold a row, fix it with harms and prescribe the ends of the harness with bricks. This will allow you to quietly continue to work without worrying about the deviation of the door from the level.
- Series number 7. We derive the chimney with a width of 0.5 bricks from the furnace to the adjacent air chamber.
- Series number 8 stacked similarly to the seventh.
- Series number 9. We derive the walls of the firebox chamoten brick. There is also a passage between the furnace and the first cap to remove the combustion products (visible in the diagram).
- Series number 10 laid out by analogy with the previous one.
- On the 11th row of work in the Polkirpich go to the masonry of the whole.
- Row №12 - laid out the grille from the chamot. We continue to lay the order in the above-mentioned coach in the one again.
- Series №13 - the same laying as on the 12th row.
- Row No. 14 - we remove the crate and leave 2 chimns.
- 15th row - similarly, but on 16 we use whole bricks instead of halves. Overlapping two chimney into air compartments.
- 17th row. Steel plate overlap the movement of smoke. Thus, the channel that you created on the masonry of the number 4 now remains the only one.
![]()
Step 5. Masonry of the second level of the furnace.
- Series No. 18 are placed similarly to the 17th, but on this row, a fence plate, which is fixed from three sides by cement mortar.
- RYER №19. Construct a column for the very top of the design. Behind the stove, we make a sinus sinus (on the width of the brick) in order for the smoke to go through the pipe.
- Series number 20. Place the same as the 19th row.
- Series number 21. This row is stacked so as to overlap the channel leading to the pipe. Smoke will go through the sinus, which you left below (in the 19th row).
- Series number 22. From the quarter of the brick, do a hood, which comes from the steam collector. Overlapping the steel part of the ceiling.
- Series number 23. Put the same way number 22.
- Series number 24. In this row, it is necessary to connect the chimney with a steam collector with a closed channel
- RYER №25-26. We are placed similarly to the previous row.
- Series number 27. Installation of a fence plate.
- Row №28. Cover the design of the roof of the brick.
- Row No. 29. We make an additional layer similar to the previous one.
- Series number 30. Almost completely overlaps the brick row.
- Series number 31. Laying the base of the pipe. We remove the pipe with a diameter of 1 brick.
- Series number 32. The chimney tube is formed.
Step 6. For the furnace to have an attractive appearance, It is possible to round up neatly all its edges by manual grinding. It is necessary to do this after the complete completion of construction work.
Step 7. Processing the created oven refractory composition.
Step 8. Clear the stove. No need to immediately give the maximum temperature. The furnace should gradually "burn out". Start with the minimum temperature, and then add heat.
That's all! Following the instructions, and most importantly, without disturbing the order of the masonry, you will definitely get a robust beautiful oven that will serve not one ten years.
At the end of this article, we offer to watch a video in which you can see the stages of the calculations of the Kuznetsov furnace.
Video. Laying Kuznetsov furnace with their own hands
Furnaces created by Igor Kuznetsov's projects are currently among the most effective among all existing structures. For already half of the years, there are a huge number of people not only in our country, but also abroad. Build your own hands such a furnace in your home or in the country, you can, if you adhere to the recommended laying scheme of a particular model.
What is Kuznetsov cap oven and where it is used: advantages and disadvantages
Kuznetsov began developing projects of various types of furnaces in the middle of the last century. For all the time of its work, he created more than 150 options for designs of furnaces of various destinations.
Coupling furnace Kuznetsov
The most popular projects of furnaces:

In fact, the varieties of Kuznetsov ovens are much greater, as it is possible to build mixed species.
The main indicator of the work of the furnace is to increase the efficiency (efficiency). It was for this that Igor Kuznetsov sought, creating a cap oven. Depending on its purpose, the wizard equipped with their improved features and capabilities. Some furnaces received an increased degree of heat resistant, other new improved furnaces, and the third provided a long service life.
Thanks to the competent development of the projects of cap furnaces, the fascinated air is delayed in them much longer than in ordinary structures, and cooled quickly goes into the chimney pipe in a special deepening. They received such a name due to the fact that inside the furnace, a kind of "cap" is created, which connects two parts of the design - low part and firek. It also shares gases to hot and cold.

Kuznetsov Bread Furnace
The efficiency of the cap furnaces reaches 95%, while conventional furnaces have only 25 to 40% of efficiency. Thanks to the "free movement of gases", which is ensured by the introduction of the Kuznetsov system, the formation of soot is reduced and the smooth heating of the furnace increases. Such a 4 kW oven will be able to quickly warm the house, with an area of \u200b\u200babout 100 square meters. If necessary, the design of the cap oven allows you to install a water heating circuit in the house. And since the traction on the channels is distributed in automatic mode, then the risk of fuse is almost zero. Therefore, the view can be not closed.
Benefits of caps
- Uniform heating of the furnace and heat transfer.
- Equipped with a large number of places where the metal heating element can be installed.
- Burn without soot and smoke formation.
- Rarely need cleaning (every few years).
- Have a low heat loss level.
- High degree of economy.
- Stability for cracks.
- The possibility of improving design.
- Have the maximum combustion temperature of fuel.
- The possibility of firebox various species solid fuel.
- Strong thrust even with a smaller chimney.
Such furnaces are almost completely devoid of deficiencies, except, of course, difficulties in their construction and costs for the acquisition of materials.
Design and its distinctive features
The principle of the device of the cap furnaces is quite simple and lies in the fact that the lower tier of the design and the center is combined into the overall space. It is called a cap, inside which the circulation of split gas is carried out.
The easiest split gases that are formed during the combustion of fuel are climbing the cap. There they will be until all of their heat goes to the brick walls of the masonry.

Standard Cap Furnace Design
When cooled, they become hard and lowered down. The following hot gases come to "come" their place, and such a circuit occurs until fuel burns in the focus. Thus, hot air is always under a kind of cap until the brick takes all the warmth. He will not be able to leave until he does not cool down and will not be hard to go down down.
Features of the design of the cap oven
In order to understand how such a furnace is valid, we can consider the option with a glass container when in it hot smoke Can not go anywhere and gradually falls down when cooling.
But it is necessary to know that the cooled gas that decreases the book is not cold in the literal sense of the word. It has a temperature of more than 200 ° C, and the combustion temperature of solid fuel is about 800 ° C, so the air rising upwards will be the same hot. Cooling, gas is lowered to the outlet channels, which are located at the bottom of the oven masonry. And then he enters the next cap, which is above the first. And if for this cap gas was cold enough, then for the upper it will be hot and therefore will rise again at the top. There, they also heat the stove wall material. After cooling, it will be devastated down, as in the first case, but already with a temperature of about 130 ° C.
That's the whole process of operation of the furnace, but, like every effective device, there is a small nuance here, which is called "dry gap". It is a discovery located vertically in a furnace with a width of about 2-3 centimeters, which combines a firebox with a lower cap from the floor itself to the end point of the camera. Due to the dry slit, heavy cold air can directly enter the pipe, without stirring with the rising hot gas and without reducing the efficiency of the combustion of solid fuel.

Dry suture in the masonry of the Cap Furnace
The bath oven has the same principle of operation, as well as heating, but in its design is slightly different.
- The bottom cap is equipped with a special metal opposition with stones.
- There is access for water intake and special holes for the release of hot steam.
- The furnace has thicker outer walls that enable the stones to heat as much as possible, and the room itself does not overheat.
- The cap has an outline for water heating in a washing room.
Stones are heated by two methods:
- Directly from split gases.
- In the steel pallet.
Since the stones are located at the top of the first cap and therefore they warm up to the maximum temperature. This is due to the fact that the fascinated air "envelops" stones from all sides at the same time.
For such a furnace, it is best to acquire rounded streamlined stones. This form will be perfectly cope with heat heating.
If you can add to the stones, you can add 1/3 part of cast-iron saues.
Calculation of the main parameters
In order to properly build the oven Kuznetsova, it is necessary to accurately comply with the scheme developed by experts. Masters who have extensive experience in the construction of such furnaces, are recommended before starting a capital laying to practice her "dry" if you do it for the first time.
If the furnace is erected at the construction stage of the house itself, then the project should be drawn up in such a way that it can dump several rooms at once.
The foundation for the furnace should be high quality and have a necessarily waterproofing layer. It is also necessary to take into account that the foundation of the house should not be based on the furnace. This design should have its own foundation that gives its shrinkage.
The concrete base should be more than 10 centimeters from all sides. The degree of it will depend on the height of the structure and the soil composition, where the furnace will be built. Typically, the depth of the pit is from 40 to 60 centimeters. A pillow of sand for waterproofing and a layer of rubble to strengthen the construction is placed on the bottom. To form lateral walls, form a formwork from the boards.

Scheme of coach coaching furnace OVIK-9

The depth of the furnace 450x470 mm with a dry seam for a brick expansion in 2-3 cm. If the furnace is needed large sizes of 510x530 mm, then the rear wall is laid out in ½ bricks, as shown in the spoke, and in ¼ brick.
Necessary materials and tools
For the construction of the furnace we will need enough a large number of Materials and tools. This list does not take into account the structure of the foundation and chimney.

Instruments
- Trowel.
- Plumb and construction level.
- Capacity for the kneading solution.
- Spatulas.
- Corner construction.
- Perforator.
- Bulgarian.
- Nozzle mixer.
Preparatory work before assembling oven
Before starting to build the furnace, it is necessary to study the room plan in detail where the oven will stand. Since it weighs quite a lot, the foundation should be well reinforced.
The following information will help to protect the oven correctly and efficiently to avoid problems in its further operation.
- The cap and the hearth should be aligned with dry seam - size 2-3 centimeters. It is necessary for the proper movement of air flows. A heavy gases rich heavy gases will move in a focus, and create a certain vibration, improving the quality of the combustion of firewood.
- It is impossible to unite the floppy with the cap, as the firewood should burn in a certain amount. Just can be created as much as possible heat.
- A catalyst made of refractory bricks should be arranged above the heat chamber in the form of a lattice. Here they are rare to the maximum and survive what burned in the focus.
If the furnace is built in a wooden house, it is very important to protect the walls from strong overheating. To do this, at the joints of the walls and the furnace itself, it is recommended to install gaskets made of refractory material.
Also at the joints of the furnace gaps that will be filled with refractory material, are needed for the free move of the wiring expansion during its heating. Otherwise, the solution on the seams will give cracks, and the furnace will deform.
- Refractory protection inside the furnace should be placed in such a way as if it hovered in the air. That is, it should not come into contact with the walls of the oven.
- Internal masonry must be installed on the edge. External masonry is done at the discretion of the wizard.
- Wire is needed to enhance the brick bundle. Therefore, every 2-3 rows it is necessary to lay it that the furnace is more durable and stable.
- After complete drying of the solutions of the furnace wall, it is necessary to treat a special refractory substance.
- Trial extract should be carried out with a minimum possible temperature, with a phased increase of heat.
Construction of a cap oven with their own hands
We will start the construction of the furnace with the foundation, since it is it that it is its basis and one of the main elements to ensure the strength characteristics of the structure.

We leave the concrete to stick for a few weeks, as the longer the foundation is set, the more stronger and more reliable.
Step-by-step instructions for masonry Kuznetsov furnace with their own hands - order (photo)
- We post the first row of bricks. It must be perfectly smooth, as it is a solid basis for future dealers. We make the thickness of the seams about 5 mm. Check the correctness of the corners. We will leave 20 bricks on this masonry.

Lay out the first row of bricks for the furnace
- We begin to create the camera pondered and the bottom cap. In order to be able to clear its foundation after the end of the masonry, we put two halves of bricks protruding from the main series, and do not sit them on the solution. We set the door stood and temporarily support the bricks.

Put the second series of furnaces
- We put 3 row on the drawing. During the masonry period, the door felt tightly.

Laying the third row
- We are lagging out partially 4 row of chammed bricks. From it we create the side walls of the furnace and the end wall. The door pondered overlapping 2 ordinary bricks, we release them a little over it and we are shattered. Also from the end pissed to put 2 closed bricks. Between two types of bricks, we leave a five millionth gap. For this we put together a simple five-millimeter corrugated cardboard. In the future, he will simply be fascinated and the heat you need will remain. Such cracks we will have to do in other rows where two types of bricks will be shy.
- We continue the laying of 4 rows. After we put bricks on the side over the door, we blocked the middle of the door with refractory and ordinary brick, covered on both sides side. We will need to take 1 ordinary and 1 chamotte brick.

Laying fourth row
- From the fifth row we create a fuel chamber. Sut off the brick and put the front wall of the hearth. The inner space of the furnace between the masonry should be similar to the size of the grate, so that it easily stood into the brick rectangle and on the protruding 10 -1mm bricks of the previous row. Between the walls and grille, we make a five million meter clearance. Behind the furnace, where the first cap is located, create a channel in ½ brick to connect two caps. We will need 12 and ½ red and 4 refractory bricks. Here, on the discovering bricks of the previous row, we lay a grate (not fixed by mortar). Holes fall asleep sand.

We put the fifth row
- On the sixth row we set the door of the combustion chamber. Holes between bricks and doors fill asbestos.

Laying of the sixth row
- Put the following row. When laying the end wall of the furnace on the left side, we make a gap in 2-3 cm, which will serve dry seam. Use 12 ordinary and 3 refractory bricks.

Laying seventh row
- The eighth row put on the drawing using 12 ceramic and 3 refractory bricks.

Laying eighth row
- In 9 row we make the walls of the hearth, and between it and the cap will be created from the bottom, where the combustion products will be leaving. Side walls We make the remaining ten millimeters below. Bricks that we put on a firebox, slightly shift to overlapping a small part of its framing. Before this, it is racing bricks on the scout and so creating a "recess" in which we will lay the main central brick. Use 12 ordinary and 2 and a half refractory bricks.
- Here, between the facade lateral bricks, which are above the camera door, put the centering brick covering the bezel of the door. Before this, you should be shedding. The side of the chamber on the left is covering a strip from asbestos 10 mm. She lines the whole 9 row.

Laying the ninth row
- On bricks of the tenth row, which are covered with refractory asbestos, to "dry" put ordinary brick. In the masonry that framed the flopping, make a small ten-minute meter cutout on which it will lie cooking panel. Between the stove and brick on all sides, we leave the slot in 5 mm for the heating of the metal. Chamotte brick that lay in front and on the right of the furnace, we are sick. We make a small ten million metering gap between the stove and masonry.
- After we posted 10 row, we put a beep from asbestos in the masonry, which is impregnated with a mixture of clay. Top to put the panel. All holes between it and bricks fall asleep sand.

We put the tenth row
- On 11 row we begin to create the walls of the chamber for cooking and install the frame with the doors. Between the steel frame and masonry make a slot in 5 mm. For the formation of the frame, we wrap it with a refractory rope.

We put the eleventh row
- We lay out 12 row in drawings of 11 ceramic bricks.
We put the twelfth row
- On the 13th row we continue to form a camera and side channels.

We put 13 rows
- We lay out 14 row strictly according to the drawing.

We put 14 rows
- Put 15 row in two approaches. First, the walls of the chamber and the channels we raise the level of the steel frame of the door, and then create a jumper for it. On this series we place a metal sheet 600x550 mm and make a cutout in it for an exhaust. For strength, we put 4 iron corners on top of the sheet and 1 strip.

Laying 15 rows
- On the corners of 16 rows and strip we put ordinary brick as indicated in the drawing. We leave open channels of channels. On bricks that are framed by the near canal and for drawing before masonry, we make holes for chimney valves. Make in the masonry slot in 5 mm.
- Here on the site with the proofs we put 2 gate valves.
We put 16 rows
- In the next row, the center for cooking and valves we overlap with ceramic bricks so that the tap channels are open.

We put 17 rows
- Next, we form a second cap. To do this, we install two halves of bricks that raise above the main masonry. This is necessary to then clean the base of the chimney. After the end of the masonry, we fix these bricks with mortar.

Put 18 rows
- Put 19 row on drawings of 12 and a half red bricks.


Put 27 row
- On the 28 row in the masonry that framed the chimney channel, we make 10 mm cutouts for mounting the chimney's main valve. Making the purses, we regularly apply a valve so that it is located 5 mm from the stove walls and looked freely into the gap made by us.

Put 28 rows
- Here in the opening of the solution we install and the valve itself
- On 29 row we take 19 ordinary bricks and almost completely overlapping the design surface. We leave untouched only a chimney hole with a valve.

We put 29 rows
- On the 30 row, we also almost completely overlap the surface of the furnace according to the scheme.
We put 30 rows
- On 31 row, we lay the base of the pipe in 1 brick. Its size must correspond to the cross section of the chimney. The masonry is carried out of 5 bricks.

Put 31 rows
- Then create a chimney pipe. For each row, we need 5 ceramic bricks. The furnace is built. Now it should stand up to a complete drying of the solution.

Lay out the chimney of the desired height
Features of operation
The difference between Kuznetsov's stoves in the fact that they do not require special care And very easy to operate. For them, it is enough just to harvest the appropriate dry solid fuel (firewood) in the right amount.
Since the CPD of the Capic furnace is very high, then the consumption of firewood will be much smaller than in ordinary furnaces, to which we are accustomed.
In the cap furnaces, soot is almost not formed, as it goes to the secondary combustion and growth of thermal energy.
- Before using the furnace, it is necessary to dry well. To do this, it is necessary to protrude 2 times a day at one - one and a half hours small quantity Fuel. The door is confused and the furnace should be open.
- Not recommended to be used for damask chips and cardboard in large volumes. Only for a short time they will give the maximum temperature, which will result in bricks.
- For extractors, the oven is best to use paper, rays or bark. This will allow you to remove the cold air from the chimney pipe, create the necessary traction and get the temperature of burning fire around 350 ° C. In winter, if the furnace was not used for a long time, then the extracts are recommended to conduct with an open "summer" valve.
- After the start of burning in the chamber of the furnace, it is necessary to put firewood in order to obtain the maximum operating temperature of 800-900 ° C.
The cap ovens practically do not need to be cleaned, and if there is a need, it is best to seek help to professionals to the cookies. They quickly and efficiently clean the chimney, fuel, grate and other elements of the furnace.
Video: Build the oven Kuznetsov do it yourself
Following the detailed instructions and the designed scheme, you can independently build a comfortable and functional furnace of Kuznetsov in your home. The correctly selected scheme of the model will be able to decorate the design of any interior of the room, and will also fully fulfill the function assigned to it - to make the house and serve the kitchen for cooking.
A great contribution to the development of a chimney introduced I.V. Kuznetsov, who devoted almost all his life to the invention and improving a large number of new furnaces of furnaces. He worked focus on developing its development effectively and benefit people.
The improvement of previously designed thermal structures is based on equipping them with more rationalized capabilities. Thus, some models have undergone a change in the furnace, the safety of heat has increased, a certain equipment and so on has been added. The fact that the designs created by Kuznetsov work qualitatively has long been proven their great popularity and many years of operation. Positive feedback on Kuznetsov furnaces motivate many on independent manufacture Household heat devices. In this case, you can save a little, but you need to properly select materials and strictly perform a scheme of coaching furnaces of Kuznetsov furnaces.
Kuznetsov was proposed a completely new approach to the construction of a brick furnace. As you know, there are channels in the furnaces of the traditional design for which the movement of hot gases heating bricks. The main factor supporting this process is a traction. Such a forced method of heating the furnace case is characterized uneven heat distribution. In addition, it often leads to the formation of cracks in the wall structures. When building a similar furnace, which occupies a rather much room indoors, a lot of bricks are used.
There is a question about the availability of a place to install the heat exchanger. This device loses the service life specified by the manufacturer if it is placed in the firebox itself. Permanent contact with fire destructively affects the strength characteristics of the heat exchanger. Such a neighborhood also leads to a deterioration in the conditions of combustion of fuel, a decrease in the efficiency of the furnace and the formation of a large amount of soot.
In the furnace built across the Kuznetsovsky method, the gases are moving freely.
This design is based on installation inside the caps that are vessels inverted upside down. In some models, the caps can have upper holes. The vessels are located in a different order, but the main condition for their placement is the presence of vertical vitreous cracks between them, called dry seam. Educated space width up to 3 cm Not filled with a heat insulator or a solution. As a result, the gases are moving freely by moving from one vessel-cap to another.
To make it easier to imagine the scheme of work of the Kuznetsov Kuznetsov furnace, It is necessary to visualize in your imagination a bonfire, burned outdoors. As a result of the fact that air has unlimited access to the flame, there is a slight heat from the fire, which immediately dissipates in space. You can change the nature of the air heating process around the fire, if you cover it with a cap-like vessel, for example, a large-sized cauldron. At the same time, it is important to leave the gap to keep the flame at all. As a result, the hot gas naturally rises to the bottom of the cauldron and limits the access of the air entering outside. After recovering the heat of the walls of the vessel, he, going down to the open impact, gradually cooled and goes out, and his place is taken by the next portion of the heat.
Such a self-regulating process is characterized by the possibility of dosage of outdoor air and finding preheated gas in the vessel to a complete cooling.
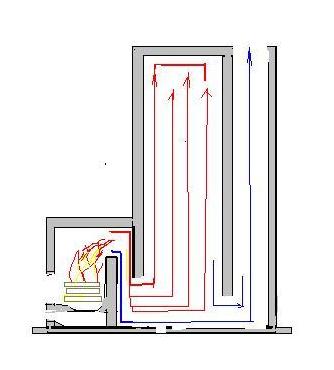
The principle described above is used in Kuznetsov furnaces for which they are applied immediately two capsconnected by dry seam. Such a non-standard design contributes to an increase in the efficiency of transmitting a sufficient amount of heat from the stove to the room where it is installed. Hot gases first fill the first cap, thereby heating its walls, and then, cooling, give way to hot flux, which rises from the furnace.
Trying to optimize this process, the inventor is still at the first stage, which begins after the fuel, decided divide the flow of gases according to their temperature. To this end, he used a partition for separating the space of the cap from the furnace. At the same time, the barrier does not reach the bottom of the vessel. As a result of this separation, hot gases are immediately rushed to the coat of the cap, and the lower temperature flow is directed along the dry seam through the slot in the partition. Thus, due to the accumulation under the heap of hot gases and the presence of a barrier in the first cap, the air comes only in the required quantity. This contributes to the complete combustion of fuel to form a certain amount of ash.
A similar process of movement of gases occurs in the cap installed above the first.
Less hot combustion products are located at the bottom of the vessel, and the hot gases strive for the severity and when cooled, they give warm on the brick walls. Then they fall down and the chimney is displayed out. Due to the equipment of the furnace with two caps in which the natural discharge and movement of gases occurs, the creation of forced thrust in the chimney pipe is not required.
Varieties of stoves
Kuznetsov's cap ovens, designed mainly to use in everyday life, are constructed to perform certain functions. Distinguish the following types of such structures:
- hob type - for cooking food;
- heating - to ensure residential premises with heat;
- bannam Kuznetsov furnaces - for heating bath;
- street the furnaces have a kind of simple barbecue or whole furnace complexes;
- for baking bread often combined with other types of furnaces;
- furnaces - fireplaces Performing aesthetic role.
Only the most common types of Kuznetsovsky ovens are named. Often, experts create combined versions of such structures that differ in their multifunctionality. Well, everyone knows, for example, a warm-cooking furnace, thanks to which you can warm up, and food is prepared.
Strengths of Kuznetsovsky stoves
More specifically, you can allocate the following advantages Kuznetsov's designs:
Independent manufacture
An example of work. Before starting the construction of Kuznetsov's cap oven, you need to clearly know, what role in the house or on the backbone it will perform. In general, more than 150 drawings of furnaces developed by Kuznetsov are represented. Everyone can choose the most acceptable option, but here we will look at the technology of building a fairly simple Kuznetsov kuznets furnace with their own hands for the heating of residential premises.
Designing the installation of a two-star kuznetsov furnace with its own hands in the first stages of the house of the house, take care that it can evenly heat all the premises of the presence. It is not entirely convenient to construct such a design in the already built completely house. Nevertheless, if such a need arose, then why not try on such a project. It is only important when determining the place of arranging the chimney, pay attention to the location of the supporting structures and beams.
The foundation for the furnace needs to be planned or together with the construction of the foundation for the house, or in the ready-made building, but should prepare for the fact that the process will be time-consuming and time consuming.
Preparatory work
Kuznetsov's cap oven with his own hands at the initial stage of construction assumes a bookmark foundation. To perform this process you need to stock bnykoy and Sovkov's shovelas well as the following materials:
- sand (3 parts), cement (1 part) and water for the preparation of the solution;
- reinforcing rod of the middle section;
- polyethylene film;
- plaquier for formworking.
Foundation arrangement work must be performed in the following order:
After the fill, the freshly prepared foundation must be left alone for 5-7 days, or even more (by 20-25). The time allotted for complete frosting and drying the base is important to provide in advance. In this case, you should not hurry. The longer the foundation feels, the higher the strength and stability of the entire structure of the furnace will be.
Implementation of basic requirements
Some moments during the construction:
- The brick from which the inner refractory shell is constructed, while heated is prone to expansion. Therefore, it is so important to ensure the independence of this part of the furnace on its entire design.
- The refractory shell inside the furnace creates installed on the edge. The drawings do not always transmit this moment, but it should be considered. When installing simple bricks from clay, freedom of action is allowed by the Master.
- Using a wire, you need to carry them out in each 3 row of bricks.
- When installing all metal devices, it is important to leave a place with regard to their possible expansion. Special gasket limit the touch of metal products to brick masonry.
- At the end of the construction of the Kuznetsov furnace, it is recommended to use a refractory composition for bricks.
- It is necessary to launch a cap oven to work gradually, starting with heating at the minimum temperature, and then increasing it.
Preparation of tools and basic materials
It is possible to thoroughly prepare for the construction of Kuznetsov furnace with their own hands only when it will be in hand bulgarianequipped with diamond discs and perforator With a nozzle in the form of a mixer. In addition, to the place of installation of the heating device you need to deliver the following materials:
Important moments
The correct coach of the Kuznetsov coaching furnace will make it possible to achieve uniform warming of the walls and ensure excellent traction.
Before you start the masonry, many masters are stelite rubberoid. However, we recommend lay a layer of foilwhich, having a reflection ability, will allow you to better save heat.
The heat transfer device depends largely on the number of departments created in it. However, for the construction of the warmest cap oven, it is important to observe the order of masonry and the conditions of volume.
What looks like.
Despite the modern abundance of a variety of heating devices and systems, brick furnaces are in no hurry to "take positions". Many owners under construction country housesWhen planning the heating system, provide for the place and for this traditional heating structure, which, with any scenario, can and heat and help with cooking.
Moreover, in this area there is continuous development, search interesting decisionsDevelopment of new models that differ in increased operational characteristics. A bright example of this is the so-called cap oven. And the most popular from the caps are the structures of the Russian engineer I.V. Kuznetsova. From the distant 1962, he has been improving the existing designs and developing new options. As a result, about 150 models appeared, which have different dimensions and are designed for heating various areas.
Kuznetsov ovens are widely popular. Therefore, to meet the requests of interested readers, the topic of this publication will be the cap oven with their own hands - video instruction + order. One of the multifunctional variants of such furnaces will be presented, which is quite accessible to independent construction Design.
Kuznetsov's cap ovens
General principles of cap oven
Furnaces developed by I.V. Kuznetsov, distinguished by high efficiency of their work. And besides, they are inherent in a very aesthetic appearance, which is able to add and harmoniously fit into the interior design performed in any style.
In the spacious design of this engineer is often called "Caps" or "Kuznetsovka". Their well-deserved popularity is explained by the fact that they are profitably different from other furnaces with their economy and increased heat transfer. Almost all Kuznetsov furnaces have an efficiency, approaching 80 ÷ 85%, while this indicator of the traditional Russian furnace does not exceed 60%, despite its larger mass and impressive linear dimensions.
Such high performance has been achieved thanks to successfully. located furnace channelsThrough which the movement of heated gas flows is carried out. Almost all previously used furnaces of furnaces have a channel tank of heated gases, which, in principle, is a long labyrinth. Hot air, moving along this labyrinth, gives warm brick and quickly cools. Without well-organized thrust in such structures, the outflow of combustion products from the heat chamber stops or stops, so smoke often begins to enter the room (for example, with strong wind on the street).
In the designs of Kuznetsov, the principles of free movement of gases are valid, so heat exchange in them is carried out in another way. The caps are the arches that are equipped inside the furnace, step-down heat the heat from hot flows. The cooled gases do not go immediately into the pipe, and slowly fall down the cap and only from there rushed into the chimney pipe, and their place in the top of the cap is occupied by new hot air flows. This is happening until the heat in the furnace is there.
This process can be traced clearly by conducting an experiment with a hot smoke, launched into an inverted glass - it first rises upRegarding the bottom of the container, heats it, and then, distributed through the walls, falls into its lower part, therefore, covering the heat all the glass of glass.

Of course, Kuznetsov furnaces have a more complex design, but the main thing is that the processes of movement of gases occur naturally. Due to this, it is possible to achieve high heat transfer and serious solid fuel economy.
Separately, you need to say about the thrust created in a similar furnace. It is formed not only due to the chimney, but for the reason that the high temperature of the gases that rise under the hood of the cap contributes to the creation of air cutting. In connection with such phenomena, the thrust in the housing furnaces is also formed in a natural way, without requiring the construction of a high chimney pipe, without which, for example, it is not necessary to do with the construction and.
Prices for the furnace
cap oven
It should be noted that the cap furnaces are divided into different types In terms of its functionality, as well as ordinary channel facilities. So, they are divided into the following "classes":
- Heating. Designed only for the heating of premises. This option, by the way, is selected less frequently, since the owners of private houses are usually preferred by multifunctional structures, because they are more practical.
- having a single or two-component cooking hob. Such a design will work both for heating and for heating water, preparation or heating of food. In short, she will help the owners of the house in any situation.
- , the purpose of which is clear from the name.
- Multifunctional structures that include not only the cooking plate, but also a brass cabinet, a drying chamber, a water-heating tank or contour, as well as heated bed.
And if you select a stove with a wide input to the furnace and install a glazed door in it, the furnace can be used in the role of the fireplace

As you can see, the assortment of cap ovens is quite large. There is an opportunity to choose the option that is ideal for both functionality, and on its size, and in thermal power indicators for a specific area of \u200b\u200bthe house.
Explicit advantages of cap oven
The advantages of the cap designs of furnaces include the following points:
- During the construction of cap facilities, much less bricks is required and, as a result, the solution for its masonry. Yes, and the masonry itself is much simpler, since it does not have to withdraw long labyrinths for moving gas flows.
- Due to the smaller amount of material used, the furnace is easier, and this, in turn, means that the foundation for it may not be so massive as under the channel furnace.
- The burning in this design occurs more intensively, therefore, solid particles remain in combustion products. As a positive consequence, the plaque on the chimney walls will be much smaller, and therefore it can be cleaned less often.
- As mentioned above, part of the chimney, towering over the roof, can be less than that of channel structures, where the pipe should have a height of at least five meters.
- Unpretentiousness of the cap design in service. The presence of narrow channels in channel furnaces requires their frequent cleaners, as they quickly overgrow soot. Their narrowing significantly reduces the craving, which can lead to the opposite course of combustion products that begin to enter the premises.
- In the cap of this design, a sufficient space is formed to install water heat exchangers. Heated water can be used for household needs Or put into the heating circuit, which will bring heat to other rooms at home.
- There is a quick heating of the design, which means that heated premises.
- For such furnaces, the uniform warming of all walls and their high heat transfer are characteristic.

Construction and principle of functioning of the cap oven
Kuznetsov furnaces can be single or two-skate. The second option is more common, since its effectiveness is significantly higher. SAMI simple scheme Such an oven is presented in the pattern scheme.

- The furnace is located in the front of the furnace. The diagram shows the output of the heated air - smooth red arrow aimed up.
- Next, the heated air from the furnace enters the lower cap separated from the fifthnik with a non-firm partition. Entering the bottom cap, hot air rises to its ceiling. Then, cooling, gradually drops to its bottom, where below, in the rear wall of the cap, there is a hole leading to the channel connecting the bottom cap with the top.
- Passing through the connecting channel, still warm air rises again to the ceiling, but already the top cap. There, hot gases are cooled and begin to fall to the overlap separating the lower and top cap. Running down and passing along the floor, hot air falls into the hole, the guide has already been very strongly cooled gases into the chimney.
- In the upper front of the fuel chamber, a valve is installed, called "Winter-Summer". It is designed to direct hot air from the furnace directly into the chimney pipe - it is necessary in the summer when only cooking plate. If this, and also located above (overlapping chimney), the valves are in open state, combustion products, finding an easy way out, will not go into the pipe through the caps, and it will go directly into it. In the winter period, the lower valve closes, and the upper opens halfway, and the hot air, passing the entire design of the furnace, heats its walls and, already cooled, who has gone to heat, goes into the pipe.
If it is planned to be installed in the cap design, it is best to install it in the top of the bottom cap. This placement place will not affect the combustion regime, as well as the thermal equilibrium of the furnace.
Calculation of the cap
For the furnace justified hopes imposed on it, its parameters must comply with the actors (or several rooms) to be heated. For proper selection The design of the furnace, the first thing you need to do is to determine the area of \u200b\u200bthe room that is planned to be missed, as well as calculate possible heat loss. The calculation of the walls of the furnace participating in direct heat exchange are also taken into account, and taking into account a number of important nuances.
These calculations are quite cumbersome, and require to carry out some experiences and some knowledge. Therefore, it is often based on the common "constants": for a well warmed house, with a conventional firebox, it is possible to proceed from the 0.5 kW per square meter of the room. But in case of severe frosts, it is better to lay and the operational reserve - to navigate the value of 0.76 kW / m².
If there is no experience in such calculations, it is recommended to use ready projectsin which the developers already indicate the power of the device and the area to which this furnace is calculated. Moreover, today there is a large number of models having different linear dimensions and intended for heating any reasonable areas.
And for the inquisitive readers who still wish to conduct an independent calculation of the necessary furnace, a special article will be published on our portal with a detailed presentation of the calculation algorithm and the necessary reference and table data.
Erecting the Cap Furnace
Preparatory work before masonry furnace
In the list preparatory work You can enable all the actions that will be listed and described in this section.
Selection of the model and place to install the furnace in the house
Before choosing the design and size of the furnace, you need to determine the place of its installation in the house and the approximate area that can be highlighted below it.
At the same time, it is necessary to take into account the location of the chimney pipe, as it should pass through attic overlap Between his beams, at a distance of them, at least 150 mm. It is taken into account, of course, the location stropile legs Roofs - there are the same requirements.
Prices for bricks
Foundation for installation of the furnace
Further, to build a furnace, you will need to prepare a reliable foundation. If the furnace is built together with the house, then it must be remembered that the foundation of the building should be separated from the base of the furnace structure. Otherwise, due to a possible shrinkage, overcast of one foundation can pull the other design.

In the event that the furnace is decided to build in the already built house with a wooden floor, a part of the boarding coating will have to be dismantled. The foundation should be wider and longer than the base of the furnace by 50 ÷ 80 mm in each of the parties. If the house is built on slab concrete foundation, and the design of the furnace is relatively small, it can be installed on general foundation at home. But this is usually stipulated by the developers of the heating structure.

To improve the foundation, it will be necessary to dug the pit, whose depth will depend from distance from Paul before the soil. In total, the height of the foundation (taking into account all the layer of construction) should be 500 ÷ 700 mm. If the floor is high above the soil, then the height of this distance needs to be constructed, as the foundation should go to the height of clean floor.
On the walls of the formwork, it will be necessary to fix the waterproofing material, since it will be fully filled with concrete solution. The layer layer presented above is suitable for the foundation completely, except for the upper concrete layer located in the ground, which will serve as a natural formwork.
If the foundation is almost completely recessed into the ground, then after installing the waterproofing along its walls, a sand pillow 150 mm is falling asleep to the bottom of the bottom, which needs to be well sealing. From above of sand, a broken brick is stacked, a large crushed stone and stones - they need them, too, as far as possible to catch. This layer should be 150 ÷ \u200b\u200b200 mm.
Prices for rubble

On top of the stone, the crushed stone of the middle faction falls asleep. After that, a formwork for filling into it the concrete layer, which is recommended to reinforce, putting a metal grid with cells with 50 × 50 mm into a solution. Dynamic loads are not assumed, so it is possible to completely apply concrete with the varying strength of M 200 (exemplary proportions of the components: Cement PC 400 - 1 part, construction sand - 1.9 parts, gravel or fine crushed stone - 3.6 parts).
For determining accurate number The ingredients needed to prepare the desired amount of concrete under the fill of the furnace foundation can use the calculator below.


