How to make a wooden box for tools. Plywood drawer do it yourself: drawing, tools and features of the manufacturer with a lid with their own hands
The thing is universal and necessary in everyday life. And the manufacture of wooden boxes does not require special skills and efforts. Consider how you can do wooden drawers do it yourself.
Fit wooden boxes for storing vegetables, fruits, various household trifles, tools, for planting colors.
Why exactly the tree is best Material For making boxes?
First, it is completely natural and safe material, it is great for storing food, vegetables and fruits.
Secondly, wood boxes are durable and durable. Wood breathable material, because everything you will be stored in such a box will be ventilated, and moisture will not be formed.
Thirdly, wooden boxes Simple in manufacture, and materials for them will probably have each. After all, any, even not very high-quality wood suitable for the manufacture of such boxes.
What materials do you need to make wooden storage boxes:

- Wooden boards, and the plywood or fiberboard is suitable. The thickness of the board must be at least 2 centimeters.
- Saws and nails
- Sandpaper
- Pencil and ruler (roulette) for marking
- Small saw or electrolybiz.
- Varnish or paint for wood, staining and brush
- Reiki
- Screwdriver
Production of wooden boxes with their own hands
Making boxes depending on the assignment will be somewhat different. Consider manufacturing technology different types Wooden boxes of drawers.
Wooden drawers for flowers do it yourself

1. The first thing to be done is to determine the size of the future box. Usually, flower boxes have not very high walls and an oblong shape for planting two or more plants. Plants can be planted straight into the box or put in a box of vases with flowers. In the box of plants it is easier to transport and move around the house or garden.
2. In order to make wooden boxes, it is necessary to cut two boards from the boards with a height of 20 centimeters, and the length you determine by yourself, depending on the number of plants or vases. It will be side walls. Then cut the two strips of the same height as the first two, but less long. Long here is also defined at your discretion, but it should not be less than the width of the ranges that you want to put in the box. These will be transverse walls.
3. The last cut the bar, which will serve as the bottom of our box.
5. You can start assembling a wooden drawer for flowers. At the bottom of the side walls and in the appropriate bottoms, we drill holes for the screws, then, connecting the walls with the bottom tightly tighten. You can proceed easier and connect the walls and bottom with long carnations. At the same time, the connected edges can be wedged with glue for wood. The corners of the box should also be strengthened.
6. Next, you can decorate the box to your taste and use to be appointed. If wooden boxes for flowers you will use on the street, it will not be superfluous to treat the tree with various protective compositions.

Different household trifles or tools can be of different shapes and size.
Make such a drawer with your own hands simpler simple:
1. From wooden boards Or a sheet of plywood needs to be cut four square or rectangular planks, they will serve as the walls of the future box. Their form and size depends on what the box should turn out in the end.
2. After the drawer walls are ready, you can go to the assembly. For this we need glue, nails, hammer, wooden planks to strengthen corners. To begin with, as in the case of a drawer for flowers, fasten the walls and the bottom. To do this, we miss the ends of the walls with glue and attach to the bottom, for a larger fortress, drive several carnations around the perimeter.
3. That the drawer would be durable and served you for a long time, you need to additionally strengthen the corners with wooden planks. We nail them with small carnations from two sides of the angle.
4. Last stage Manufacturing a wooden box is the cover. The easiest way is to climb the last of the four planks that we cut out at the beginning of wooden planks around the perimeter. If you want the cover to be attached to the box itself, you can do it with a metal rings. Just make holes of the required diameter on the lid and on the box itself and connect them with a wooden ring.

An ordinary wooden storage box, which we already considered are suitable for storage of vegetables. It can store vegetables that do not tolerate the effects of light. And for those vegetables and fruits that the sun are not afraid and, on the contrary, require additional ventilation a box with lattice walls. Such a box is also just done with your own hands. To do this, it is necessary to make a frame of wooden bars, and to secure the crate of wooden planks.
Irina Zheleznyak, Sobcor Internet editions "Atmwood. Wood-Industrial Bulletin"
How useful information to be useful for you?
The rooting of several dozen cuttings is more convenient to produce in a portable container - spring soil warms up faster than in a cold greenhouse, and in the fall seedlings easily move to the place of wintering. Make a drawer with your own hands is easy: there will be a little time, and suitable trimming of lumber will be found in every farm.
In a wooden box, there must be enough space for the normal growth of cuttings for 4-6 months to the autumn transplant or even 1-2 years, if it requires a rooting agrotection. Optimal dimensions Box: 300x350x750 mm (height / width / length). In a less deep container, the cover will interfere with the lid, and it is even more difficult to move a cumbersome design.
Preparation for work
For the construction of a homemade box, you will need a tool:
- Handman hand,
- plates,
- a hammer,
- Drill,
- drills on wood,
- furniture stapler,
- knife,
- Roulette,
- Galnik,
- Pencil,
- Brush.

Pine wood is suitable for work without traces of posting:
1. Boards with a thickness of 16-25 mm.
2. Brucks with a cross section of 30x50 mm.
3. Thin rails 10x30 mm.
Riding the boards, rebel the sword-bored and twisted - with high humidity they will become even worse.
Consumables:
1. Nails 50x2.5 - 28 pcs.
2. Nails 60x3.0 - 20 pcs.
3. Carnations Furniture decorative - 10 pcs.
4. Antiseptic.

The lid of the homemade box can be a piece of polyethylene film or white nonwoven material with dimensions of 80x60 cm.
Production of details
Drawing drawer elements for shilling

Wooden details: 1 - longitudinal bar for sides and bottom; 2 - insertion; 3 - slats for the end walls; 4 - Reiki; 5 - handles; 6 - connecting bars.
Using the pencil, the kitchen and roulette, mark the blanks according to the drawings, cutting off the cracking and plumbing ends.

Split boards in size and process the surface with the plane. Cover parts 2-3 layers of protective impregnation, following instructions on the package.
Build the box with your own hands
Fold two short boys into the shield, spend 30 mm from the cut parallel to it. Repeat marking from the opposite side. Attach connecting lines along the lines. Run the details of nails and bend with back side Speakers.

Take two longitudinal planks and "hug" around the edges of the cloves. Collect the workpiece of the letter "P", push the ends and score nails.

Turn the design and secure the side planks of the opposite side. Try to blow the nails vertically to avoid the exit of the island from the wood.

Send the details of the bottom, placing the narrow bar in the middle and leaving the lumens between the planks in 2-3 mm for the possibility of expanding the wooden elements during swelling. Attach the handles with nails closer to the top of the box.

Drill two rows of drainage holes in the bottom of the box.

Make an improvised lid for the box. Obtain one rack with a film and secure the material with brackets.

Wrap a second rack with the opposite edge of polyethylene, put a third bar on withdraw and lift with small cloves.

Attach the canvas on the wall of the box at three points, pre-extended guide holes in the rails to prevent the split of thin wood.

When using polyethylene, make a knife with a knife for dragging water, otherwise the film will get into heavy rain.

Put a fertile soil in your hands made with your own hands and put the harvested cuttings.

Placing a container on the soil surface, put the bricks under the bottom. After determining the seedlings in "School", free the drawer from the ground, clean the walls and dry the wood.
Very often when I pass by fruit bazaars after the trading day, I see a lot of discarded boxes made of beech rails. There are so many of them, and the tree is valuable and decorative, and I have a question: what is interesting and useful can be made from these rails with your own hands. And you can make for example, here is such a box for linen, which in addition to its functionality is an interior decoration. Several boxes as if casually delivered to each other with beautiful things inside will create a unique style and comfort in your bedroom.
The box itself is going pretty simply from wooden rails and bars:

The walls of the box are done like this: the rails are born on two bar. The edges are aligned so that any rake does not go beyond the limits of BROs:

Thus, they pin two wallpapers. We associate their skirts:

The angle is not on the lining, but we leave a small gap and slightly spin the ends in order not to hit sharp corners:

Thin plywood will go to the bottom. It is either nailed with nails, or we glue the PVA (one can both).

When the box is ready, drill holes for ventilation, as such boxes are put on each other:

For the decor of our laundry box, you can use different variants impregnates and tinting your taste:

Handles can be made from ordinary rope, it is very decorative:

Here is another piece of furniture made with your own hands adorns your bedroom.
By the same principle, by the way, you can make drawers for toys in the nursery.
Please note this post:
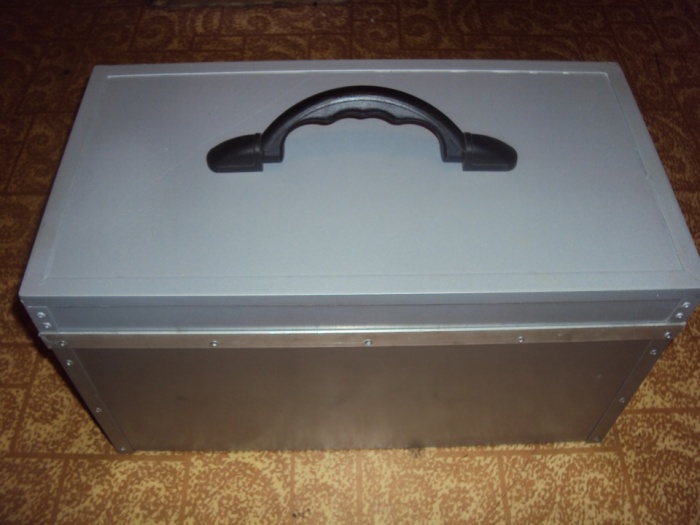
A good host always under hand will be a whole arsenal of instruments: from nails and screws to passatizes, levels and a set of screwdrivers, not to mention a drill, a perforator and a screwdriver. Very often simple household repairs It does not begin due to the fact that the Master cannot find in the apartment or garage all the tools you need. That this does not happen, the entire working toolkit must be stored in a specially designated place - the toolbox.
What are the tools for toolboxes, what requirements they must answer, and how to make a box for tools with your own hands - about this article.
Varieties of toolboxes
In fact, the tool box is a box with a lid or without, divided into several different in size and shape of compartments. Small drawers are designed to store fasteners, drill, tips or other small parts can be broken in them. As a rule, such boxes are divided into several compartments, each of which has a separate lid. Such boxes are easily transferred, because they weigh a little.

More overall cases are necessary for storing and transporting a large tool, such as hammers, saws, drills or electrolovka. Completely huge boxes will be needed for the content of perforators, levels or chenos in them. Such toolboxes are often made on wheels so that they can be moved and transported.
Professional toolboxes may differ depending on the qualification of the wizard: so the plumbing needs one set of equipment, and the car mechanic is completely different. You can find such boxes in building supermarkets or in specialized stores, often they are sold complete with tools themselves.

Cases are divided into several categories. Not only their size is taken into account here, but also the design, as well as material manufacturing. Constructively, it can be:
- Open boxes with a handle for large tools and facilitate their transfer from one place to another.
- Multi-tiered boxes with a variety of small and large compartments for comprehensive storage of working parts and their lightweight transportation. Such a box can be thrown into the trunk of cars or move in the hands.
- Compact cases with ergonomic handle containing the entire tool required for small repair or a trip to the cottage.
- Cheats consisting of multiple drawing compartments are usually used inpatient at work.
- Belts with tools are needed to those who work at height or in hard-to-reach places.
- Trolleys - peculiar boxes for tools on wheels, characterized by large sizes. On such devices, very overall equipment, such as welding machines, drills.

Important! When choosing a box for your tools, it is better to give preference to multifunctional boxes, where each part is assigned to your place, and small compartments are closed with covers. Otherwise, all tools risk mixed in one pile during transportation.
What makes toolboxes make
Cases and boxes can be performed from different materialsBut the main requirement for them is one - boxes should be light, since the tools themselves weigh quite a lot. There are some more nuances that you need to know those who buys a case for their tool arsenal:
- The bottom of the box should be as thick as possible, since all the content of the content presses it.
- The full box when picked up should not be deformed - the walls remain perpendicular to the lid and the bottom. If the walls begged, it suggests that the case strength is insufficient for such a set of components.
- Well, if the box is fire-resistant, then the expensive toolkit will meet even during the fire.
- If the boxes are gaps, dust and characteristic of construction shoes will penetrate inside the box and pollute the tools. And in this case, the content threatens oxidation and rust due to increased humidity.
- Durability is an important factor, because it is worth a professional boxing quite a lot, and the load on it from metal components will be essential.

Today, the most popular materials for such boxes are considered:

Attention! All materials must comply with special standards, because if the box breaks at the most inopportune moment, all heavy tools will fall on their feet (or on the head) an unfortunate owner.
If a metallic tool box or wooden can still be made with their own hands, then plastic boxes really just buy.
How to make a tool box with your own hands
If the owner has decided to make a box for its inventory independently, first of all, it needs to decide on the size, and choose the boxing design.

To do this, it is necessary to inspect all your tools, measuring the most overall elements and taking into account the smallers (bolts, wrenches, washers, and so on). For these parameters, the size of the container itself and the internal compartments is calculated.
Construction of drawers for tools
Speaking about the design of boxes, they mean not their form, but the method of opening and the presence of additional sections. Standard are the following structures:
- Case - a portable box of a rectangular shape with a handle. As a rule, cases are divided into a variety of departments, have removable partitions that allow themselves to separate the space inside the box. The mass and dimensions of such cases are usually small.
- The container is a larger box for a variety of tools. As a rule, it has a trapezoid form with a rectangular bottom. Inside this box, there are also partitions, and there may be separate boxes of smaller size (folded by the type of matryoshki). The sections of such a container can be extended to the top and to the parties, forming a whole "troll" with tools and fasteners. Large drawers for tools of this type can be equipped with wheels, which is very convenient and practical.
- Multiboxes are located vertically and drawers in them are put forward on the guides, as in a conventional dresser.
With your own hands, it will be easiest to make a case for tools, because there are no complex mechanisms and hinges in this design, with which additional sections are leaving.

Important! Although the container with drawers folded in several floors is quite realistic to build with their own hands. To do this, each pair of "floors" should be made up with metal brackets, providing mobility elements (as in the figure below).

Improving the idea of \u200b\u200blife
If we talk about the material for independent manufacture Box, then, of course, the easiest way to work with a tree. For the first experience, it is better to choose inexpensive wood - for boxing it is quite suitable for a shuttle boards of coniferous rocks.

The whole process of making a drawer for tools consists of several stages:
- Make up the drawing of the future boxing. To do this, use the usual Watman and a ruler or a professional program of type "AutoCAD".
- The resulting drawing is transferred to wood with simple pencil or marker.
- Cut parts by contour using an electrolovka or saw.
- Proceed with antiseptic agents or veneers to prevent its rotting and make "inedible" for insects and rodents.
- The box is going. Now all the details must be combined into a single design, according to the drawing. To do this, it is best to use carpentry glue that is applied to the ends of the parts and press them to each other for a few seconds.
- It is better to additionally fix the elements of the box with self-drawers, following the tree not cracked when screwing fasteners.
- Install the cover using conventional loops or other fixture corresponding to the type of box opening.
- The lid is equipped with a handle for transferring and transporting boxes with tools.
- Inside the box are placed on the sectors, given the scheme and drawing. Extra partitions cut out from the board and fasten them into place with glue and screws.
- The walls, bottom and lid of the drawer are grinding with several types of grinding paper, then stain or coated with several layers of varnish.
The box is ready to use, it remains only to fill all its compartments with appropriate tools and fasteners.
The easiest drawer for instruments
Joiner's newcomers are offered more simple design Boxing for tools is a regular box with a handle, but without a lid. The advantage of this box is that it is suitable for tools. various sizeIf you wish, you can put even a water level or a perforator here, and you can make a miniature box for the "apartment" wizard.
It consists of such a box of just six parts:
- two long side elements;
- two short sides, the height of which should exceed the height of long sideways, as the handle will be attached here;
- the bottoms that should be made from a solid piece of wood, since it is precisely the bottom of the load from the weight of the tools;
- the handles whose role can play a bar, a plank or a circular section - the selection depends on the size of the box and the intended mass of its contents.
If desired, the design can be supplemented with internal partitions or complicate it with compartments with covers or doors.

All elements are collected in one design, fixed with joinery glue, then additionally fastened with self-draws. Special attention should be paid to the folding knob - it should be durable and reliable.
You can independently assemble the tool box not only from the boards, depending on the arsenal of the toolkit, the plywood, chipboard, OSB, galvanized metal or sheet aluminum can be used.

There is nothing complicated in the manufacture of such a box, and the advantages of the product are obvious: the tools and fasteners will be in a certain place, at any moment it is enough to get a box from a storage room or a garage and perform the necessary repairs.
The main advantage of the color drawer for flowers from wood is the variability of solutions: it can be done with its own hands from the residues of building materials, while the dimensions and the form will be determined only by specific needs. Such compositions are extremely cheap, and with a skillful approach, they are not inferior to other decorative elements of landscape design.
The key advantage of the decision is extremely low cost, also pleases the possibility of creating a unique composition, fully relevant to the interior or landscape design. The special structure of wood helps maintain optimal microclimate for plants, with a skillful approach you can use the natural beauty and fiber material.
All disadvantages of such boxes are due to the exposure to wood with rotting and biological striking. If you want to plant plants directly into the container, you need to take care of protecting boards from contact with moisture and soil substrate. When applied on the street, the tree is relatively short-lived, so needs protective impregnations and paints and varnish.
What materials and tools will be needed for manufacture?
To perform your own hand drawer for flowers from wood, you need to prepare the following elementary tools:
- electrolovka or saw;
- grinding machine;
- forceps;
- roulette with a square;
- plane;
- screwdriver;
- a hammer.
The design of the future box is selected in accordance with the present equipment: if all manipulations are done manually, it is better to prefer the simplest form. The presence of power tools allows, in turn, to implement any design ideas.
As basic materials, you can use:
- rake and boards with a thickness of at least 1 cm;
- uPP trimming;
- plywood sheets, including re-use.
Subsequent processing of surfaces will be carried out using an antiseptic, a variety of paints and varnishes, simulators. Nails, waterproof glue, screws are suitable for connecting parts.

Simple street model manufacturing technology
In the most promalistic work, work is performed according to the following steps:
- The boards whose width varies within 15-20 cm, cut on the workpiece. Three long pieces will need to perform the bottoms and sides, the ends will be decorated with two short (here you need to leave the thickness points from three sides.
- The boards are overshadowed by a planer, they can be painted with a coarse sandpaper, you need to carefully treat sections.
- At the edges of the blanks, thin holes are performed: in lateral parts - 3, in the end - 4.
- With the help of screws, first fix the side and the bottom, then attach end blanks.
- The collected design is grinding with small emery.
All surfaces need to be thoroughly impregnated with an antiseptic, outside can be lacquered, a morone or enamel.

As basic material, used used trucks, it is a very cheap raw material, convenient to processing. Instructions for assembling a street drawer for flowers:
- the pallet must be disassembled with the help of a nail, to extract the fasteners of the nippers;
- rejected rotten and damaged planks;
- an exemplary sketch of the box is drawn up with an indication of the planned dimensions;
- in accordance with notes, wood is cut down, covered using sandwich;
- the assembly begins with fixing the lower base and the upper frame;
- side faces are attached to the two parts of the container with nails;
- the joints are masked by narrow decorative straps.
Here also the final stage is the application of protective and paints and varnishes.
If necessary, you can navigate the legs made of bars to the container, made from them, with their help, it is provided with a complete ventilation of the bottom face. Flowers can be placed inside in pots or planted directly into the container. In the second case, it is necessary to store the box with a film and equip it with drainage holes.

Options for decorative design
In great demand, miniature flowers for flowers are used in greater demand, in which the decor is directly vegetation: hanging stems and long leaves form a single composition in which greens prevail.
The craftsmen decorate the walls of wood with a sleeper (that is, what remained after work), thin skips on the manner of the stakenik and curious thick trimming of branches, purified from the bark and varnish coated.
Those who own the skills of figure threads on the tree will not be difficult to perform beautiful color tanks imitating the shape of the toolboxes, baskets, ships, the subject of the interior. There are no restrictions - you can draw inspiration in the surrounding landscape design.

If it is planned to use decorative boxes in the room, to create a single stylistic composition worth paying attention to the possibilities of decoupage. Paints, brushes, glue and special napkins will help to easily transform any capacity, create an interior design element based on it.
Those who do not like to overload perception, one can recommend the monochrome design of the tree - for example, to paint it into the elevated gray, lilac, blue or lightweight shade. Such pastel notes look like juicy, but at the same time restrained.
Products can be outdoor and suspended. Wide distribution was obtained by variations installed at high legs: they allow you to care for plants without getting squatting, which significantly simplifies all manipulations. For the assembly of wall models, special holders will be needed: choosing them, it is necessary to take into account the potential weight filled with soil and colors of the structure.
In the fashion, the boxes hanging outside the window are fixed on the outside of the window sill with the help of special strong loop-shaped fasteners. Particular products polished or covered with verses are particularly spectacular.


