Do-it-yourself metal tile laying: useful recommendations
-
In order for the roof to please the eye with its attractive appearance, and not to depress with unpleasant smudges on the ceiling, and to fully retain heat, it must be arranged according to the necessary technology. At the same time, each roofing material has its own “character”, its own installation specifics.
Laying requires not only certain skills, but also knowledge. This is the only way to guarantee long-term operation of the roof. On the network you can find a lot of materials on the topic "Technology for laying metal tiles", videos, articles and more.
As with any other material, when building such a roof, you must follow a specific sequence of actions:
However, we will dwell in more detail on the coverage of such issues as the rules, the laying procedure, and the fastening of metal tile sheets.
Laying waterproofing
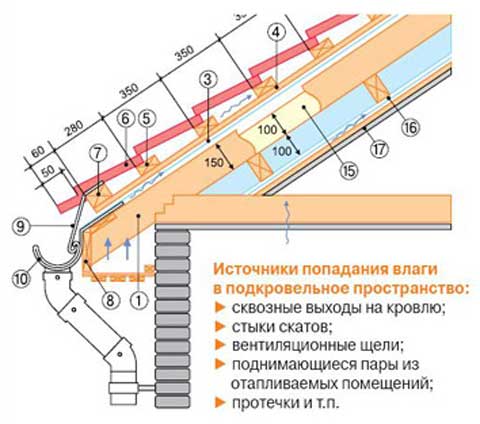
Waterproofing protects the space under the roof from moisture and dirt, but at the same time does not delay the passage of water vapor into the upper ventilation gap. under the metal tile use one of three options:
- classical, with the exception of bituminous. In this case, it is necessary to provide double-circuit ventilation: waterproofing - insulation and waterproofing - roofing material. The ventilation gap in both circuits is 3–5 cm.
- superdiffusion membrane, for which single-circuit ventilation is sufficient: the membrane is a material for roofing. The membrane is spread directly over the insulation, the ventilation gap is the same.
- anti-condensation materials have the same conditions of use as classical waterproofing, however, unlike the latter, their fleecy structure completely absorbs moisture and prevents it from falling off in the form of drops. When aired, it dries quickly.
Laying waterproofing is also necessary when arranging a cold attic. Any temperature difference, even small, in the attic and on the street becomes on metal profiles. By laying an anti-condensate film directly under the sheets of roofing material no closer than 5 cm to it, you can equalize such a temperature difference.
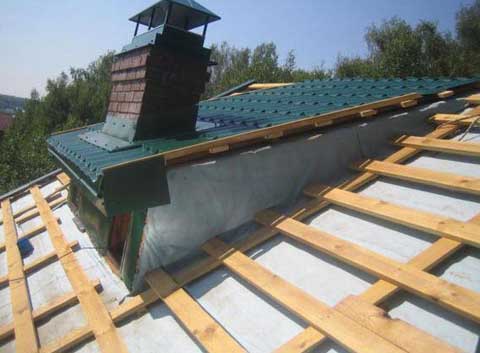
As you can see, the presence of a ventilation gap between the roof and the installed waterproofing is mandatory, so it is unnecessary to talk about whether a counter-lattice is needed for a metal tile. Immediately after the waterproofing material is fixed on the rafters, the packing of the counter-lattice begins, which is closely connected with the device of the base for the roofing material -.
The purlins are stuffed on the bars of the counter-lattice.Lathing installation
An important structural element that is required when laying metal tiles on the roof is the crate. It is made from bars with a section of 5 by 5 cm or edged boards with dimensions of 3.2 or 5.0 by 10 cm.
The lathing is carried out in a direction parallel to the eaves, according to the following technology.
The initial obreshetina differs from others in its cross section - it is greater than the height of the profile, since it is placed under the top of its step.
The step of the battens, except for the distance between the two initial elements, is 3.5 cm. These battens are 70 mm closer from one another.
During the installation of the battens, it is necessary to foresee the possibility of attaching additional roofing elements, ridge, eaves, parts, etc., and prepare the appropriate places.
Especially carefully you need to prepare the place of fastening of the ridge of the metal tile.
Above it, on top of the rafters on both sides of the ridge strip, two more boards are nailed, leaving a distance of 5 cm between them.
In the valleys, around the chimney and other similar structures, a continuous crate is made.
The technology of laying metal tiles on the roof
Consider the scheme of laying metal tiles on a roof with a rectangular, triangular and trapezoidal slope shape.
Do-it-yourself high-quality laying is possible only if you know exactly how to carry out the work correctly.
Basic installation rules
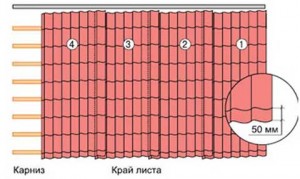
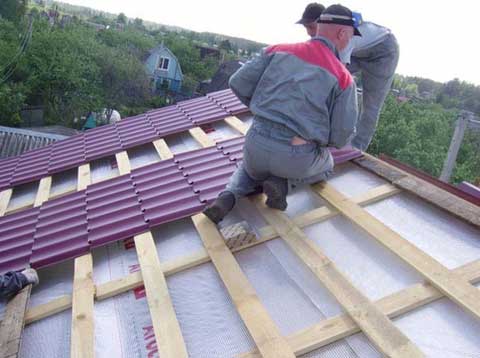
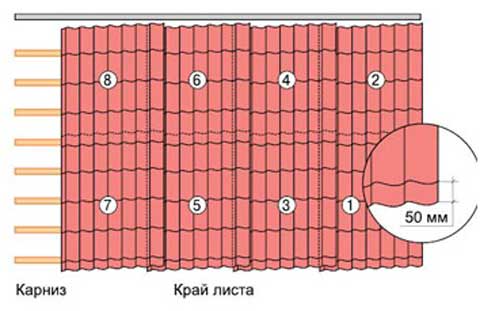
- The roof covering must be protected from strong gusts of side wind, so the sheets are installed with an overlap of waves. At the same time, self-tapping screws are fixed into the crest of the wave, placing them one to one and a half centimeters lower than the stamping line is located on the sheet from above. First tighten the joints vertically.
- The sheets are laid in rows so that the joining line runs along the crate. In this case, both waves are fixed.
- Mounting profiles on the eaves is possible in two ways: water flows from them into the drain tray or enters the drain through the cornice strip.
With the first method, the coating sheet protrudes beyond the line of the eaves, and the crate board should be one and a half centimeters narrower than the eaves. The fastening points of the metal tile should be located higher than the stamping line by about six to seven centimeters.
If a stepped cornice is provided for the roof or if its geometry is violated, it is recommended to choose the second option for laying sheets.
- The support for the ridge board is the uppermost purlin. To get a ventilation gap, the ridge board must be taken thicker than the crate board, as in the case of the eaves, by 10-15 mm. It is fixed to the crests of the waves with a metal tile fastening step of 8 cm. End strips are also fastened with a similar step.
- The average consumption of self-tapping screws is 9 pcs/sq. m.
Design options
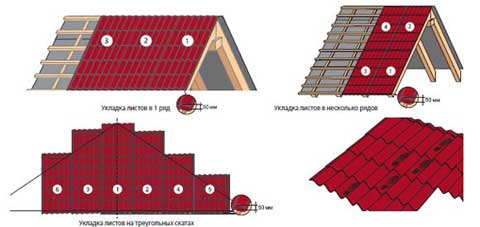
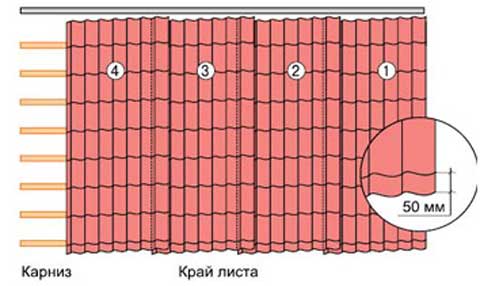
The profiles will dock correctly if, for a start, the metal tile is “grabbed” after 1–2 rows and then the docking row is finally fixed.
 According to another technology, the upper sheets are joined to the joined bottom sheets. The junction of the four profiles is thickened. To correct this shortcoming, either the capillary groove is slightly straightened, it is located under the stamping line, or part of the corner is simply cut off.
If the triangular slope overlaps, then the beginning
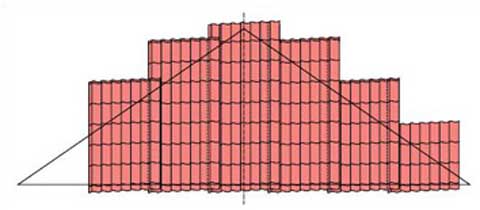 mounting becomes its middle. Having performed the same marking of the slope and profile, the center lines are combined, then the profile is fixed near the ridge. Subsequent sheets are mounted in the direction of the ends according to one of the previous technologies.
Scheme of installation of metal tiles with hidden fastening
Among the modern models of metal tiles, there are samples for which a hidden fastening is assumed using screws with a press washer. Considering that the hardware is not visible on the front surface of the coating, in this case, galvanized self-tapping screws of any color are also suitable, including the cheapest ones - unpainted.
The main difference of this installation method is the absence of through holes on the roofing, since the screws are screwed into the grooves specially provided for this. As for the connection of individual sheets, the principle of engagement with the mounting ledge is used to connect them, and the self-tapping screws in this case are hidden by the next sheet. This type of profile provides greater strength and tightness of the roof covering.
Additional information on the topic can be found by looking at the installation of metal tiles in the video instructions.