How to put a warm floor under laminate with your own hands. How to choose infrared warm floor under laminate and carry out installation? Installation of film floor under laminate
The most reasonable option for the furnace of the warm floor, with the subsequent laying of the laminate is electrical, in particular the infrared film warm floor. Due to the fact that the principle of its work consists in radiation in the infrared range, as a result, the surfaces of the surrounding objects occur, and not the air convection up. Therefore, IR Paul has proven itself as heating base under laminate.
Laminate is moisture-resistant, resistant to mechanical damage material, with a reasonable price / quality ratio. Laminated flooring by 90% consists of chopped wood connected by various adhesive compositions.
Laying of electric heat under laminate for many causes doubt. After all, wood is distinguished by the ability to strip at high temperature, cracking when it is dropped, and formaldehyde, which as a binder component is included in the laminate board begins intensive selection.
Film infrared warm floor under laminate - Benefits
- uniform thermal radiation - makes it possible to warm the laminate over the entire surface;
- economic power consumption. Saves up to 30% of the means compared to other floor heating systems;
- there is no risk of damage to the integrity of the laminated coating, because There is no need to heat the system to high temperatures. Thanks to the use of infrared radiation, first of all, objects in the room are heated, and not air;
- no need to perform "wet" works. Laying of laminate does not require pouring screed;
- the ability to use any type of substrate;
- availability. In large shopping pavilions there are demonstration models, where you can visually (visually and tactile) to evaluate the operation of the system (available in large cities Moscow, St. Petersburg, etc.) or order in the online store, based on the specifications and reviews of the owners.
Laminate for film warm floor - what better to choose
Despite the fact that manufacturers and masters are recommended to lay a film warm floor under the laminate should not be discounted and the peculiarities of the laminate itself.
In particular, choosing a laminate for infrared warm sex needs not to pay attention not to several factors:
- laminate marking. Most manufacturers quickly responded to changing market trends and included in their range of laminate designed specifically for installation on a warm floor. It is possible to use laminate for a warm floor will be designated on the package (the corresponding icon on the label). Moreover, some manufacturers indicate the limiting heating temperature;
Note. The maximum temperature to which you can heat the laminated floor - 27 ° C.
- structure (density) of laminate. From how much the "loose" floor structure depends on the ability of lamellae to carry out heat. The more denser the laminate - the greater the value of the thermal resistance indicator. In practice, this means that the system of the warm floor will warm the lamella, and not the surface of the surrounding items;
- laminate thickness. All other things being equal, the thicker of the lamel, the slower it will pass heat;
- formaldehyde content. This component is located as part of MDF, which serves as the basis for the laminate board. At a temperature of 20-26 ° C, formaldehyde is allocated in normal mode. Those. According to this indicator, most of the floors refers to the E1 class. However, when lamellae is heated, the selection of formaldehyde is activated, so you need to pay attention to this indicator. It should also be borne in mind that the intensive selection of formaldehyde begins when heated over 27 ° C;
- cost of laminate. Many reviews contain no complaints of the system with a warm floor, and the need to sharpen the laminate re-due to saving on the material;
- substrate. Laminate installation technology provides for the use of the substrate. The setting of the substrate will reduce the pressure on the lock connection of the bands from movement along the lamellas. Due to the fact that the substrate lays down not under the floor of the floor, but on it, to the choice of film you need to approach also responsibly.
Which substrate can be used for laying on a warm film floor
- technical cork;
- liquid composite system;
- extruded polystyrene foam;
- polystyrene substrate;
- material with reflective surface.
Note. It is unacceptable to use foil material as a substrate (aluminum foil, podophole).
Installation of infrared film warm floor under laminate with your own hands
Stacking technology implies the execution of several consecutive steps.
Note. For autonomous heating (main source of heating) you need to mount a film floor by 70% of the room area. With additional - by 40%. It takes into account that under the furniture, heavy and low film items do not fit to eliminate its overheating.
Note. When laying the system, infrared warm floor above the basement, soil or garage, the waterproofing film should be laid on the prepared base.
Note. The sensor wire can be laid on top of the insulation, and you can cut the hole in its thickness, and place the sensor wire in the corrugation. So, if necessary, you can repair the wire or sensor.
Note. The number of thermostators depends on the power of the system. If the installation of the system is performed on a significant area, it is reasonable to use several thermostators.
Installation of infrared film warm floor under laminate - video
In order for the process of starting the system infrared warm floor, it is recommended to gradually increase the floor temperature (3-4 ° C per day) to a specified value.
Rules Installation of a warm floor under laminate
Laminate is considered a fairly popular coating that is used for residential premises. This is due to the fact that it is low cost, practicality and high aesthetic qualities. But is it possible to use it for a warm floor device? After all, this material is made of wood. High temperatures can not only destroy it, but to cause the allocation of substances harmful to the body.
The main components of the laminated flooring
Installation of laminate occurs on the already ready-made heating design. Before that, the base is covered with a thin substrate with a thickness of 2-3 mm for sound insulation of the floor covering. In order not to reduce the quality of heating, use material with perforation.
In this case, thermal energy can penetrate the holes in the substrate. When laying an infrared film for heating flooring, polyethylene is additionally used. It stacked directly on the finished base for decorative cladding.
After that, the alternate laying of all laminate occurs. The connection of individual elements is carried out using Click or Lock locks.
Video: Installation of film warm floor under laminate with their own hands
How to put a film warm floor under laminate
To create a warm and cozy atmosphere in your home, every diligent owner seeks. Competent organized system The heating of the room will make this task much easier, therefore, before the onset of cold weather, it is worth taking care of the insulation of all surfaces in the house, including gender. Film warm floor under laminate will be the ideal solutionTo create an optimal microclimate in the apartment, without spending the mass of time and effort.

In this material with the photo will be discussed about ways, species and rules of laying, which must be observed if you decide to arrange heating of the floor under the laminate.
Methods for laying a film warm floor
As a rule, when laying a warm floor with power supply, three methods of their location are used:

If the floor screed is in perfect condition, it is possible to install a warm floor under laminate or linoleum directly to it, which will significantly save time for additional work. When laying the cable electric floor in the kitchen, in the bathroom or on loggia, the heating elements are hidden in the thickening of the screed, setting a pre-thermo insulating layer.
In the case of laying a warm floor in two-storey houseswhere the insulation of the floor on the first floor is completed, no additional screed and thermal insulation. Laid ceramic tile And the thick layer of glue will serve protection for a warm floor. True, it is worth first to refer to the instructions for it.
Varieties and dignity of film infrared floors
Infrared film warm floors are becoming increasingly popular among buyers, since their radiation is not delicate for delicate wooden coatings, such as laminate, parquet or parquet board.
The following varieties of film infrared sex are distinguished:
The latter is often used not only for floor insulation, but also walls. With such material, it is easy and convenient to work, because it is elastic and has a small size (585x545 mm). READ ALSO: "Infrared film for a warm floor is the principle of operation and installation scheme".

We call a number of undoubted advantages of infrared film floor:
- the speed and convenience of laying - it will take about 2 hours before the laying of the warm floor under the laminate will be completed;
- the height of the room will not decrease due to the increase in the floor level, because the film thickness is only 3 mm;
- film warm floor features a high level of reliability;
- no need for additional work on the pouring screed, since the film infrared warm floor can be raised directly under the laminate, linoleum or carpet coating (read: "How to lay an infrared warm floor under linoleum");
- it does not dry the air in the room, so the humidity of the heating of heating does not change;
- has an anti-allergic effect on the human body;
- economically spending electricity - 20% less than other varieties of warm floors;
- can be dismantled and moved to a new place of residence;
- it has an air ionization effect.
What will be needed when installing a film warm floor
The infrared package assumes the presence of a thermal film, rolled into a roll, insulating material, contact clips and wiring for them. Additionally, you need to purchase a temperature sensor and thermostat.
A number of additional materials will serve to increase the service life of the floor and increasing its thermal qualities.

Requirements for a warm film floor under laminate
Before laying a warm floor under the laminate, it is necessary to carefully prepare the basis for it. If laying on an old coating is planned, it is important to make sure that it is suitable for further operation, does not contain depression or irregularities, can withstand the load after laying the finishing floor.
The basis should be cleaned, check the presence of level drops - their value should not exceed the thickness of the film in 3 mm. Discovered irregularities need to be eliminated, after which it is thoroughly drying the surface. After that, laying of film warm floor under laminate can be performed.

Having a film on the floor surface, it is worth remembering that heating the space under furniture is impractical and harmful for furniture. However, if in a short time it is planned to rearrange furniture, you can reach the warm floor all the space of the room.
When planning the laying of a warm floor, you need to calculate the power consumed for a specific area of \u200b\u200bthe room. These values \u200b\u200bincrease directly proportionally. Get the necessary advice to calculate the optimal power and efficiency of the operation of the warm floor can be when purchasing a film floor.
Laying insulating materials
The next important stage in the process, how to properly lay the warm floor under the laminate, is the flooring of insulating materials to prevent the heated floor contact with the moisture.
After that, it is possible to lay thermal insulation to increase the efficiency of the warm floor and reduce heat loss from heat flux directed downwards.
Any rolled material is suitable, laid by a metallized side up, whose seams should be sutured by scotch.

Before putting a warm floor under laminate, it is best to use foam insulating materials, not thinner than 3 mm thick.
As insulation under the laminate, both reflective and non-reflective insulating materials are equally well suited, only the thickness standards were suppressed. Lovenian reflective film shows well, but the foil material is not entirely suitable for infrared film floor, so it is undesirable to lay it.
Metallized adhesive tape is optimally cope with the task of sealing of seams between the insulation canvas.
Choosing a place and preparation for the installation of the thermostat
To control the temperature indicators of the warm floor, a thermostat is used.
The main functions of the thermostat are as follows:
- setting the desired temperature level;
- setting periods of heating;
- performing the on and off of the warm floor in the framework of the installed programs in automatic mode.

Before laying a warm floor under laminate, you need to decide on the location of the thermostat, since it affects the location of the film and the installation of the wiring. As a rule, it is 20 cm from the floor level.
Methods of laying heating elements
To know how to install a warm floor under the laminate, it follows when the film is located with the scheme developed.
Infrared film warm floor can cover not the entire area of \u200b\u200bthe room, which depends on its purpose and the intensity of use (read: "How to lay an infrared warm floor under the laminate - installation instructions").
Film can be flattened:
- At half a total area of \u200b\u200bthe room, if other sources of heating are provided, and the warm floor serves as additional support. At the same time, it is quite power of 90-150 W / m 2.
- At 70-80% of the total area, if it is the only heating device. The power of the floor in this case increases to 150 W / m 2.
The distance from the edge of the film to the walls or furniture should be at least 20 cm, and heating devices - Not less than 1 meter. This is done to avoid overheating of the floor and the exit of it.

In order to make the film as conveniently and efficiently on the floor surface, it can be cut in light marks. At the same time, the maximum strip length cannot exceed 8 m.
Please note that the segments of the Vane film segments are strictly prohibited.
If the film is one-sided, it is reinforced by the downward side, and if the two-sided side does not matter. The direction of laying the film should be towards the thermostat to minimize the costs of wiring. It is necessary to drain the film with copper contacts down to which they subsequently attach clamps to connect the wiring. Read also: "How to make floors with heated under laminate - step by step guide «.
Sing insulation
Sections of sections containing open areas of copper need additional isolation. Often, for these purposes, bitumen isolation is used. To glue the bare sections on both sides, you need to cut off large pieces of film.
Then the holes cut into the film, where the glued copper areas are pressed and the sections of the scotch are closed. You can start connecting contacts with clips and wiring to insulation only after installation. To attach the clip, it must be placed between the film and the copper strip, and then - to press the passage.
Laying and checking work
Connecting wires
Stacking of wiring of film warm floor must be carried out from the center to plinths on the walls to avoid excessive pressure of the floor covering. The wires are laid under the film, in which the holes are pre-cut for them. After fixing the place of the feet to fasten with scotch. The posting layout must be made so as not to act beyond the heat insulating substrate.

Connecting the cable to the clamps is performed by the parallel method. The ends of the wires are cleaned, hide through an incision in the film and insert the clamping attachments, after which they are pressed by passatages. The connection site is isolated and fixed to a tape film. To not confuse the wiring lines, you can select two colors cable.
Connecting the thermostat
After laying the thermal film to it, it is necessary to attach the thermal sensor. It is usually in the field of the second section. Under its wiring and the sensor itself in the film makes cuts. In addition, it is worth tracing that the film made a smooth turn in the place of passage of the cable under the thermal sensor. This will prevent the cable break.
As soon as the sensor is installed, you can start the thermostat installation. It is preferable when it is connected inpatient, however, it is allowed to connect through the outlet.

Connect the thermostat to film infrared warm floor It should also be as well as other types of warm sex. Two wires suitable for thermal sensor and warm floor are connected pairwise on both sides of the thermostat. Two remaining free connector serve to connect power cables. Grounding is connected using the terminal.
System Check
Before conducting laying a laminate, make sure that the warm floor operates correctly. If there is no overheating of individual elements or sparking, then the thermal film is high-quality.
As soon as it is established that there are no faults, it is necessary to cover the heating elements with a layer of protective polyethylene, the thickness is not already 80 microns, designed to prevent moisture from entering the thermofilm. In addition, such a layer will increase the service life of the warm floor. Waste a polyethylene flush film over the entire surface of the warm floor.
Installation of laminate
For laying on warm floors, it is necessary to use laminate with special marking, and during installation it will be useful to abide care, so as not to damage the thermal film. READ ALSO: "What a laminate is better for a warm floor - choose optimal Material «.
You can collect laminate quite simple. Each of the panels is equipped with a locking mechanism, so it is enough to arrange them at an angle and connect, then drop the panel until it clicks. In the case of small gaps, you can catch a rubber hammer panel. First, the panels are bonded between themselves with narrow edges, and then the stripes are connected to each other.

When laying a laminate, it is important to leave the gaps from the walls to expand the coating at temperature changes. Upon completion of this process, plinths are installed on the perimeter of the room, which hides the wiring floor.
The heating film must be given a time to warm up to room temperature, after which it can be included in the network.
Works on the laying of film warm sex should be carried out at a relative humidity of no more than 60% and the positive temperature.
Be sure to make sure that the contacts and places of the thermal blind can be insulated before connecting it to the power supply. In no case should not be included in the network the heating film if it is in the rolled state.
If it turned out to be damaged by graphite spraying on the thermal film, the hole must be measured from both sides.
Making the installation of film warm floor under the laminate on the wet surface is prohibited. In the case of entering a warm floor of the water due to flooding, it must be immediately disconnected from the network, and then leave for complete grazing in natural conditions.
Do not step in the shoes on the ladded thermal film.
The thermal sensor must be installed freely so that in the event of a malfunction it can be easily replaced.

And although this portal is devoted to insulation and heating issues, the topic of publication - "Installation of film warm floor under Laminate" suggests a story not only about the installation of heating elements, but also on the subsequent laying of the floor laminated coating. Therefore, it seems appropriate to show the entire cycle of the work carried out so that a reader gathering to do such a reconstruction appears a fairly clear idea of \u200b\u200bthe scale of the upcoming tasks. The author hopes that his experience, including the analysis of the mistakes made, will be useful for those who plan to do this for the first time and do all their own hands.
Source conditions
Repair was carried out in the children's room of a private house - the need for reconstruction was brewing a long time ago, and finally the final decision was made that it was not necessary to postpone the next.
The place where everything described - the city of Bender, Moldova, Transnistria occurred. Work was carried out in the first decade of September 2016. That is, the practice of operation of the created system is already two winter seasons.
House buildings of the 50s of the last century. The walls of global thickness of about 700 mm, sufficiently warm to do in terms of our climate without additional thermal insulation. The specifics of the walls, by the way, left certain nuances and on the course of further work - attention will be drawn at one time.

The house was purchased in 2002, and before our unfinished he was empty for a couple of years. So I had to initially put it in order to keep it in the near winter to bring it into a cherished look. In particular, it concerned the nursery, as the daughter was only 3 years old.
The floors in the whole house are boarded on the lags raised above the ground backfill level by about 300 mm. They were not pleased with the straight, but were durable, reliable, collected from strong-quality boards with a thickness of 40 mm.
However, given the fact that the game sphere of children at an early age percentage percentage is on the floors, it was then decided to get a pleasant blue carpet in the children's room. - And warm, and gently.
In this time, when the abundance of construction and finishing materials has not yet been observed (in any case, here we have), the carpet has seen optimal option. It can be said that at first he was sympathetic, and, as it seemed, it was completely coped with his tasks. But gradually began to manifest all its negative qualities.
- First, he began simply ugly. On its surface, the mass of the juices of juices, tea, and even from the printer cartridge, was formed on its surface.
- Secondly, he demanded almost daily cleaning with a vacuum cleaner. And the further - the more: even small garbage is impossible otherwise to collect from its surface. And add to this the presence of cats (as without them in a private house) - and the picture will become understandable.
- Thirdly, he is outdated and morally. The handsome daughter - a high school student categorically expressed that he wanted to change the appearance of his "possessions". Well, has the right! She wanted a laminate, and even picked up in the store catalog I liked her model.

So, the decision was made - change the floor covering. But immediately was conceived and the organization of heating of the floor - simply because the laminate itself is rather "cold" material. The system was assumed certainly not instead of classic heating (with this in the house everything is in order), but simply to create the most comfortable conditions, so that it was nice to walk with bare feet when the window is groaning autumn or frosty winter weather.
Now - about some features of the room itself. It is small, only about 6.5 m², close in shape to the square. And it seems to be anything special, however, there are a number of nuances that have somewhat complicated the task.
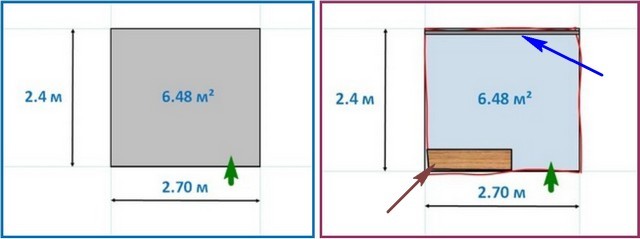
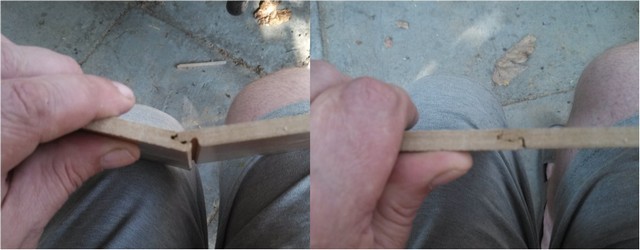
If you take "clean" dimensions for calculations, then they are shown on the left fragment of illustration. But in reality, global walls, alas, do not differ in the right - on the right fragment of the red line are bends at the floor level. You can, of course, attempt to level the walls to the ideal - plasterboard to help. But this will definitely lead to the loss of the already small area of \u200b\u200bthe room. The existing curvature of the walls for the feeling of comfortably accommodation has not been influenced for us, and therefore only especially allocated on the overall background of defects were reflected. Partially disadvantages were hidden by finishing - cladding and creating a bedside shelf (it is shown in the brown arrow scheme, and it was decided to leave it, only with a small "modernization"). But when laying a laminate at the starting stage, even a small remaining curvature was still affected - this will be paid to the attention below.
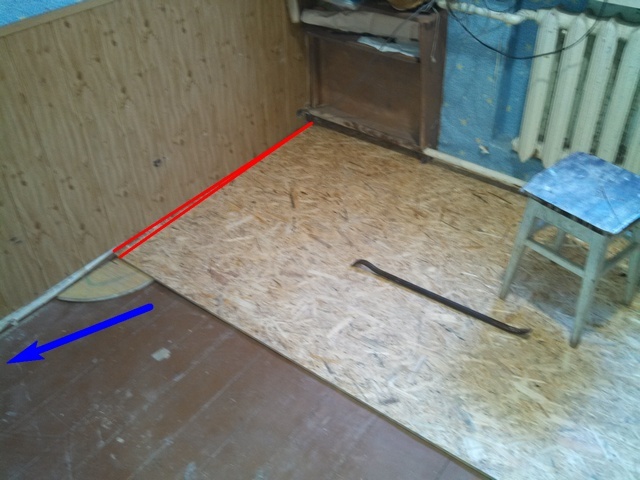
The second nuance is along the outer wall of a slightly above the level of the old floor, the heating contour feed pipe is well visible in the photo above, and the diagram shows the blue arrow. Previously, the heating system worked on the principle of natural circulation, so the pipe has a bias - on the left side of the room under it, the sheet of plywood is calm, to the right - the slot for this is too small. This also left a certain imprint on the next work.
For the flooring, this laminate was chosen - the company "Krono Original", the "Sastello Classic" series model "Art Works". Boards of 1285 × 192 mm, Class 32, Dubble Click lock connections.

Prices for laminate series Castello Classic
Castello Classic
A simple calculation was conducted, and 30 boards were purchased by its results - three packs of 9 pieces in each and more plus three boards. The reserve was made about 10%, and was taken into account that one board would go to the decoration of the left bedside shelf. With the store administration, the issue of the possibility of marriage was immediately agreed on the possibility of sharing the missing boards and even the return of unspent. True, I did not have to resort to one as it turned out.
Now - about the system of "warm floor". It was decided not to make a heated plot with solid all over the area. It is enough of those zones where the man's leg is usually ". As a result, they stopped in the following scheme.

Place infrared film under the bed (pos. 1) - there is no particular sense. But when you get up cool in the morning, it will be very pleasant to put bare feet on a heated floor. Therefore, a meter film segment is planned here (pos. 3) along the bed.
The work area is located in the right far corner - desk (pos. 2) with a computer. From the door to the table and partially under it passes the second "comfort zone" - a two-meter heating area (pos. 4).
Total - three rowing meters of heating film elements are necessary. The most suitable option for the price and operational parameters was the film of South Korean production width of 500 mm with a specific power of 220 W / m². The total power of the system being created is low - only 330 W, that is, the special additional load on the home power grid is not supposed.

Complete with the film heater, two wiring was attached (stranded copper cross section 1.5 mm²) with blue and red insulation, a set of terminals and insulating linings. In addition, the thermostat was purchased separately for installation in standard conversion. A model with a button control and the possibility of weekly programming modes of operation was selected.
So, the main materials were purchased. Others were used - this will be mentioned in the course of further presentation.
Plait was planned to take three days. But, as it turned out in reality, five left - the inexperience, unforeseen problems, and the like were affected. But in the end, everything was decided positively.
So, go to consideration practical side - The real move of the work performed.
Paul with laminated coating and system of infrared film heating - stages and step by step
First stage - Preparation and alignment of floors
This stage at the planning stage looked unlikely. In practice, it turned out not everything is so "rosy" and simply.
But under the laminated coating such a drop drop is invalid - compliance with the unified plane is required. Therefore, the alignment was conceived with the help of OSB sheets with a thickness of 10 mm.
As it was done practically - in the table below (all the pictures are deployed when clicking the mouse).
| Illustration | |
|---|---|
 | The room is freed from all the furniture standing in it. Carpet in some sites looks still awful than it seemed earlier. |
 | Dismantling of old wooden plinths. They are so unaware that they went immediately into the pit - on firewood. Instead, they will be plastic, in the final stage of work, to tone to the floor coating. The blue ellipse shows the section of the bedside shelf, where the alteration is planned under a comfortable niche for gadgets. And under this niche, the thermostat of the "warm floor" and socket for the charger will be placed. Convenient - cladding from the lining eliminates the need to cut in the wall of the socket under the submersion and the power cable. |
 | Finally, the old carpet is taken out into the yard. His back some had once had a rubberized base. This layer on extensive areas has already reached and remained on the floor of black dust (the arrows are shown the preserved areas of the base and with a full squeeze of the substrate, up to the pile). The picture is terrible, and once again convincing that experience with carpet was probably the last. |
 | I had to immediately make a cleaning - clean the floor from black rubber dust. It is already - after cleaning, during which it happened to join the head to the head. |
 | And this picture opened. By the way, I didn't remember about this with my wife - that under the carpet also aligned the surface of the plywood. True, plywood is saying very loud. In fact, due to the deficit (for those times), all available trimming, and it turned out such a "patchwork blanket". So the next and, it turns out, an unscheduled task is to dismantle this "mosaic." |
 | It is said easy, but in fact - it took quite a long time and demanded a lot of strength. The difficulty is that only individual sites were fixed to the boards by self-draws. Mainly prevailed small nails with a very frequent step (shown by the red arrow). So it was a lot of it. Moreover, under the electric "warm floor", simply in order to ensure security, I did not want to leave extra nails, so they were not scored after having puffered plywood, but they pulled out. The opening floor is in a very decent state, with the exception of one small area in the corner - it is circled in the illustration of a yellow ellipse. |
 | In this section of the board, too, without signs of decomposition, but for some reason the coverage is collected from short segments - it was possible that the hatch was once in the cellar, and then the decision was changed. The bottom of the board was relied on chocks that were asked to the ground, which gave the overall instability and sending this site. Repair turned out to be simple. Three crossbars were fixed to the high-headed floorboards, which were the same chocks-stands under which there were vespers. Well, then - returned to the place shot short cuts of boards. It turned out firmly and stable. |
 | After cleaning the surface, we switched to the alignment of the floor by OSB sheets. From this side and about three quarters of the room the floor is horizontal. And then the bias begins down. Since the sheet is shorter than the length of the room, it is shifted in an uneven side. And here, on the remaining horizontal areas that do not require alignment, the missing narrow bands of OSB will be easy. |
 | A business is the opposite side. Here, unevenness is also expressed in two ways. First, the long-range left corner is not completely straight, and it had to slit a sheet somewhat (shown in red lines). And secondly, this is the main thing - there is a decrease in the level from almost zero in the far corner and up to about minus 45 mm in the near (the increase in the differential is shown by the blue arrow). It is necessary to tinker here. |
 | Alignment is decided on the following algorithm. For the beginning, it is approximate and fixed to the floor lighthouse, which provides a horizontal position of the sheet. This beacon is nothing more than a segment of a timber selected thickness (shown by a red arrow). Then the sheet was removed to the side, and from this site is already selected with the help of a normal level and a number of beacons are fixed along the wall to the far corner, where the difference goes down to zero, that is, the sites are becoming thinner (the direction is shown in the blue arrow). And then from each of this lighthouse, the line of the platforms is made in the same way along the sheet, up to the transition boundary to the smooth section of the floor (a series of yellow arrows). All sites after careful fittings were screwed to the boarded base with self-draws (with a pre-drilling to prevent cracking). |
 | Here are these platforms - before laying a sheet in place. By the way, in the distant rows I did not even have to "build rows", since the deformation of the plane is small there. And on the renovated section of the floor, it even had the need to remove the resulting protrusion slightly. |
 | The leaf is perfectly in place. Check the level proved its correspondence to the horizontal plane. The beam players are located quite often, and when moving on the covering of the sheet deflection was not (and I have a height and weight, believe me, rather big). In addition, a little later was taken another step for greater stability of the coverage - it will be said below. Note - the closest to the edge of the beacon is made so that it is simultaneously supporting and for the second sheet, which will be further stacked with the first. |
 | The leaf fixation begins to the boarding surface of the floor. Black screws were used with a length of 35 mm (on a flat section of the floor) to 75 - on the sections of large drops. The illustration shows the "trajectory" of screwing the fastener, in about 200 mm in increasing. From the edge of the sheet - not less than 20 mm, otherwise you can get a folded plot. The tightening torque on the screwdriver (ratchet) was regulated so that the hat of the self-press immersed in the thickness of the sheet at about half a million. |
 | After covering the sheet, it was also decided to fill the remaining cavities below the mounting foam. In the right places between the beam players in OSB, the holes were drilled with a diameter of 10 mm - so that they are well a good pistol spout. Filling was carried out until the foam appears from the adjacent hole. Particularly many foam did not need - the lumens are not so great. The illustration is the picture after expanding and frozen foam. All spoken surplus were cut and removed. And the leaf, except for the support on the site, has also received a sufficiently rigid pillow below. His position has become absolutely stable. In addition, the deformed part of the floor is in accurate to the location of the bed. That is, special dynamic loads are not supposed here. So for the reliability of the aligned surface, you do not have to worry about. |
 | The algorithm for the alignment of the second sheet is exactly the same. A number of sites along the wall (red arrow) are fixed from the center of the lighthouse (the red arrow) to the point of the highest level drop (green arrow). And then there are ranks of the beacons to the center of the room, before moving to the horizontal section (yellow arrows). There was no long rule at hand, so a two-meter segment was used instead profile pipe It turned out even more convenient: the pipe itself is heavy, and it simplified the selection of the height of the platforms. It was true, truth to tinker with the opening of the leaf itself - his neighbor edge repeats the configuration of the bedside shelf and all corners of the protrusions at the entrance to the room. But it is particular, just a little more markup and workload. By the way, the deformation gap of about 7-10 mm (due to the irregularity of the wall, it fluctuated during the walls is left). And between sheets (and inserted fragments), about 5 mm was also leaving. These gaps are in case of a linear expansion of the material when heated. |
 | The cavity under the second sheet was also filled with foam. After it is frozen - the surplus is cut and removed. |
 | Further, a turn of the remaining not closed areas came. Here everything is simple - the fragments needed in size and after fitting were attached to the boarding coating with self-draws. Then all the deformation gaps were also filled with mounting foam. Do not pay attention to the incomplete plinth on this wall. He just so firmly wondered in old wallIt was decided not to touch him, otherwise there would be a "new front" of work. And so according to the preliminary attack after the installation of the laminated coating, it will close a new plinth. |
 | Finally, everything is completed, excess foams according to deformation seams cut off, cleaning with a vacuum cleaner. Before us is a ready-made solid reliable coating for the subsequent installation of a "warm floor" system. |
The second stage - the supply line of the "warm floor"
In truth, this block of work was conducted in parallel with the first stage. Time was enough - so far I froze mounting foam After each latached sheet of leveling coating. Yes, and I wanted to immediately fulfill all the "dirty" work - to leave them for later, and then re-clean - it is unlikely reasonable.
So, the power of the floor heating system is small - a maximum of 330 W. Plus, in parallel with the thermostat, it is planned to install a socket - to charge the smartphone and tablet, if necessary, to turn on the laptop power supply. That is, the power of this load is low. However, in the room where the repair is carried out, it was not convenient for connecting the line. But in the neighboring, through the left wall, the room, there is a dedicated line with a copper wire cross section of 1.5 mm² (that is, it is enough for 3 kW). And on this line, only lighting (with lED lamp On 13 W), night light and two sockets, are also mostly used for charging devices. That is, you can easily "cling". Yes, and the location is that it is possible to organize a liner to the place of installation of a "warm floor" thermostat with a minimal disorders.
Although the load and low, but just in case for a "warm floor" with a parallel with a socket, it was decided to install a separate automatic machine for 6 amps.
How it all was performed - in the table below:
| Illustration | |
|---|---|
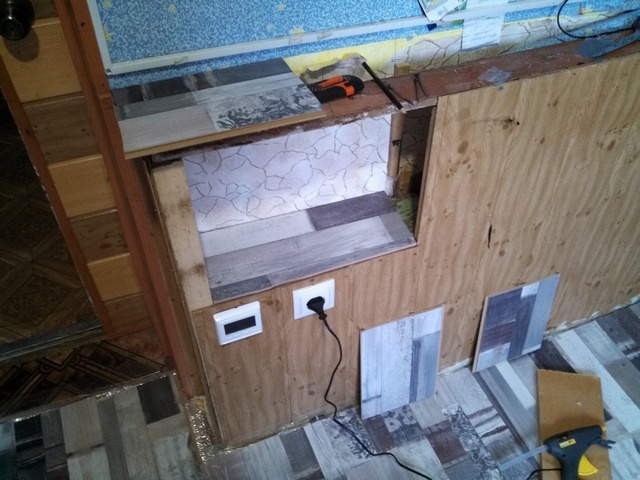
 | Three panels of the bedside shelves were removed - they will be shorted and altered somewhat. A comfortable niche will be made at the top for any small things and the phone, and the "warm floor" temperature regulator and an additional outlet will be located in the lower. It is here that the power cord will be laid. Convenient - it is easy to hide behind the remaining facing. |
 | IN next room Temporarily dismantled the socket, from where the food on the "warm floor" will go. To install the automaton, a small built-in boxing is purchased for four modules. To drown it in the wall, niche is cut in it. The leveling wall lining here is made of drywall, which made it possible to cut a very accurate "window" exactly in size of the box. Under plasterboard - first the old plaster layer, and then the clay wall begins, in which it was easy to cut a niche of the required depth. |
 | True, under the layer of clay, the brickwork was also discovered, the thickness of the Pollipich. But it is deep, and installing boxing does not interfere. Through this masonry to the adjacent room, the perforator is drilled by a cable skipper. A niche for boxing, in addition, is connected by a hidden channel with a neighboring socket - for a parallel connection to the power line. It is not shown in the photos, but the cable segment is immediately stretched through this channel and connected to the terminals of the socket. The phase will go to the gap through the automatic, and zero - through the standard zero boxing bus. |
 | This is the hole, but already in the room where the repair is carried out. When drilling, definitely, a fair piece of plaster was turned away. But it is not scary - the wallpapers were prudently cut and are rented. It remains only to cut through a completely small stab (it is conditionally shown here with a yellow arrow), about 200 mm long, to the edge of the facing. And then the power cable "dives" under the lining will be located under it and "pop up" only at the installation site of the thermostat. (The trajectory of its gasket is shown in a green arrow). Looking ahead, I will say that after laying the cable, the plungered plot and the stresses were neatly embedded with a gypsum putty, and after drying it, the wallpaper returned to the place. So there are no traces left. |
 | Here it is a 2 × 1.5 jn cable after laying to the place of installation of the thermostat. |
 | The lining panels shot from above. In two of them are cut by the jigsaw windows for the installation of conversion. Subscribers were used such as used for drywall, that is, with the stacks attracting behind. In the central panel, a small "arch" is cut off - it is for passing the power and signal wire of the heat-mate floor. Panels with approaching, understandable, while they are simply attached to the place, not fixed. |
 | A slightly run forward, you can immediately show that in the right nest, as planned, a regular socket was installed. The cable from the next room is connected to its terminals. And from the terminals, another segment of the same cable is moving - it will just go to the thermostat. So far, he is left alone. Important - when carrying out this switching, not to be mistaken with the location of the phase and zero - this is required for the correct operation of the programmable thermostat. Therefore, it is better to adhere to the recommended color marking of the wires. In my case - blue (zero) and brown (phase). |
 | In the next room also ends the switching of the wires - the phase with a break through the automatic, zero - through the tire without breaking. Returns the socket. Boxing is installed in the cut niche. |
 | Boxing and so well installed in a niche, but for greater reliability I decided to fix it with silicone thermoclause. And it was not necessary to mess with a solution, and it turned out very quickly, firmly and pretty. |
In essence, everything is ready for the electric liner - it is ready for further installation of the heating system. Naturally, it was verified - short-term inclusion from the audit correctness of the location of the phase and zero. Everything turned out to be as necessary.
Third stage - Installation of film infrared "warm floor"
Go to, perhaps, the most interesting stage. Everything is ready for the beginning of work already directly above the system of "warm sex."
| Illustration | Brief description of the operation |
|---|---|
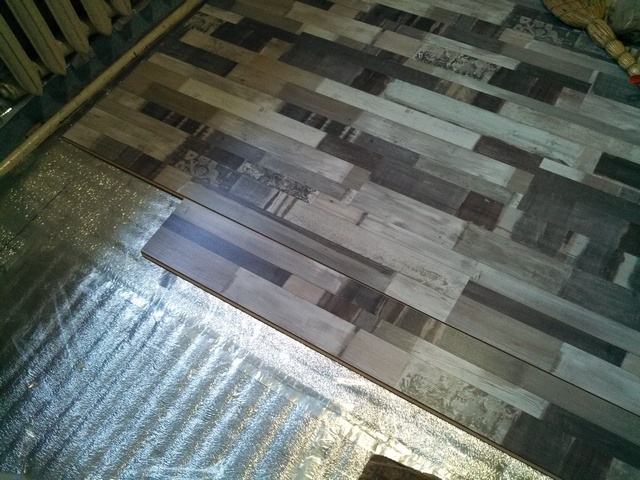
 | Starting a thorough cleaning. It is important that there are no small solid fragments on the floor surface - it should be completely clean. And then the next step will follow the flooring on the floor of an elastic insulating reflective substrate - foil polyethylene foam. It was purchased with a slight margin - 7 m². The roll has a width of 1000 mm, the substrate thickness is 5 mm. Required tools - A sharp knife, stapler with brackets, foil tape. Two important problems are solved at once by laying this layer: - first, the installation of infrared sex itself requires a thermal insulation reflective interlayer, for the direction of radiant energy up; - Secondly, the technology of laying laminate involves the use of a thin elastic substrate, reducing all possible minor irregularities. |
 | Laying the substrate - the operation is very simple. A strip of the desired length is cut from the roll and stacked on the floor with a foil side up. The edges - rest in the wall, as no deformation gap here, is not required, not required. It must be said that even the stapler did not really need - the material perfectly lies on the slightly rough surface of the OSB, not shifting. At first, fashed sheets in the corners of the brackets, then stopped - it is quite possible without them. |
 | The next strip is stacked with the first. And then this line of the joint is glued with foil scotch. It turns out a solid seamless reflective coating. |
 | The last band had to paint under the remaining unclosed area, but it does not cause any difficulties. As a result, literally in 15 minutes the room is completely covered with a reflective substrate. |
 | The remaining large substrate fragment was solved also to apply with benefit. From it was made a reflective screen, which is fixed behind the heating radiator. I had to tinker a little to slip it there, making slots for brackets. But now the battery heat transfer will be higher. |
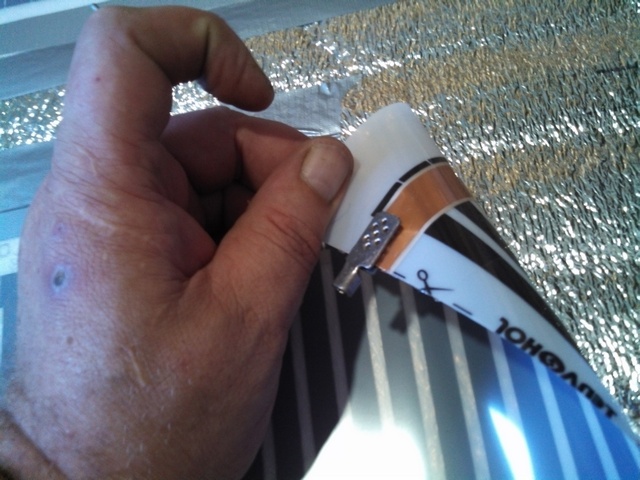
 | The substrate was finished - the brass heaters came. First of all, the acquired three-meter roll is cut into two canvases - 1 and 2 meters. Ther must be made exclusively on the applied lines with the appropriate signature. On this film model, these lines are located in 250 mm increments. Carved cloths fit on planned places. It is important - they must lie with a shiny "copper" side down. By the way, for proper location All inscriptions on the film are becoming readable. Otherwise, they are obtained in mirror mapping. |
 | After careful removal of the position of film cavities so that they are no longer shifted, they should be fixed on the floor. For this, construction reinforced tape was used - the canvas were glued to the substrate along both long edges. But still - not skip. The edges must be left "degree of freedom" - they will have to raise them more often when switching wires and insulation of cropped tires. It turned out as shown in the illustration. |
 | The heating film canvas are ready for switching. It's time to clarify the scheme for which it will be made. In order not to omit the crossing of the wires on the floor, it was decided to supply the phase and zero from different sides of the canvas. Wire consumption is somewhat larger, but the amount that was issued complete with heating elements was quite enough. Where the phase will be located, and where zero - it does not have any value for the heating film absolutely no value. The main thing is not to plant a phase and zero by mistake on one bus So, the illustration shows the circuit of electrical switching. 1 - green shows the thermal sensor with its signal cable. It will be located under the meter flat film, in the center, so that the sensor head comes into exactly the heating black carbon strip. 2 - Points of connecting the terminals of phase wires to the tires of heating canvases. Accordingly, the red lines show the routes of laying these wires. 3 - Blue shows zero wires and points from the connection in the terminals with tires. 4 - Mandatory should be carefully annexed by the tires of film heating elements unredened in switching. All wires converge at one point - and it comes in exactly the same arched "window" carved in one of the facing panels. |
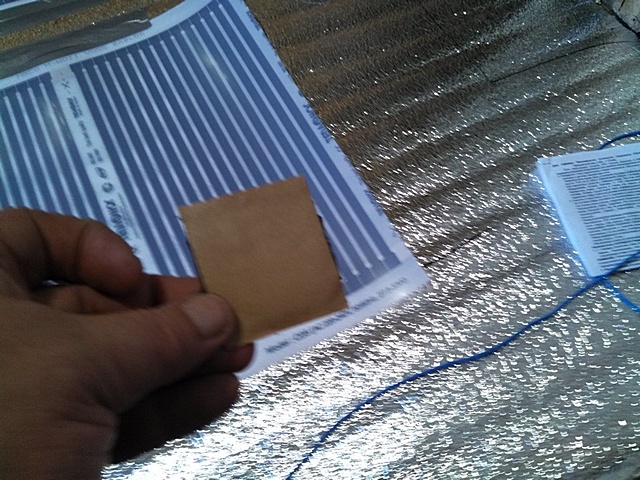 | The work has begun with the insulation of the cropped ends of the tires. Included with heaters walked special insulating linings. They are a rectangular fragment of a rather thick elastic resinobitume web, on one side of a plated polymer film, and on the other, a paper protective substrate closing the adhesive layer. For insulation, the tire trimming space requires one such a lining. |
 | To begin with, this paper substrate is neatly removed. |
 | Then the lining of the adhesive layer is pressed from the bottom to the place of the circuit of the tire, so that approximately half the lining is at the bottom - glued to the surface of the film. |
 | After that, the insulating pad is driven along the edge of the canvas and is pasted on top of the film. Then, with a rather significant attachment of the efforts of the fingers, this resulting "cocoon" is crimped throughout its area. In fact, the tire cut insulation is made. |
 | This insulating cocoon eventually even after a very dense crimping it turns out quite thick. And we can not be allowed to at least something drank over the surface, otherwise there will be difficulties with laying laminate. Therefore, exactly along the contour of the resulting "nonsense" in the substrate a sharp knife is cut out the window. In this "nest" everything will be perfectly hidden in a roving with a common surface. |
 | Similar operations are carried out at all points of trimming tires, there will be no switching, that is, in three places. |
 | The next step is the switching of power supply wires to heating elements. Wires are laid out on the floor about the truss of their gasket. These tracks, by the way, can be accomplished for convenience in advance on the substrate with a marker. |
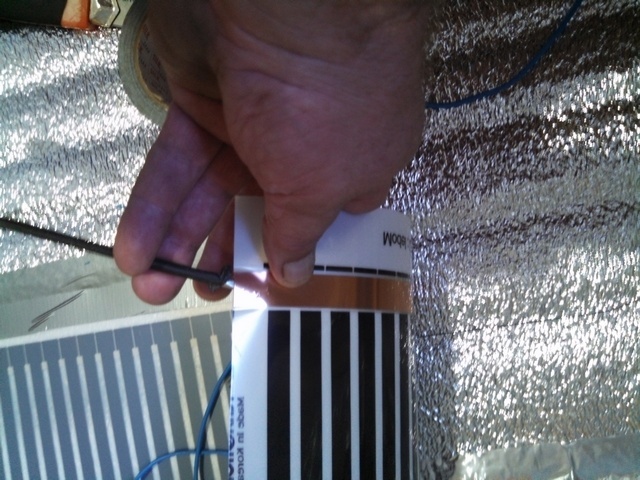 | The connection of wires to the tires of film heaters is carried out using terminals, each of which has two large petals and crimping clamp for wire. The top petal of the terminal must be headed into a special "pocket", which is available in the tire cut place. In order for it easier to slip there, it is recommended that this "pocket" is recommended to slightly expand a slight screwdriver. |
 | Then the top petal of the tire is started in this "pocket" and moves inside until it stops. |
 | Terminal petals are reduced - shrink, you will simply simply with your fingertips ... |
 | ... and then, finally - crimped with pliers. Contact terminal with a bus is provided - now it is necessary to connect to the wire terminal. |
 | This is also easy. The wire is inspired by an isolation of about 8 mm from the edge, the alks twisted into the tight "pigtail". Then this bare area will start in the contact chalomb of the terminal, which immediately after this is thoroughly crimped with pliers. The clamp also consists of two petals, and it is better to crimp them immediately, but in turn. Well, if in the terminal it is necessary to build two wires, for parallel connecting the heating films, I used one side of the clamp for one conductor, the second - for the other. It turned out securely and neat. |
 | Immediately after such an assembly, a ready-made terminal connection is necessary to isolate. Two insulating linings will be used. |
 | The first, after removing the paper protective substrate, is glued below. It should completely overlap and enter the bus, and the entire terminal, capturing the beginning of an isolated section of the suspended wire. |
 | The mirror to the bottom is glued, after removing the paper substrate, the second lining. |
 | The resulting node is very carefully crimped with fingers. By the way, the arrow in the illustration shows that just in case of the case of insulation of tire trimming were also cocked on top of the strips of construction scotch. This is not a requirement and nowhere are not specified, but the consumption of tape is kept, and reliability is significantly higher. |
 | Under these insulated switching nodes, the windows in the foil substrate are also cut. In addition, thin grooves in which the wires are hidden are cut through it. |
 | Similar operations are repeated with the second wire. It is important, once again we emphasize, do not connect two different wires to the same tire on both sides of the heating tight. |
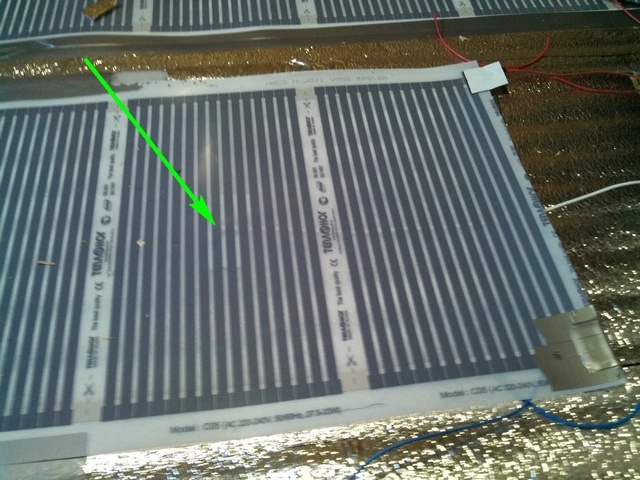 | After the power wires are connected to the heating film elements, the thermal sensor can be installed. It will be located in the center of the black carbon strip, in the middle of the second from the edge of the block of these bands, on the short meter section of the "warm floor" - its position below is shown by a green arrow. |
 | And specifically, at the place, the sensor head is recorded on the back side of the film strip of construction scotch. |
 | For the sensor itself in the substrate, too, the window was cut through. The groove is made for the signal cable. However, it turned out that the sensor head is still too thick to completely hide in the layer of the elastic substrate. That is, it turns out an unacceptable tubercle. |
 | I had to work a chisel - cut a recess in an OSB leveling sheet. After that, all sawdust were carefully removed, the bottom of the resulting excavation - is punctured by foil scotch. After laying the sensor, the groove with a signal cable was topped with a scotch. |
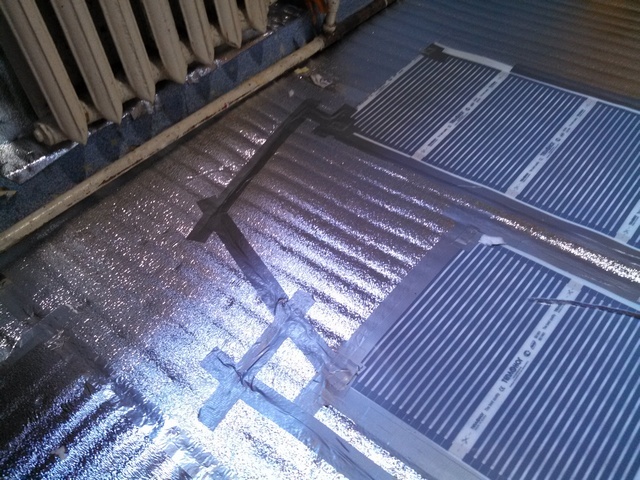 | Switching the heating elements, in principle, completed. It is possible to "bring the beauty" - the canvas of the film are finally fixed to the floor surface along the perimeter of tape. The grooves are cut under the wires, and after laying - immediately sealed with the same scotch. |
 | All three wires (red phase, blue zero and white signal thermal sensor) in the end converge in one "finishing" groove, follow in it to the wall and "dive" there into the cutting arched passage. Nowhere, no wire on the floor surface crosses with the other is very important to ensure the safety of the heating system. |
 | Finally, when the wires are headed for the trim, that is, to the place of connection of the thermostat, the ultimate "sealing" with the scotch of all elements of the system located on the floor are performed. It turned out this picture. |
 | You can go to the installation of the thermal sensor and the subsequent inspection of the system's performance. |
 | In order not to make it possible to afford the bare ends of the wires for their clamping in the screw terminals of the thermostat, wherever it took it, installed and appealing such terminal tips. |
 | Here are both "cold end" - so usually referred to as wires coming from heating elements. |
 | Just in case, the multimeter check the load resistance. It turned out 137 ohms - very close to the value calculated according to the law of 146 ohms. You can move on. |
 | Through the remaining empty, the windows cutting into it, the windows in pairs are in pairs - the power cable coming from the adjacent socket, the cold ends from the floor heaters and the signal cable from the thermal sensor. All of them will be connected to the corresponding terminals of the thermostat. Naturally, all work is carried out during a de-energized power line - it can now be turned off with a recently installed machine for 6 amps. |
 | And now the panel with the submergent finally occupies its place and is fixed by self-drawing to the frame (the fasteners head will be hidden subsequently with finishing corners). According to the rules, the thermostat must be not lower than 400 mm on the floor level. In this case, it turned out 450 mm, that is, everything within the normal range. |
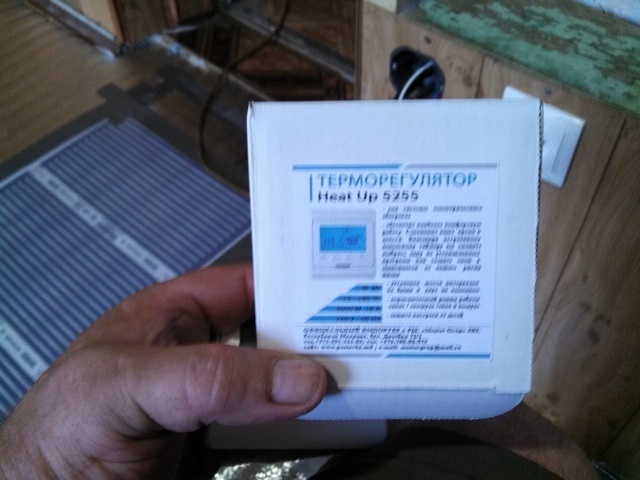 | For the "Warm Paul" system, such a thermostat was acquired - it provides the ability to program work modes on the clock for the day, taking into account the weekend and everyday life during the week. |
 | To install the thermostat, it is necessary to start it to get to get to get to the assembly caliper, which it will be attached to the opposite. |
 | A decorative frame is removed - it is holding simply on plastic latches. The metal bracket is clearly visible from above. |
 | This bracket with a screwdriver shifts up and frees the fastening of the device to the caliper. |
 | Everything, the disassembly is finished. |
 | The caliper is immediately attached to two self-drawing. |
 | You can go to switching wires. On the back of the thermostat, there are terminals with very understandable designations of their purpose. 1 and 2 is a power cable, phase (L) and zero (N), respectively. 3 and 4 - load, that is, "cold ends" of heating film elements join here. And 6 and 7 are terminals for connecting the thermal sensor. Here, the polarity of the location of the wires does not play. |
 | And since all the wires are ready for me, the switching takes only a few minutes. First we install and pushed in terminals to contact the thermal sensor. |
 | Then - the wires from the load with the observance of the color marking of the phase and zero (although, by and large, here it also does not matter much). |
 | And finally, the wires from the power line are connected, and here compliance with the correctness of the position of the phase and zero is a prerequisite. The device is ready to check the system's performance. |
 | I turn on the automatic power. |
 | The inscription "OFF" appeared on the thermostat display - disabled. Already well - visible "signs of life." |
 | Press the power button. Heating floor does not begin. But this is just because factory presets on the thermostat - 24 degrees. And the work is conducted in early September in the conditions of the admin heat. And the floor surface in the room is already in itself has a temperature of more than 28 degrees, which eloquently speak the sensor readings placed on the right side of the display. That is, the thermostat is just working correctly - the power does not turn on. But it is necessary to check all the same, so in manual mode I raise the heating border to 33 degrees. I worked instantly - the symbol of heating appeared on the screen, and already a few seconds later felt the temperature of the film. |
 | More and not necessary. The system is functioning normally, so you can finish this stage of work. The power is turned off again on the machine, and the thermostat finally occupies its regular place in the opposite. More disturbing him - no need. |
With the installation of the floor heating system, it is completed. And the next stage is to be laying the laminated coating.
Prices for film infrared warm floor
film infrared warm floor
Fourth Stage - Laying Laminated Coating
Laying the laminate, in principle, is not included in the list of traditional topics dedicated to heating and insulation. But throwing the story so, in the half-word - is also not a matter. Therefore, the subsequent stages will be considered until the end of the repair, but not to the slightest subtleties, but simply with the illustrated listing of basic operations. But still with mandatory focusing on some possible errors.
You may be interested in information about what is
So, the stage began with the next thorough cleaning - even small debris is unacceptable under the laminate, since the laying may not be worst, and the cores of the coating are capable of emerging.
After cleaning, the entire surface of the floor was covered with a polyethylene film with a thickness of 150 μm. In my case, it cost one web, with an approximately 100 mm on the walls. If one canvase is not enough, then they are stacked by about 100 mm, with the obligatory scholars of the line of this adhesive waterproof construction scotch.
What is it for? In fact, polyethylene becomes a waterproof layer. How to know whether it will not be on the floor randomly tipping the water bucket, or is the full cup of tea? And the penetration of fluid to the heating film elements can not be allowed.
The installation of the laminate did not seem such a difficult task, since everything looked extremely simple in the instruction in the instruction:
Video: Installation process of film warm floor under laminate
An exemplary installation scheme was compiled. At the same time draws attention to one important moment. In the conditions of the existing room, if you start with the installation of a whole board from the wall (in width), then the narrow strip is the thick of only about 10 ÷ 12 mm in the end. Naturally, such a narrow fragment high-quality snapped in the castle - it is impossible, and you will not leave such a gap either. So, it is necessary to reduce the width of the starting strip, about 60 mm - then the finishing band will become quite acceptable to laying the width.
As can be seen from the video instruction, the next button for the lock connection is joined with a previously laid at an angle, and then, when lowering down - the lock is snapped.
But I have along one wall there is a pipe inverting system of heating system, which has previously appealed attention. Therefore, the coating has to shorten the coating (the space behind the pipe was subsequently filled with fine trimming - they are practically invisible). But this, in turn, means that from the side of the outer wall it is impossible to carry out a qualitative defoding of the starting strip.
For the cropping of the coating from the rest of the walls, inserts are prepared - dried from the remaining OSB sheet waste 10 mm.

Everything seems to be ready - you can start.
The first strip was prepared and laid. And immediately the first problem - due to the existing curvature of the wall, this strip cannot be consistently located along it with an emphasis on the insertion-wedges. I had to adopt a non-trivial solution - temporarily in the area that will be closed by a plinth, fix the collected band to the surface of the floor with granted screws. They will be removed at the end of the installation work.
But this problem was not the main thing. After assembly, the second band was undertaken with a dozen unsuccessful attempts to combine its lock from the first. Nothing turned out - on the one hand, about the center of the room, the connection goes - it does not work with another lock. And vice versa. Frankly, there was a light panic, until he guessed to search for advice on the forums on the Internet. It turns out that the case is quite common and can be due to several reasons:
1 - The surface of the floor may have although not particularly noticeable curvilinear deformation, which interferes with the normal operation of the locks.
In the straightforward, I was sure, but I still checked once again to make sure that the reason was not in this.
2 - Laminate after the acquisition was not allowed to be crowned in the temperature and humidity conditions of the laying.
Also, by - the boards were unpacked and leaving in the neighboring room with exactly the same conditions all the time that the floor was aligned and the system of heating it was mounted. That is, three days - minimum.
3 - Factory laminate marriage. There is no one in any party, and there are boards with imperceptible distortions of forms. Moreover, it happens that the amount of such cancer increases up to 10%!
I decided to check. And with the revision of the first board of the second row, it was found that her face end with the lock is not quite perpendicular to the longitudinal! That is, when assembling the strip, it turns out not a straight line, but the imperceptible eye is broken, and the error to the opposite end of the assembled band runs in the good one and a half millimeters! Naturally, no about the triggering of locks along the entire length and speech can not go.

I postponed this board aside - took another with preliminary control of the corners. And the strip lay with ease, the locks immediately worked along the entire length!
All subsequent boards with addiction checked for direct angles. But, as it turned out, this was the only defective - she then went to finishing work.
Well, in the future, they did not draw any special problems, and the laying went very spore. There were a couple of "roughness" - they mentioned below:
| Illustration | Brief description of operations performed |
|---|---|
 | Unfortunately, in the rearness of the "struggle" with starting strips and the experiences associated with it forgotten about the photo. So in the first illustration - already two laid rows. But the most important thing is still visible. First, it is inserts that had to be laid only along one wall - the reason has already been explained. Secondly, the screws are visible, which the starting strip was recorded on the floor surface. They were subsequently removed. |
| And in this picture, the opposite edge is clearly visible - the same pipe of the heating system, which interferes with the "classical" laying of laminated coating. So I had to adapt. |
 | The third band is already assembled in length (end locks) and posted on the longitudinal castle line. It remains to raise it face a little further and lower - it easily entered the connection with the second. |
 | But with the fourth strip - again the hint, resists. True, the reason was revealed quickly. At the corner, at the intersection of two milling grooves of the castle, there is such a thin thorn. It has no practical significance - just "production costs." But but, as it turned out, this "Gadenash" is able to fasten and interfere with the compound. |
 | Solution Banal - Before assembling the next strip, all such spikes cut off with a knife. |
 | It turned out such a picture. |
 | And in order not to stop at all - it makes sense to fully check the locks of each board. Time does not take a lot. |
 | For example, in the locking groove of one of the boards, too, there was also a small "surprise" in the form of a pressed glued roller. Surely, you will be unnoticed - there would be a problem when assembling. |
 | To check the grooves adapted the back side of the sawmill from the electric bissing. Spent along the entire length - and the grooves are guaranteed clean. And there will be any obstacle - it will surely feel it. |
 | Otherwise, the stack went fast, almost as easily as shown in the video instructions. And the main problem was, rather, thoughtful placement of the plank board. So that the same patterns on this, say, not quite ordinary design of the surface, did not go in a row. And plus it is important to rationally use the remaining trimming to minimize waste. But the pre-compiled scheme in which the necessary shift of the boards and the possibility of using the remaining fragments is taken, helps to cope with this problem without much difficulty. |
 | It is important - there is always a broom and scoop at hand. On the legs may be a small garbage, the inadmissibility of which has already been said. By the way, the solid small fragment remaining under the laminate can be very potentially dangerous. It is quite capable of time under the action of a dynamic load on the coating to gradually "spray" and the polyethylene film, and the heating element. So for the cleanliness of the beginning to the very end of the laying. |
 | And literally in a few hours - ready-made flooring. The last row is a narrow, only about 80 mm wide, but it also fastened with the castle with the previous one. And so that it does not "hide" - temporarily put the father-in-law. He will help his severity (small) will help this narrow strip "lie down" in place. After the end of the installation of the last row, the screws from the first strip were unscrewed, all spacer inserts were removed. The floor is left in this form until the next day - it is desirable to give him a little time to adapt in the mounted state. |
The next morning - everything is fine, the boards are amazingly smoothly, anywhere nor squeaks, no deflection. Tried to include the "warm floor" system (again with a somewhat overestimated heating threshold). Already literally in a minute - quite a tangible effect. Naturally, after that, the system of inheritance was turned off - it is time to come later, with the onset of cold weather.
Fifth stage, finalizing - "Guidance of final beauty"
Here I will try at least as short as possible - just to demonstrate the result of the repair in general.
| Illustration | Brief description of the operation |
|---|---|
 | The task of the day is to put everything in order, finish with decoration, put the furniture and transfer the finished room at the disposal of the hostess. I start with the shelf-niche above the thermostat |
 | Of the laminate fragments remaining after cutting, I cut the parts for the bottom and the side walls of this niche. Immediately mount them in place - bottom to small screws, whose caps will then be hidden by a decorative corner, walls - on silicone thermoclay. Fixation turned out very good. |
 | The next step is the long bedside shelf. This is just a defective board. Cut in size, stacked, fastened with small screws. |
 | Next - there is a framing of all external and internal angles with a decorative plastic corner. |
 | Shelf-niche after the framing. |
 | After that, the long bedside shelf is framed. |
 | It is time to install plinths. The first step must be cut off protruding around the perimeter from-under the coating of the polyethylene film. From the plinths are removed slats-plugs covering the cable channel. Cable gaskets are not expected - fastening screws will be screwed through this channel. |
 | Marking is made - to begin with the most complex knot for the door, with several external and internal angles. |
 | From short segments of plinth and profile parts (external and internal corners and plugs) a node is collected. |
 | And so that it does not fall apart with the final installation, the details are fixed with each other with small droplets of silicone thermoclause. |
 | Fastening the angular node through the cable channel with self-tapping screw. |
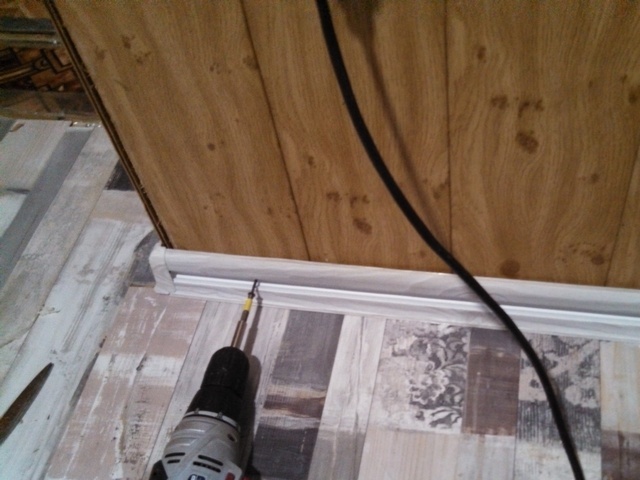 | On the straight area - everything is much faster. |
 | After fixing the plinth, the plane-plug is cut into the desired length and is installed in place. |
 | Another inner corner - and left wall. |
 | Along the outer wall, the plinth is not needed (there is a pipe of the returns), that is, there is another small plot to the right of the door. |
 | Accurately twined previously remote wallpaper fragment - on the site of the passage of the cable through the wall. |
 | You can enter furniture. But in order not to scratch the laminate, on the legs of the bed, chairs, the tables are glued here such elastic linings. They are in a wide range are presented in the store, and cost inexpensively. |
 | Installed in place bed. |
 | And then - and temporary workplace. Temporary because the old writing desk is decided not to enter back. - It will be too disharmoned with an updated view of the room. Will go on the expense material in the manufacture of a new homemade convenient table. |
 | By the way, here it, made a somewhat later table - style and design in strict accordance with the wishes of the owner of the room. |
Well, that's all - the "point" was raised about the dinner of the fifth day.
* * * * * * *
Repair is held for two years ago. That is, you can estimate and intermediate results of operation.
The coverage is reliable - no squeaks or unstable areas have not appeared.
Heating floor functions perfectly. In accordance with the instructions attached to the thermostator, the system operation modes were programmed. It turns on to heated to a level of 25 ° C in 5.45 and works in this mode until 8.00 - while the daughter is going to study (at first - to the gymnasium, and now - to the university). From 8.00 to 15.00 the heating threshold is 18 ° C, so the heating elements at this time are practically and do not work. I repeat that in the house there is good heating, and it does not happen coldly, that is, to drive a "warm floor" at the time when no one goes on him - there is no need. From 15.00 to 23.00 - again in mode 25 ° C, at night - 18 ° C. On the weekend mode is divided only on day (heating) and night.
Perhaps you will be interested in information about how mounted
I can not say that such a mode of operation at least some sensitively affected the total consumption of electricity. Everything turned out really very economical.
But in the winter in the winter it is really pleasant to go by barefoot - the feeling of increased comfort. And in particular, of course, it was rated a cat with a cat - in the cold they love to sleep on the floor in the daughter room.
On this end. Do not judge too strictly - and with the floor, and with the laminate was the first experience, as it seemed to me - sufficiently successful. I will be glad to listen to comments, suggestions, critical statements. I will answer questions. Read on the site.
Perhaps you will be interested in information on how to install.

Evgeny Afanasyevchief Editor
Publication author24.08.2018
![]()
By setting the warm floor under the laminate as the sole or additional method of heating the room, it is possible to significantly increase the degree of comfort compared to other options. To make the placement scheme of the elements and the installation of the entire system, it is necessary to familiarize yourself with the specifics of the work performed. Agree?
We will tell you how to choose an outdoor coating capable of working in a tandem with a warming film system. With us you will learn how to properly arrange the components of the warm floor and how to connect them correctly. With regard to our tips, you can independently fulfill all the stages of difficult, but quite affordable work.
The quality of work and the life of a warm floor laid under laminated panels depends on the parameters of the acquired equipment and the material, with the understanding of the characteristics of their combination.
For independent development of the infrared layout scheme, it is necessary to take into account the physical features of such heating.
Parameters of infrared film floor
The film heater is a flexible narrow web, placed under the floor coating and containing the heating element. It produces electrical energy transform into thermal waves of the infrared band.
The heating of the laminate or other material occurs from the bottom due to its emissions. After heating the surface of the floor in thickness, the heat returns to the air heated room.
Gallery of images
Laminate is an outdoor coating that has gained extraordinary popularity in our days by virtue of his advantages. The main dignity is accessible from a financial point of view. It is also practical, possesses a fairly good service life, simple in laying. And for fans of warm floors that appreciate comfort and comfort in their home, the use of laminated panels as a final coating is the perfect solution! But not all systems of warm floors can be mounted under the laminate.
Warm floor under laminate
There are three main types: electric, water and infrared warm floor under solve, of course, you, but the last type is considered the most modern and upgraded. It is about such a warm field and will be discussed in our article.
IK-floor under laminate - the lot of modernity
Electric and water options gradually go into the past. Under the laminate, or, as it is still called, film, won the vast popularity among the population. The relatively small indicator of thickness and homogeneity of laminate panels ensure the effective distribution of IR rays over the entire surface. And the structural features of the film canvase (warm floor system) do not allow radiation to penetrate deep into the base, ensuring that high level The economy of the heating system.

Principle of operation of infrared warm floors
The operation of film warm floors is based on the use special technologyconcluded in the features of bimetalov connections. When the installation is connected to the power grid, the current passes through these bimetallic connections, causing infrared rays that comes from them.
All for and against
Infrared has a number of advantages over their competitors:
- simplicity in montage;
- the ability to independently install;
- availability;
- high-quality substitution of stationary heating (in areas with warm climatic conditions);
- lack of fluctuations in temperature modes;
- economical energy consumption.

Is it possible to install the infrared floor yourself?
The warm IR-Paul under the laminate will not only make the coating modern, but also give it a functionality property that is in the instant creation of a comfortable microclimate indoor / room at any time of the day and in winter, and in summer. Making the installation of infrared warm floor under the laminate itself more than real. At the same time, there is no need to resort to the use of expensive technologies and make a tie of concrete.
Required toolkit
For work you will need:

Types of infrared film
Infrared film is classified depending on the type of heating element, and it can be two types:
- bimetallic;
- carbon.
It is worth noting that the carbon film is considered more elastic and durable.
How to put infrared warm floor under laminate: General installation rules
- Distance. The warm floor system should be arranged at a certain distance from heating sources, such as fireplaces, batteries, furnaces and others. As a rule, the minimum index of such a distance is 50 centimeters.
- Free space. It is allowed to assemble exclusively on the free furniture space infrared warm floors under laminate. Reviews indicate that when installing a system for furniture or equipment, the heating design or the entire floor can overturn.

- Availability. The floor covering should maintain the ability to control the functioning of the design and provide access to the system at any time.
- Ventilation. As is known, the laminate coating is characterized by minimum thermal conductivity. That is why it should have high-quality ventilation, which is partly dependent on the proper laying of laminate.
We make infrared warm floor under laminate with your own hands: Installation instructions
The main requirement when laying a warm floor is an even base that does not have any bugs and cracks. Also in the room there should be a socket that allows you to connect to the power grid in 220 V. After you have seen in accordance with these two requirements, you should proceed to the following actions.
Preparatory and insulating work
Step 1. Cleaning the base. Cleaning work in order to eliminate pollution and garbage. It is recommended to use vacuuming equipment.
Step 2. Measurements. It is necessary to measure the size of the room and make the calculation of the material. Installation of the IR film must not. Therefore, if, due to the size of the room, a certain amount of solid bands does not work out, then the possibility of creating small gaps between them.
Step 3. Installation of the heat transfer substrate. Under the laminate when laying implies the use of a special substrate with heat-reflecting properties. It is covered by such material throughout the area of \u200b\u200bthe room. In case of inconsistencies, it can be shortened.
Step 4. Processing the jack of the substrate. The joints of the heat transfer material should be glued with the mounting adhesive tape from the outdoor side.
Step 5. Preparation of heating cut, guided by the size of the room. Cuts can be done only in areas that are painted in white.
Step 6. Film laying. The heating film is placed on the floor over the entire room, if it is released from cumbersome furniture. If this is available, laying should be made in free places.

Step 7. Tire insulation. Copper tires in places of film cuts should be isolated by electrical adhesive tape, twisting it through the cut slicer. It is very important at the same time so that the air does not hit the tape.
Step 8. Processing grounding tire. A tire, which, as a rule, is located in the central part of the heating canvas, must be bent on both sides. At the same time, cutting cuts should not, actually, as well as the remaining white areas.
Step 9. Isolation of the film on the plot, which is released from the grounding tire of copper. An electrical adhesive tape is used. It is necessary to glue it so that it remains to bend on the wrong side.
Step 10. Isolation of sections of the IR film with a scotch, which is pasted on ½ width and driving through the cut.

Wire soldering and connecting thermostat
Step 11. Alignment of the film at the placement location and its mounting to the substrate from the other side, which is the opposite side of the temperature regulator side.
Step 12. Soldering of wires that combine individual sections of the film. Film Bend from the other side where the temperature regulator is installed, so that its insane side look up. In order to increase the level of comfort when performing work, it is allowed for a while to fix the film by mounting adhesive tape. Next, the preparation of materials begins: the installation wire, the cross section indicator is 2.5 m 2, the soldering tool with a capacity of no more than 60 W, solder. With the tires of protective destinations, which are located along the edges of the film, through the use of a heated soldering iron or a stationery knife, remove the insulating layer. The solder apparatus is the edges of the cut, the insulation melts. After that, it remains only to clean the knife.

Step 13. Connection of the film sections in parallel by the method of soldering. The installation of the installation wire from the insulating coating should be accomplished neatly on the area, which will be enough for the soldering. In this case, the lives of the wire is not cut. Connecting the sections of the film, you should be guided by the Rule "Phase-Zero". Based on this, it is rational to use a wire with a multi-colored insulating coating. During the soldering, it is impossible to cross the wires, and were too stretched. Otherwise, do not avoid damage or cliff.
Step 14. Isolation of soldering places. Places where wire fired are isolated by electrical adhesive tape.
Step 15. Installation of the temperature sensor of the floor. Install such a device under the film, in the recess, which was made in advance in the substrate with heat-reflecting properties. The thermal sensor is laid under the film in the central part of it working area, in the very warm place room. Performing the last requirement, the risk of overheating film master negates. The wire that is included with the thermal sensor is paved along the substrate and lead to the thermostat. The latter is fixed to the substrate with the help of assembly tape.
Step 16. Stripping of wires, the congestion of them ends and connecting to certain terminals of the temperature regulator. Similarly, you need to connect the installation wire that goes to the heating tires of the film, and the nutrient cable.
Step 17. Following the previous action algorithm, you need to connect the turntable tires of the film. They are cleaned, clipped and connected by using a strip from copper or cable. The exit wires are placed in a corrugated pipe.
Step 18. Film fixation. It is necessary to mount the film on the substrate using the mounting tape. At the same time, it is impossible that individual sections of the film lay down on each other.
Testing and laying of laminate panels
Step 19. Fastening the grounding wire derived from the corrugated pipe, to the contact of grounding the temperature regulator, and if there is no such, to the ground contour.
Step 20. Check before laying you need an infrared film warm floor. Installation under the laminate is carried out only after preliminary inspection of the heat structure. To do this, it should be connected to the power grid to 220 V, set the temperature regulator to the middle position and run the heating process by pressing the toggle switch. In such a state, hold no more than 1 minute, after which the quality and degree of heating of all parts of the film are tested by hand.
Step 21. Cleaning. Elimination of the remnants of the mounting cable and other garbage. It is considered permissible to use a vacuum cleaner.
Step 22. Laying of a polyethylene film in order to improve its waterproofing properties. The IR film is covered with polyethylene so that there is a lamb to the walls somewhere 15-20 cm. The thickness indicator should be more than 160 μm.
Step 23. Laying of laminate.

Let's say no carpets
Remember! It is not recommended to use carpets and other floor coverings as decor and interior design, if infrared warm floors under laminate are installed. Consumer reviews confirm it. After all, such things create the effect of the delay of warm air, which can cause overheating of the floor. For example, if the palace is to lay where the thermostat is installed, the power relay will systematically turn off, which means that the heating efficiency of the room or room can not be speech.
Before laying infrared warm floor under laminate, you should draw up the appropriate scheme, given the following nuances:
- The temperature controller should be located at a height of 15 cm from the floor in the most accessible and convenient zone.
- The surface temperature of the laminate floor as a whole is directly dependent on which the thermal sensor will be placed in. The optimal is the location of the device near the windows or doors - where the coolest.
- Laying infrared warm floor under laminate is under installed furniture and equipment. If, for the absence of sufficient space in the room, this requirement is violated, then it is necessary to create so-called air pockets, the minimum height indicator is 10 cm.
- The extreme canvas of the film should not be tight pressed against the wall surface. They must be at a distance from the wall of about 15-40 cm throughout the perimeter. In this case, the length of the canvas should not be more than 8 cm.
- Cut film heaters only in special places.
- The location of the infrared floor under the laminate is unacceptable.
What do users say?
Most people who have a laminate floor covering choose infrared warm floors under laminate. Forwards, however, there are both positive and negative.
Some notes the effectiveness of such floors as a heating system as a whole for the room. Others complain about an inesthetical appearance due to the loss of laminated laminate, as well as the instability of the structure. The disadvantages of which users say can become a consequence of neglecting one or another installation or exploitation rule, since it is very important to correctly install infrared warm floors under the laminate. Reviews When choosing a type of heating for the floor, of course, it is worth reading, but it is still no need to take them to heart. It is better to study the technical characteristics of the IR films and the most laminated coating when choosing, and the installation works are trusted by a specialist if you doubt our own forces.
Warm floors are an ideal solution for any home or apartment. They provide comfort to accommodation, so many people can not imagine their lives without this system. For apartments, the water floor is considered unacceptable, so the installation of infrared warm floor under laminate is considered the optimal choice, because such a system provides uniform and high-quality heating of rooms, and is also considered suitable for laminate, easily withstanding heat from infrared film.
To the advantages of the application under the laminate, it is infrared:
- uniform heating is ensured, which is especially important for a laminate, which does not withstand excessive overheating in one section of the coating;
- there are no temperature drops in the system, which are very often found using water warm floor, and it is precisely the most negative factors for the durability of the coating;
- the process of laying an infrared film is considered very simple, and if you see the training video in advance, then no difficulties will arise during self-work.
In which places it is best to use the system
Initially, it is necessary to figure out which elements the system consists. It includes the following components:
- electric wiring;
- direct infrared film, and it should be enough to perform work in a particular room;
- temperature sensors;
- clamps for fastening;
- temperature regulator that allows the placeholder to independently control the heating process;
- insulation.
 The composition of the infrared floor
  Film for infrared
 Films are produced in different lengths and width, so elements are selected, ideally suitable for a certain room. On each element manufacturers create a special line on which it is cut. In other areas, it is prohibited in any way to deform the material.
Use infrared floor under laminate in different rooms. Often it is formed directly throughout the apartment. It is optimal to use its use in the kitchen or in another room, in which carpets are not planned.
When planning the location of the film, the following points are taken into account:
- it is impossible to perform work in a wet room, since the infrared film will last long and in accordance with its appointment exclusively in the dry room;
- it is allowed to twist the rolls, but you can not create beggars that lead to quick damage to the product;
- it is impossible that the film is located next to different heating devices or a fireplace.
The installation of infrared warm floors under the laminate is considered to be understandable and simple work, so often the owners of residential real estate prefer to exercise it on their own.  Infrared Heat Floor Installation Scheme
Infrared warm flooring technology for laminate
This work must be performed only in a certain sequence of actions. Each stage is large and important, so you need to clearly follow the instructions. To clearly see the stacking process, it is recommended to see the training video in advance, which takes into account all the nuances and the features of the process.
Preparation of instruments and materials
Installation of infrared film and the creation of a full-fledged floor covering from the top of the laminate is considered an easy work for which the preparation of the following elements will be required:
- direct infrared film, and its number is calculated in advance, for which the area is taken into account, in which work is planned;
- electric wires that are usually sold complete with a film, but often they are poor-quality or not enough to perform work, so they have to buy them separately;
- thermostat;
- special film with heat transfer effect;
- bitumen isolation;
- contact clamps;
- double sided tape;
- substrate designed for laying under laminate.
When choosing a heat transfer film, it is important to take into account that it should not be conductive.  All you need to connect a warm floor
  Head of thermal film system infrared warm floor
Surface preparation
Laying infrared warm floor under the laminate begins with the preparation of an existing foundation. The following features are taken into account here:
- the screed must differ in perfect evenness, and the presence is not allowed on the basis of any transitions or other problems;
- if there are essential drawbacks on the basis, it is recommended to make a new screed to get a perfectly smooth surface;
- it is important to determine the location of the thermostat in advance, and several elements are often required if it is planned to lay a warm floor not only in one room, and immediately in several rooms;
- laying is made on the base of the heat transfer film, and the isolon presented in the form of rolls, which is raised throughout the room, is most often selected for these purposes, which is filled with a bilateral scotch or stapler.
It is not allowed to lay the infrared film under those sections of the floor on which large-sized and heavy furniture will be located, as this can lead to the destruction of the heating circuit, so the optimal film laying scheme is formed in advance.  Paul alignment
  Mounting thermostat
  Laying the substrate with heat transfer film
Laying infrared film
Next, the important stage begins, which involves the use of directly heating film. The laying is performed in such a way that the copper stripes are located at the bottom. Often, in the process of work, there is a need to cut the films into individual elements, and it is permitted only by special lines applied by the manufacturer. If you perform an incision elsewhere, it will damage the film.
During the styling of the film, it is important to leave between it and the walls of the room at least 10 cm.
As soon as the film will be completely laid down, connection and insulation will be performed, and these actions are implemented in the following steps:
- all places where the copper tire was cut, it is necessary to be treated with bitumen insulation, and it is important to make sure that silver contacts are absolutely blocked;
- contact clamps are mounted, and they are installed on all areas where the wire is connected;
- the contacts of the copper are clamped by conventional pliers;
- in the clamps, the wires are stacked, which are pre-canceled, after which they are also fixed with the help of pliers;
- all connections are isolated, and it is advisable to check each site several times so as not to miss any places;
- the temperature sensor is set, and it is also fixed with insulation;
- at the end of the work, the thermostat is installed on the place where it was planned in advance, and then the scheme was performed in advanced in advance its connection.
It is desirable to connect the thermostat to electricity with a separate machine that is installed in the shield.  Fastening infrared film
  Brepim clamp to copper coupling - press the clamp of the passage so as to prevent spark
  Insulation of the contact compounds of warm infrared floor
Staying protective coating
As soon as the entire system is created, it is important to test it, designed to determine the presence of different errors or other problems in the design. If no shortcomings are detected, the special protective coating is made.
For this, a special film is used, which has high waterproofing parameters. It is important to create a sealed layer from it, so all the joints are securely and correctly skidded with scotch so that there are no passages.  Protective coating is stacked on the infrared film
Installing laminate
The next stage involves the direct creation of an outdoor coating. Laminated material can be laid only after testing the entire system to make sure there are no problems or disadvantages of the design.
The process of laying is considered standard, but certainly the following features are taken into account:
- since the laying is performed on the heating system, the high temperature will certainly affect the coating, so it will constantly expand a little and narrowed, so a small distance is left between the walls of the room and the coating, for which it is recommended to use special wedges;
- certainly necessary to smoke joints in the process of glue, in order to prevent the destruction of the coating;
- all strips are connected to each other very easily and simply, for which special locks are used, which they are equipped in the process of production;
- the laying should begin with the window, and it is allowed to perform a solid installation, in which all the coating for the apartment and the house is performed by one material without transitions, and in this case the joints can be avoided between separate rooms.
As soon as the floor covering is fully made, the most complex and specific works are completed, so you can use efficient and high-quality heating of the floor.  Laying of laminate
Trial start system
After laying the laminate, it is necessary to fix the thermoregulation block on the wall in the selected area. It is not allowed to connect this system to a conventional outlet available in any apartment or house, so it creates a separate output to the shield.
For infrared heating, a separate automatic is created. After connecting, a test start is performed. If all the work was performed correctly and in accordance with the requirements of security, then the flooring is heated literally in 3 minutes.
Connection schemes
Installation of infrared design should be carried out with its indispensable connection to the electrical system and the thermostat. To do this, use the special instruction applied to the warm floor to ensure the perfect result of the work and safety of the design.
There are the following film connection schemes for electricity:
- one-sided - connection and wire connection is performed on one side. Therefore, they intersect with each other, but these places of intersections are certainly hiding behind the plinth, to prevent the system failure;
- bilateral - Connection here is performed from different sides. The process itself is implemented much faster, as well as a small amount of wires. As a rule, connections are executed after the system is connected to electricity. Proper laying of wires
- before working, the base of the floor is not purified from garbage and dust;
- there are significant differences and irregularities;
- lack of heat transfer material;
- cutting films not by the existing markup, but at the request of the employee itself, which leads to a violation of its main elements;
- during the laying, the copper strip is located at the top, and not below;
- installing the thermostat in a hard-to-reach place;
- poorly broken ends of the wires.
Possible mistakes
In the process of creating a system, serious errors may be made, leading to a violation of the system's performance or to the danger of its use. The main mistakes include:
Thus, the creation of infrared warm floor is a fairly difficult job, to implement which it is necessary to carefully study the appropriate instructions, as well as to remember frequent errors in order to prevent them with independently performing the process. If all actions are implemented correctly, it turns out reliable and quality system, providing uniform and optimal heating of any room. At the same time laminate laminated on top, correctly selected, will not collapse or rolled under the action of high temperature. Only following all recommendations, you can make high-quality infrared warm floor under the laminate.
Video Installation of infrared warm floor under laminate
The video describes all stages of laying infrared type of warm floor under the laminate.