Step-by-step instruction on the installation of metal tile on special technology from A to Z
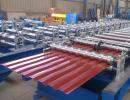
Metal tile is a roofing material having a form of profiled steel sheets with a polymer coating. It is used to cover the roofs with an angle of more than 14 degrees.
Externally, it looks like a classic ceramic tile, but surpasses its reliability and ease of installation. In this article, we considered what is better?
Material sustainable To temperature drops and other negative climatic influences. Its main disadvantage is low sound insulation featuresBut it is eliminated with the right job.
In this article you will learn how to make a roof of metal tile with your own hands, step by step from A to Z. If you do not know how to choose a metal tile, then.
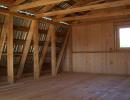
This stage of work should pay special attention, since it will be on the crate. Also, this design provides natural inner roofing space.
- Metal troops made from wooden bar. The mutual location of the boards can be solid and shutty.
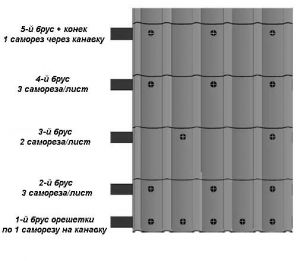
- Most often used robust structuresAt the same time, the distance between the boards () is strictly tied to the distance between the lower depressions of the tile waves, as in these places the material has the greatest strength.
- Distance Between the first two bars from the side of the skate must be approximately at 70 centimeters less than the set step.
- The minimum thickness and width of the bracket for the crate make up 25 and 100 mm respectively.
- The width of the board for the counterclaim can be two times less. The first side of the roof of the roof should be the thicker of all the rest by 15-20 mm.
NOTE!
Boards pre- calibrate One size in order to avoid the occurrence in the future distortion and irregularities in the location of the tile.
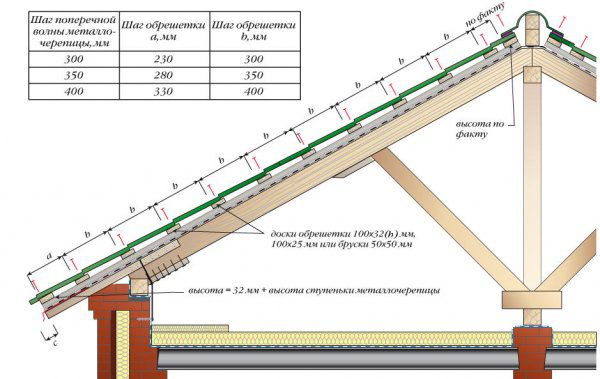
STEP of the crate
Installation of construction is carried out after Completion. The main income is attached to a counterclaim, which is associated with a rafter frame of self-drawing. At the ridge of the roof under metal tile put additional supporting boards.
Calculation of metal tileage
Count The required amount of material for the construction of the roof is done so (or use):
When counting the number of sheets in the row you need to keep in mind the value overweightwhich can reach 15-20 centimeters.
To ensure that it is better to avoid a lack of material, it is better to round all the values \u200b\u200bin the most side.
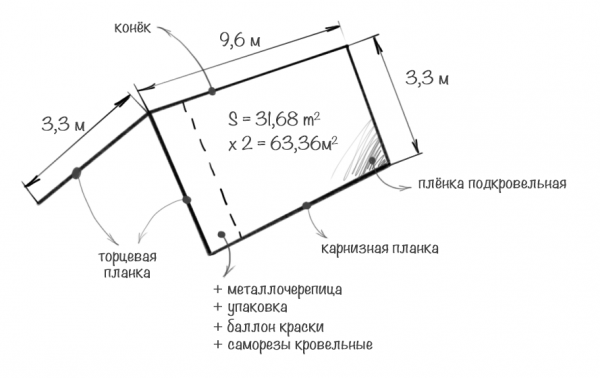
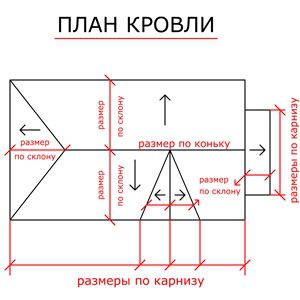
Calculation of roof
Roofing of metal tile: Waterproofing and vaporizoation
Before starting to install metal tiles with your own hands, you should take care of isolation . Protection Internal liquid spaces Provided by layers of vapor barrier and waterproofing.
Waterproofing is located between the rafters and the counterclaim and does not allow to fall in the inside of the roofing pie moisture from the environment. Self common moisture protection materials - These are polyethylene and reinforced films. They are tensioned throughout the area of \u200b\u200bthe skate with a slight savory. It is important to ensure that the waterproofing does not intersect with thermal insulation.
Roofing pie
Parosolation is a protective layer, inner roof moistureformed in rooms. This is the lowest layer of roofing pie, it is under rafters (it is attached to them) and thermal insulation, thereby ensuring its protection against condensate.
The roof of the metal tile must necessarily be qualitatively vaporized, in cold roofs without insulation, the installation of vaporizolation is not mandatory.
Required tools and equipment
The roof covering with metal tile begins with preparation of necessary tools. For mounting the roof from metal tile, you will need:
- Screwdriver.
- Rail.
- Scissors for metal or other devices for cutting metal, for example, high scissors, disk saw, etc.
- Building stapler.
- Roulette and marker.
- The components of the roof and roofing cake: tiled sheets, screws, hydro, vapor-and thermal insulation materials, brushes for crate and rafters.
NOTE!
When working with tiles you can not use Bulgark And other abrasive cutting tools, as it disrupts the structure of the sheet.
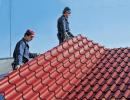
Mounting and laying Metal tile - step by step
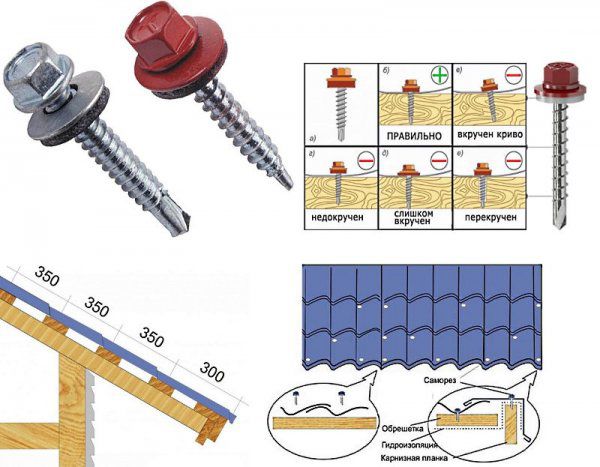
 How to cover the roof of metal tile with your own hands? Metal tile on a self-tapping screw with a gasket from ethylene-propylene rubber, which provides waterproofing plots of fasteners.
If a tile is mounted with a hidden fastening, then galvanized screws are used with a press washer.
Self-tapping screws need to be twisted with optimal force.
If the fastening force is insufficientThe moisture will fall under the hat and cause it corrosion. If the screws are tightened too much, the gasket is deformed that it will break its tightness.
- Before covering the roof of metal tile, make sure that the symmetry and reliability of the crate.
- Selfless screw in the bottom of the roof tiles, They should be strictly perpendicular to the plane of the shell boards.
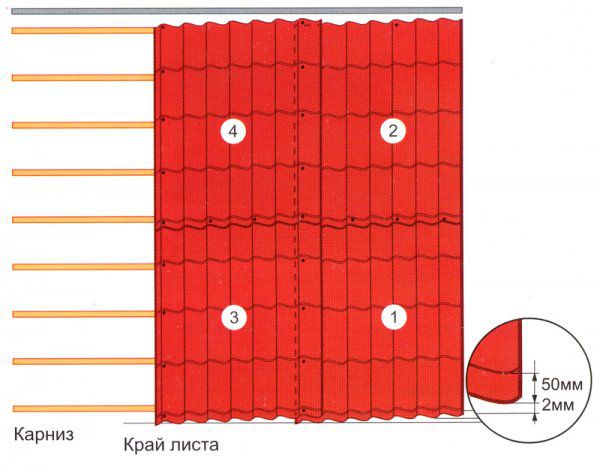
- When connecting two overweights fastening is carried out in wave lifts Using shortened screws.
- Installation of tiles begins with the lower left corner of the skate, subsequent sheets are stacked on top previous.
- Selfless screw to each wave of tiles around the perimeter of the skate and in a checkerboard order In the inner fields. If a screwdriver is used for this, then it is necessary to minimize its rotational effect on the material.
Metal tile - installation with your own hands + instruction
Now you know how to put metal tile and we suggest you familiarize yourself with the most important thing - instruction On the installation of metal tile.
Installation Metal tile - Step-by-step instructions
How to cover the roof of metal tile with your own hands? The first step is.
It is on it that all other elements of the roof will be fixed. 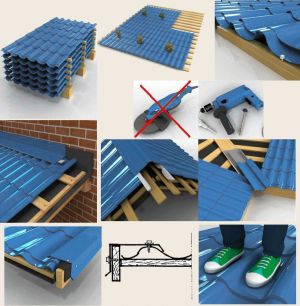 The system is constructed from wooden beams, while their size exceeds the dimensions of the bars of the crate.
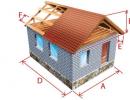
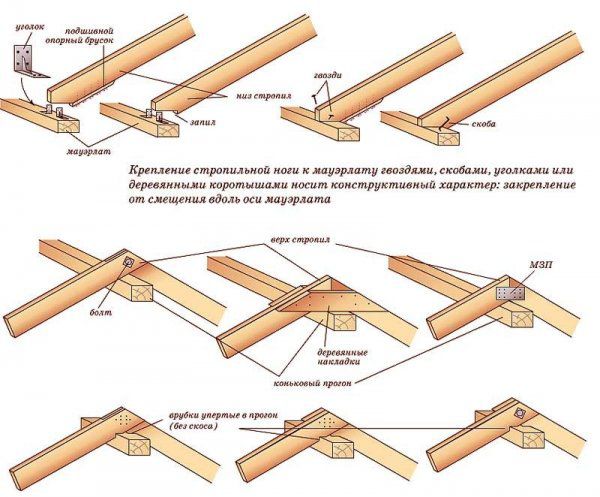
The most important elements of the rafter are:
- Mauerlat. This is a point of support design.
- Stropile legs. They hold on themselves and rest on Maurylalat.
- Stands. Strengthen the support of the rafter feet.
Fastening rafters to the wall is carried out using the so-called shoe. These are strips of metal that bind two structures with nails or self-drawing.
Next are set basic insulating layers: insulation, steam and waterproofing. The waterproofing film or the membrane is superimposed on the rapid system and fastens with it the stapler. Thermal insulation is located in cellsFormed by the intersections of rafting beams, and is fixed using the striking currency in the lower plane of the rafter.
Installing timing
After completing the installation of protective structures, it is possible to start installing the crate to which, in the consequence, we will lay the roofing coating. She is superimposed on top of the rafter and waterproofing layer And attached to the screws to these structures.
Installation of metal tiles do it yourself:
- Farmeter boards attached to the frontal board, protecting roofing from wind exposure.
- When performing work, the need to ensure good natural ventilation of space is always taken into account. To do this, leave the gaps between all layers of roofing cake. The basis of natural ventilation is the possibility of free air circulation under the rod of the roof.
- The last step is installation of metal tileage. Need to take into account that sheets should protrude Beyond the edges of the crate on 5 centimeters and aligned horizontally on the cornisa line.
- Sking Planck Attached on additional two boardswhich are installed at the joints of two skates when installing the crate. Such measures are needed to ensure additional sustainability of an important constructive element to negative impacts.
metal tile painting scheme
- . They break the snow masses coming from the roof, making them fall relatively safe for building designs and for humans.
- Planks of adjoins. These products are framed by tile joints with all the important designs, such as chimneys and ventilation pipes.
- Corners and endanders. They protect all the angular structures of the roof.
- Films. Used to redirect the streams of rain and melt water.
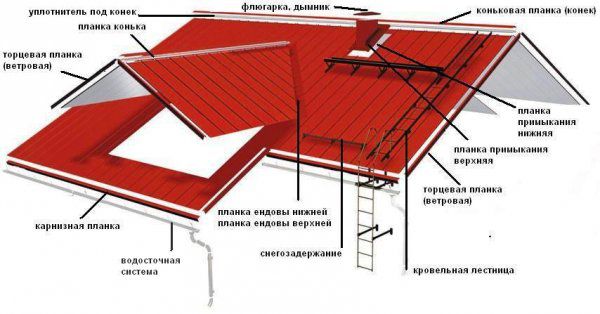
Doborny elements
- Distance between the beams of the rafter frame should not be more 60-90 centimetersotherwise the design of the roof can seek.
- When performing work, you need to wear shoes on soft sole And move along the tile, coming in its lower deflection. This will prevent the material to prevent the material.
- The absence of contacts between protective layers is important not only to ensure ventilation, but to prevent them mechanical damage With friction.
- To ensure additional ventilation can be equipped hearing windows In the attic room.
- For a smooth installation of all oblong challenges need to stretch thread and fix it between two already installed structures.
This is how the technology of laying metal tile on the roof looks. This material has an exemplary service life of about 50 yearsBut without the need for repair work, the operation will take place only with the correct installation of the installation.
Useful video
Laying Metal tile with your own hands in video format: