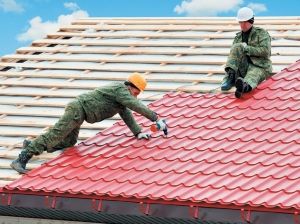
Order laying Metal tile on a two-screw roof
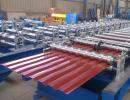
In the overwhelming majority of cases, when repairing the roof, the choice drops on metal tile.
In addition to the long list of economic and operational advantages, this material is also interesting for the fitness for self-laying.
At the same time, even the basic skills of the home master will be quite enough so that the roof is not only durable and practical, but also attractive outwardly.
 The widespread spread of metal tiles is due to the combination of the following advantages in this type of roofing material:
- Economic expediency.
Compared to most of the other roofing coatings, metal tile has a relatively low cost.
An even more profitable acquisition of such a roof makes it possible to refuse to hire builders for its arrangement, as well as long service life. - Low weight.
With an average weight of 1 square. M material of about 6 kg The total mass of the roof is obtained relatively small. This allows you to do without the use of a powerful and expensive rafting system. In addition, the light roof does not require the installation of a solid crate, which simplifies the calculation of the roof and reduces the cost of work. - Resistance to the impact of external factors. Protection is ensured by using several protective words in the design of the roofing sheet. Therefore, the metal base of the web is not afraid of a long-term exposure of moisture, nor direct sunlight, no damage during styling or during hay.
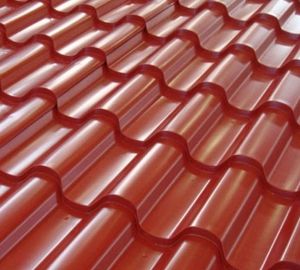
- Aesthetics. Metal tile production technology allows you to form an absolutely any texture. Accordingly, on the market you can easily choose a suitable option to the general exterior of the building. Even more expanding the range of painting sheets in all shades of the palette.
- Fire safety. The basis of metal tile is a sheet of galvanized steel. This material is completely non-combustible, due to which is absolutely fireproof.
The dignity of the coating from metal tile makes it the most practical, affordable and attractive Externally, an option to arrange a roof.
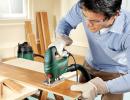
Materials and tools
 For mounting sheets, metal tiles will need a set of traditional finishing tools:
- electric screwdriver;
- electrolovka or disk saw;
- marker;
- construction stapler with brackets;
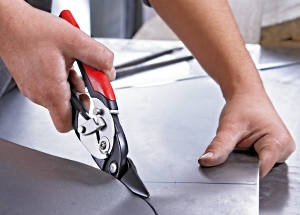
- scissors for metal;
- scotch;
- laser plane builder or construction level;
- roulette.
Important! For cutting sheets, metal tiles cannot be used with abrasive discs working on high revs. Their use will lead to overheating of the steel base, melting and destruction of the polymer protective coating. Such damage reducing the service life of the roof repeatedly.
From materials, in addition to the actual metal tile and accessories to it, the following will be necessary:
- bars 50 x 50 mm;
- boards 100 width and 25-35 mm thick;
- sheet waterproofing material;
- wooden rails;
- galvanized selflessness, nails.
Individual protection and auxiliary devices will also need: staircase, scaffolding, brush for savory sour cream, etc.
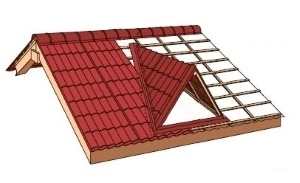
The structure of the roofing "cake"
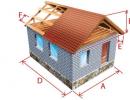
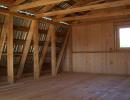
The basis for creating a roof from the metal sprinkler is slinge system. In a double (or twin, as it is more common in everyday life), the roof of the rafter system has the most convenient configuration for assembly work, since only two planes forms.
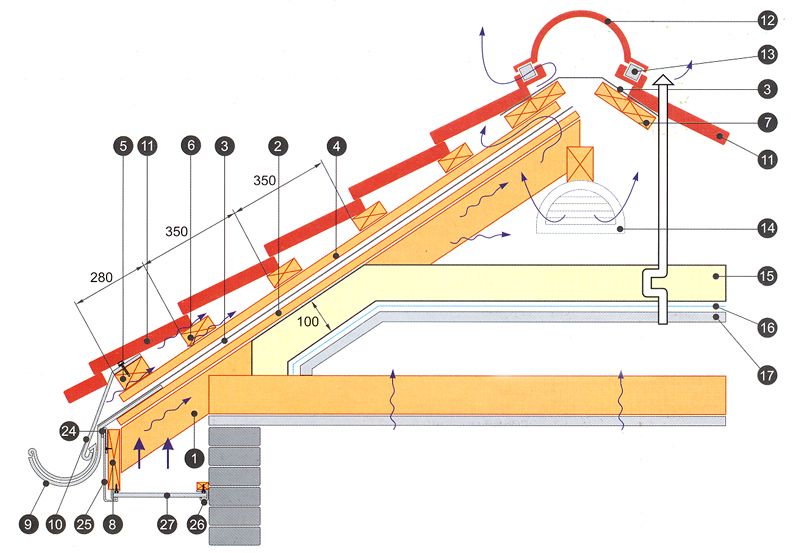
A layer of waterproofing material (3) is laid on top of the rafter system. Without it, the moisture condenses on the sheet of metal roof will be absorbed into the wooden structures under the roof, destroying them. Helps waterproofing and in cases where the roof begins to leak.
Vertical rails are attached to the waterproofing material on the racks - a counterclate (4). Their appointment is to organize the ventilated space between the waterproofing and the crate.
In addition, front boards (8) and cornice strips (10) are present in the roof design. The first is stuffed on the end part of the rafted (1) and protect from the moisture falling with the wind. The second serve to derive moisture flowing along the waterproofing layer.
Mounting order
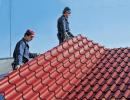
 On the duscal roofs Metal tile lays first on one slope, and then on the other.
Start laying sheet metal tile with nizhny The corner of the skate.
All installation work on the arrangement of the roof is carried out in several stages:
Checking the geometry of the carrier elements of the roof
At this stage, with the help of a roulette, the diagonal of roofing rods are measured and compared. If they coincide, the roof has a rectangular form suitable for laying metal tank.
In addition, you need to make sure that the horse and both eaves are strictly horizontal. Taste and flatness of the skates. Emergency sites of the rafter system are repaired.
Installing a frontal board and a swing swing
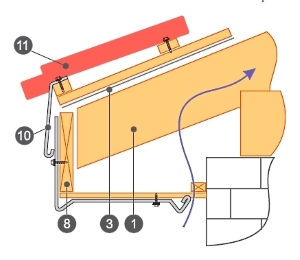 Place of fastening of the frontal board (8) - the end (lower) part of the rafted (1). This roofing element is fixed with galvanized nails.
Front boards should not be tightly isolate the underpants space from the street. To ensure the free passage of air, there should be ventilation gaps between them.
On the back side of the front board under the sink of the roof, a horizontal liner is installed. As such, you can use perforated plastic panels. This option is convenient to use fastening J-strips for plastic, navigable to the front board from the back. If the boards apply, then between them should be left ventilation gaps.
Installation of gutters of the drainage system
Hooks (9) It should be placed on one straight line with a slope In the direction of the planned drainage. Confident plums will be provided by an angle of a slope from 5 mm on the meter of the gutter. 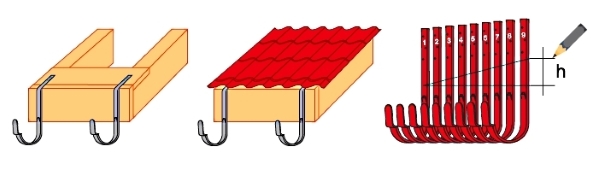
Most practical and easy to install enlarged length hooks. They are sewed to the bottom of the rafted over the front board. To ensure the vertical arrangement of the hook, the grooves of the required depth are cut into the board and lower part of the rafter.
First of all, it is nailed or fastened to the top of the rafter the upper part of the hook. Then it bends to the desired position and fixed on the end part of the rafter. If the installation of the drain is made after styling the metal tile, then the short hooks use, the upper part of which is not started under the roofing coating.
Laying of waterproofing material
For roofing "cake" applies rolled water-repellent material (films). During the rafter, the roll unfolds horizontally, along the cornice. It should be started from the bottom of the roof. Each subsequent strip stacked with the allen on the bottom. The magnitude of the allen - 15 cm.
Fix the canvases of waterproofing (3) is followed by a construction stapler. Material sagging is allowed to 2 cm. The joints of the joints are punctured by scotch. The top and bottom of the film is determined by the factory markers applied to it.
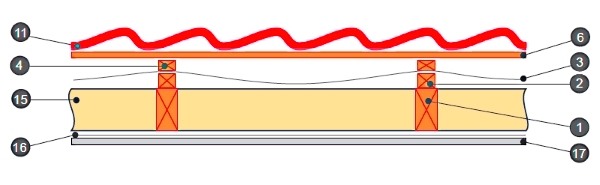
On rafters over waterproofing are stuffed vertical (4) and horizontal (6) Wooden slats. They are nailed through the central part of the rafter bars.
Attention! The roof of metal tile and bitumen waterproofing are incompatible materials. When the roof is heated under the sun, the bitumen melts, and the canvas will lose the ability to push moisture.
Installation of crates
Bruks or boards of horizontal crates are starting to be cut back, from the cornice. The first lap shaft must have a cross section greater than the cross section of the rest of the bars. When installing it, it is necessary to control the strict parallelism of the eaves. Installation of sheets of metal tiles begins with fixation in the lower wheel of the crate. Therefore, the appearance of the entire roof will largely depend on the accuracy of its installation.
The pitch of the bars of the crate depends on the distance between the horizontal waves on the sheet of metal tile and should coincide with it. Most often, the step is 300, 350 or 400 mm. The exception is only a step to the second bar of the crate. Here it should be reduced by 70 mm. 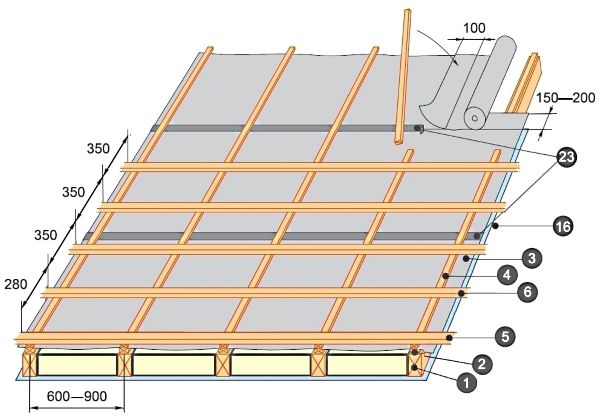
The top bars of the crates are also stuffed with decrease Step, up to the nipple of the bars closely. This will facilitate the installation of the skate elements and will add strength all design. Around the attic and hearing windows, chimneys, ventilation channels and other additional elements (bridges, snowstores, etc.) The doomle should also be strangle stuffing the solid cloth from BRUSEV.
Installation of cornice planks
Planks are attached along the entire eaves with galvanized screws. Fastening step - 300 mm. If the lengths of one bar are not enough, then it is increased. At the same time, the planks are stacked with a 50-100 mm scavente.
The cornice bar is attached with a slight tension, then the roofing material will be more resistant to wind gusts and less noisy.
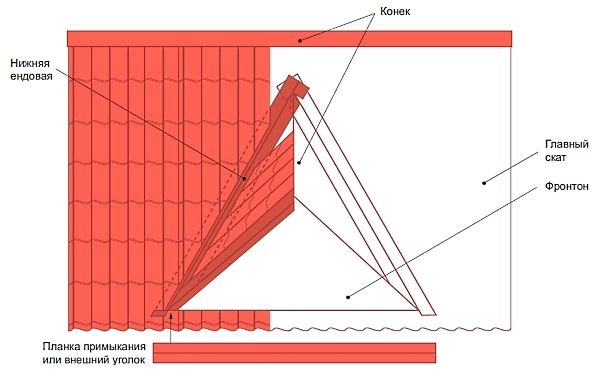
Installation of the Lower Endament
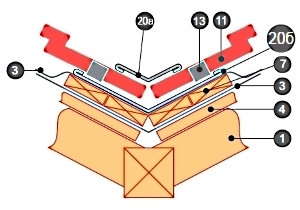 Where the roof plane (for example, the roofs of the roof of the house and the roof of the roof of the hearing window) form an intersection at a low angle, the installation of a special plank is required - the lower end (20b).
Under it is stuffed with a solid carage (7). As a creewater material, the plates are superimposed with a cross section of 150 x 25 mm.
Under the lower end, a solid strip of the screaming of the width of about 300 mm will be required.
The position of the lower end is chosen in such a way that its edge in the sink area passed on top of the cornice board. The sheet of metal tiles and the bar of the lower end is not fastened directly, and they are paved with a porous insulation.
Installation of chimney output
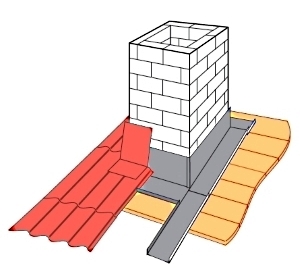 For a chimney brick tube, the order of actions will be as follows:
- the perimeter is superimposed by a layer of waterproofing with a nasce of 50 mm per pipe. For fixing, you can use heat-resistant tape;
- mounted the bypass planks (28);
- the pipe is cut out of a depth of about 15 mm, where the upper edges of the bypass plank are reached. It is possible to stroke only on whole brick, for the masonry seams to do this forbidden;
- a discharge plank is organized with a removal of water, which is either merged into the nearest Unda, or sent to the eaves.
The decorative pipe of the pipe at this stage of the work is not established, the metal tile is first stacked. For round chimneys, the distribution is performed from the sealing tape. To ensure a dense adjacent to the pipe, the tape before sticking will be required to be cut through the top edge in several places.
Installation of sheets of metal tile
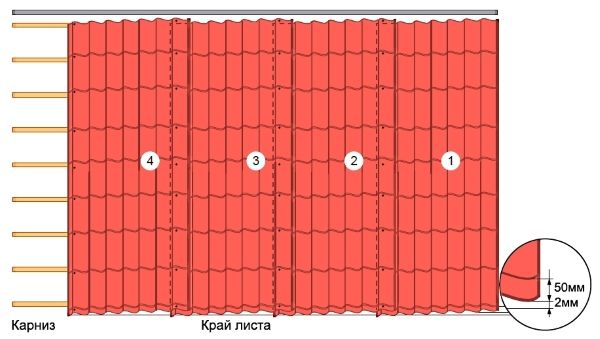
If there is an opportunity to put the sheets all over the roof of the roof in one row, the installation order will be like this:
- the extreme leaf is superimposed and its position is selected relative to the cornice and side cutting of the roof;
- the first sheet is fixed at the top of one self-tapping screw;
- the next leaf is placed with the allen in the wave and levels vertically;
- sheets are stitched by self-drawing, but the thread should not turn into a bars;
- similarly, the following sheets are mounted;
- the resulting assembly once again fails to relatively skate and eaves;
- self-tapping screws are screwed into the crate.
If the height of the sheet is less than the length of the skate and you have to lay the metal tile into several rows, the order of work will be as follows:
- the first two sheets are stacked by the same scheme as for single-row installation;
- the third sheet is placed on top of the first with a displacement of 150 mm horizontally, after which these two sheets are bonded between themselves;
- the next sheet is placed on the second and is attached to it horizontally. With a third sheet, the mount is carried out on the vertical side;
- four bonded sheets are aligned together and by culping the self-tapping screws are fixed on the crate.
![]()
At the final stage fixation produced in the lower part of each wave lower slice Sheets. In places where the vertical fall, Self-tapping screws in B. crest Waves. Distance between self-timers It should be chosen with this calculation: there should be 6-8 pieces per square meter.
Detailed instructions for mounting the roof of metal tile see this video:
Hearing window device ("Cuckoo")
 Location "Cuckoo" is determined early. When laying sheets of metal tiles in them, areas corresponding to them configuration Humor window.
Roofing cake under the window neatly peeps. By perimeter Windows are installed additional Bruss crates.
Gaps between the timber and sheet metal tile sealish. To remove the water are installed endovma top and bottom of the auditory window.
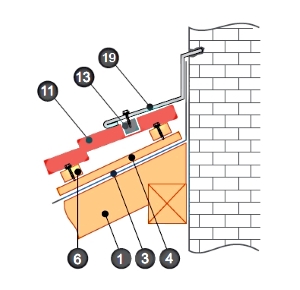
Installation of the end plank
Purpose of this planks (29) - Protection against atmospheric precipitation and sharp blows of wind penetrating under metal tile. In addition, the end planka performs and decorative Function: With the right installation, its upper face overlaps crest Waves metal tile. Screw The end bar starts from the cornice. If necessary, increase the nast 100 mm.
Installation of the upper endand
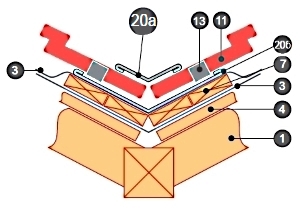 The purpose of this element is the removal of water, in addition upper Endow (20a) Makes the roof joints more aesthetic.
For installation, self-tapping screws, screwing them up so that do not disrupt Waterproofing layer. Between the Top Endament panel and the surface of the metal tile is laid self-seeping insulation.
Installation of adjustment planks
 These planks allow you to organize orderly and sealed transition From the surface of the roof to the adjacent walls and other structural elements of the building and roof.
The adjoining of the wall is arranged by the same principle as the adjoining of the chimney.
Installation of skate slats and external corners
Before installing skown Plank. It should be verified that the gap between the canvases of waterproofing of the adjacent roofing rods is not less than 20 cm. On top of the top solid crate can be laid additional Layer of waterproofing material with a strip of 150 mm.
The mount is carried out by self-tested screws in print Through the wave of coating. To build up the ski plank, organize naughty employees of additional ribs stiffness.
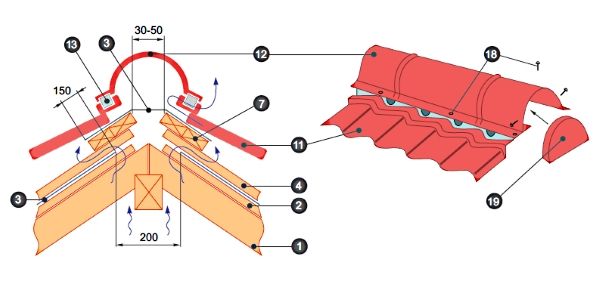
Facial Parts of the skate are closed by external angles recorded on the self-tapping screw. Between the metal tile and the ski bar is laid insulation from elastic material.
Installation of stairs, transitional bridge, roofing fence and snowmobile
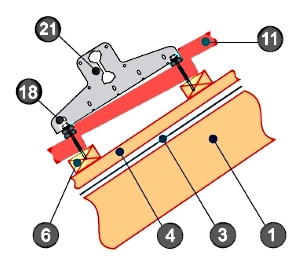 Roof Accessories Metal tiles are fastened over roofing.
Their places accommodation Defined in advance I. strengthen Additional bars and classes of crates.
Special attention is paid to the installation snowman (21). It is fixed in terms of rafters. complete reinforced self-drawing.
Installation of the drain system
When installed water removal systems From the roof, follow the following rules:
- to one drain pipe it is impossible to sum up more than 10 meters of drain gutter;
- part gutter above the funnel should be cut the angle with the parties in 100-110 mm;
- funnel Must be located under a gate at a distance of 150 mm.
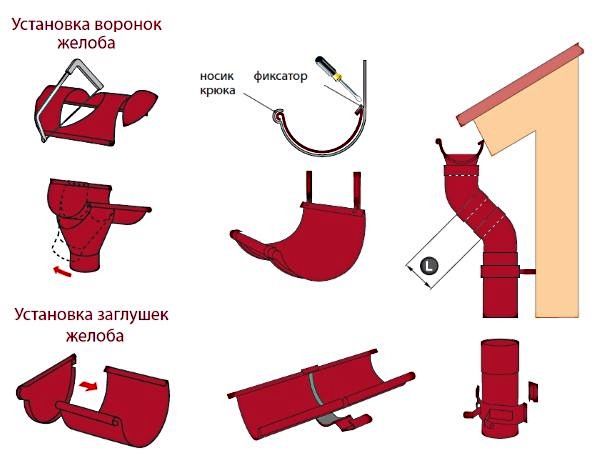
All elements of the drainage system, including plugs Funnels, etc., have a fixation system among themselves. However, after the installation work, they should additionally process them. silicone sealant.
Attention! The drainage pipes are mounted by crimping down, otherwise not to avoid leaks.
Grounding the roof of a separate tire
Since metal tile has the ability to conduct electricity, then for security purposes it should be provided by the system ground.
Grounding is configured electrobrovod Big cross section with one end to the roof (through the self-tapping screw). The second end is securely fixed on metal Designs buried to the ground on depth At least meter.
Postal treatment
Metal tile canvas requires periodic inspection (semiannually). From the roof and the drainage system clean trash and foliage and surface clean Soft brushing.
The cloth in problem places can be tint This will increase its corrosion resistance.
Installation of counterparts under rafyles
The system of counterrelics under rafters allows you to produce insulation Roof. As counterchains are used wooden bars or strap nailing.
Next to the space between rafyles The content of the insulation layer is placed behind the control, which is additionally reduces noity Metal roof.
Laying vaporizolation and reiki mount
Leave insulation It is unacceptable open, because moisture can fall on it and to reduce the entire insulation effect. To prevent this, the insulation is superimposed parosolation film (sixteen). This material does not miss moisture, but effectively misses water vapor, leaving the insulation dry.
Wooden rails are stuffed over vaporizolation for fixation Total pie.
Safety technique
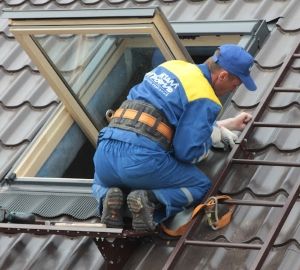 Work on the device of the roof of duct roofs belong to the work with high Danger level and the more bias Skatov, the stricter safety techniques. Do not neglect them, take care of your health:
- be sure to wear safety belt, tied with a strong rope to the durable part of the building;
- work in shoes that has good clutch with a surface;
- stairs and the woods securely fix the walls of the house;
- roof fence The gratings, forests, grid or sidelights with a height of at least 1 m.
When working S. metal tile. The following rules should be followed:
- always use mittens;
- to not allow applications of excessive effort to metal;
- take into account the wind strength and sailing Metal tile sheets.
In addition, it will not be superfluous to use all available devices that facilitate work. For instance, inclined guides from long boards will not only increase security when lift