Coating roof metal tile
For high-quality and proper execution, you need to know all the nuances and the subtleties of this case.
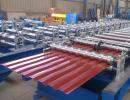
Among the many diverse colors for metal tile, presented in the market, you can easily choose a shade, which will organically fit into the design of your site.
Before you started to mount the roof to the roof, you need to make sure that its surface is smooth.
After that, it is necessary to make the calculation of metal tiles and correct defects detected during the survey and measuring the roof.
Start roofing
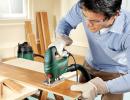
In order for, you will need:
- roulette;
- pencil;
- a hammer;
- screwdriver;
- duct tape;
- nails;
- self-tapping screw;
- bars, planks;
- hydro and thermal insulation.
Check the correctness and accuracy of the forms. For this measure the skates (their diagonal) from one corner to another. Know that any disk of your roof can be aligned by making a crate. And the skew from the ends can be removed, if you correctly mount the challenges. The required inclination of the roof should be at least 14 degrees in relation to the ceiling line at a skate length of 6 m. If the skate length is more than 6-7 m, then the sheets are broken at 2-4 pieces and laid a 10 cm.
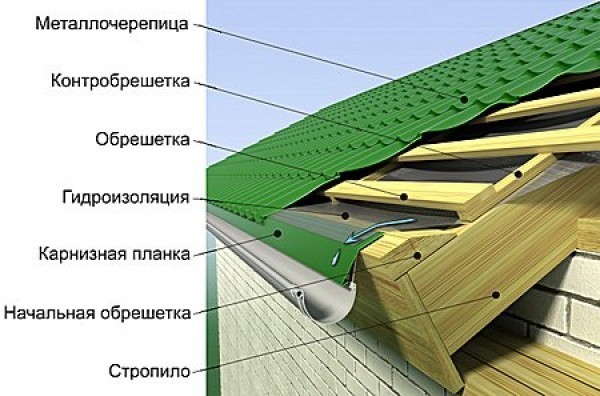
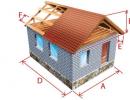
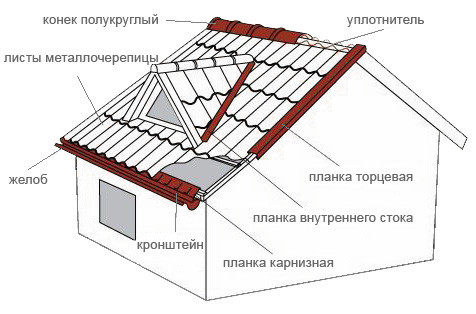
Diagram of the device of the roof of metal tile.
In order to correctly calculate the required amount of metal workers required for the roof improvement, in addition to the measurements of the skate, it is necessary to examine the roof and find the perpendicularity of the ends with respect to the lines of the skate and cornice. But this calculation is complicated by the fact that, unlike slate or sheet material, the top and bottom edges have clear contours.
When installing, it is impossible to change the sheets of this material in places, and if the design of the mounted roof has a broken line, then there are a large number of waste and joints. Therefore, it is often necessary to cut the metal tile. With the arrangement of this type of roofing at home, it should be borne in mind that cut pieces may not be suitable in order to correctly (for overlapping hollows, scallops and skates).
Choice of metal tile
One of the important points when calculating the material is the shape of the tiles and the size of its wave. If there is an old coating on the roof, it must be removed correctly to avoid an imminent collapse.
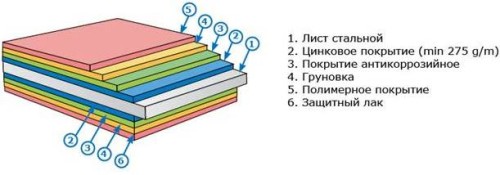
The base of the metal tile is a steel plate having a thickness from 0.4 to 0.7 mm. The plate on top is covered with a passivating aluminum layer, on which two boding layers are applied.
At the very beginning of work on the installation of the roof, you must install and remove all pipes and ventilation channels. It should not carry out any facade or facing work during the installation of the roof, since the inevitable splashes (from paint or solution) can get to the roof and spoil its appearance. Removal of spray will surely spoil the protective layer of the roof or lead to deformation of several sheets.
Consider other similar materials used for roof lining:
- Lifetime for up to 50 years.
- Ease. Metal tile does not deliver trouble during transportation and installation (while lifting on the roof of the house).
- Special component parts are easily getting, which allows you to reduce energy to physical work when installing.
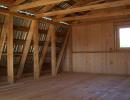
Before it is correct, it is necessary to make the basis (flooring) under it. Such a basis is called a doom. All installation can be started (both on the right and left) C, because its line also serves as the basis for installing the entire crate.
Diselet roof
Under the metal tile is installed in the range from 60 to 90 cm and depends on the type of tile used. It must coincide with the size of the leaf ribs. The bars for the rafter should be a cross section of at least 150 x 50 mm. The lamp must be properly made of a boards of size not thinner than 100 x 25 mm, and their dimensions must be 25 x 50 mm and more.
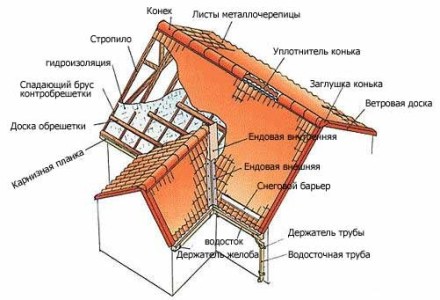
Mounting scheme metal tile on the roof.
When the lamp is installed, it is necessary to mark the attachments of all additional parts located on the roof, which involves the design. In the place where the skating board should be fixed, it is necessary on top of the rafter to nourish two boards at a distance of 5 cm from each other.
Around the windows of the attic (if it is) and around the chimney, the shap must be solid. Sometimes there are sinks (frontothy), in this case, the horizontal doom is extended to the length of the soles, and the enhancing agent is installed from the eaves to the skate, the end timber is mounted, covered with waterproofing. The connecting boards are naked between the beam and the end timber.
The cuttop, the tile control and waves are closed with an end beam, which is carried away from the walls and strengthen. Where negative angles are formed by the shakes of the skates, it is necessary to install funds. Before mounting the lower end, perform a solid crate of boards with a cross section of 150 x 25 mm. They are laid on both sides of the joints by 30 cm long.
The resulting wooden chute from the inside is covered with waterproofing. A distance of 30 cm are observed between the endows, and they are fixed with self-draws. In this case, the cornisic board is located under the edge of the endand (Lower). If the angle is too stupid, then it is protected by additional waterproofing, which is stacked along. The jack of endands horizontally implies a total of 10 cm. Between the lower end and tile, the porous material is laid, which is self-seated and compacts joints.
Pipe coating Metal tile
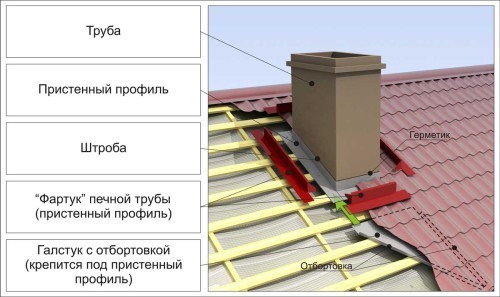
Diagram of the pipe output device through the roof.
In the place where the chimney is assumed on the roof, the internal parts of the adjunct are shutdown. For this:
- the corresponding size and color of the adjoining bar are selected;
- in the pipe make a depth of 15 mm deep and a small upper bias;
- the pipe is derived waterproofing (heat-resistant), and the slice is fixed to a special tape tube, and the output is made by 5 cm.
The place must be wrapped in a film. After coating the roofing, the outer apron is mounted. For this, the top of the adjunct bar is superimposed on the pipe, their external part is placed in the stroke and isolate the sealant, and the lower part of the plank is fixed with self-drawing to the crate. Between the pipe and rafters is the ventilation, which is ensured by the optimal distance between them.
In order for the brick tube to be protected from cracking during heating, it turns it with a sheet with a polymer coating. For ventilation, 2 cm clearance is left. If the chimney is round, it is insulated at the site of the roof of a special construction ribbon, which is self-sewn and therefore well seals the hole throughout the diameter.
The standard sizes of the step are the following: along the slope - 35 cm and across - from 18.5 to 19 cm. The shadow step is determined from the bottom board (from its edge) to the middle of the subsequent. To the rafter feet of boards are attached to construction nails, and their length corresponds to the thickness of 2 beams. The first board (for the crate) should be 1-1.5 cm wider than others.
Hydro and thermal insulation
In order to correctly, the first thing to be done is to apply a waterproofing and thermal insulation layers, which are inseparable elements and prolongs the operational period not only material, but also the roofs.
After that, you can go to the installation of the crate. Note that the heat-insulating film is protected the roof from the bottom, and the waterproofing sheath is above. Films are connected to the brass and fix with sticky ribbon. The roof must be supplied with ventilation.
The method of coating the roof of metal tile implies the fixation of the waterproofing shell using counterbasses, which are fixed on the roof rafters of the house. Between them allowed to be saved up to 20 mm. The cost of the roof from the metal appendix depends on the waterproofing, more precisely, from which material is used for this. If the film is covered with an absorbent layer, then it is expensive and high-quality. When installing, this layer should be directed towards the room.
Waterproofing protects the roof of the house from the formation of condensate, which is mainly recruited under metal tile and protects against the flow. The film is mounted in the mustache, and therefore it is necessary to align it and apply a black strip to the edge, which helps track shortcomings and deviations when placing waterproofing. After layering a waterproofing layer and its fixtures, you can start mounting your own clamp at home.
Mounting scheme metal tile on the roof of the house.
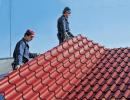
The next step is to lay the metal tile, which can be done both on the left side and with the right. If work starts from the left edge, then each subsequent metal tile is laid under the wave of the previous tile, and the edge must be mounted on the eaves with a protrusion 4 cm.
Before making the tiles, it is necessary to secure the cornice bar through the hooks for the drain. The cornice should be resistant to wind gusts, and for this it should be maximum for this. The bar is fixed to the frontal and cornice boards with the help of self-tapping screws, which should be located 30 cm away from each other. The length is made by 5-10 cm nascent. A cornice bar, which is considered the guide, is nailed along the sink of the roof. Multi-sheets are fixed by a screw, after that they are aligned on the etern and fix with self-draws.
The design of the roof of the metal tile involves the use of connective and fastening parts, such as 8-graded screws with a walker-seal. They are accepted strictly perpendicular to the surface of the roof of the house in the bending of the wave. For the correct calculation of the required amount of self-samples, it is taken into account that at 1 m2, the metal tiles are fixed with 6-7 pieces of 0.45 x 0.25 / 0.35 cm.
Scheme of installation of the roof of the roof for metal tile.
After the vertical is exhibited, go to the horizontal. During transverse laying, one wave is 200 mm, and with a longitudinal - one nailestone. The end bar is fixed on top of the laid wave of metal tiles (from the end), it should be roof tiles. The platband is fastened and fixed by self-drawing with a 200-300 mm step. The bar makes the roofing coating from the impact of the wind, and therefore the sheets do not break off from the mounts. In fact, a stable design is mounted.
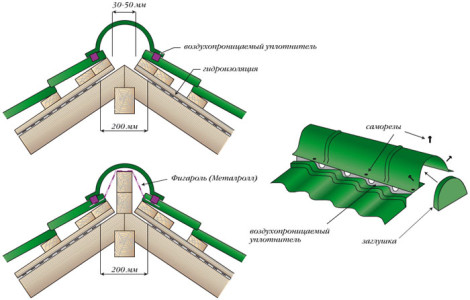
After fixing, the metal tiles hide the lip cover, which is closed with a layer and fasten with construction nails to the crate. Next, the following works are produced: closed the backrest on the tiled material by the skate element, which is attached to 200 mm with a pitch. The sealer is placed between the skate and metal tile, but the ventilation holes are open.
After the horse is fastened with self-drawers, the end must be closed with a plug. In order not to damage the tile, the shoes should be with a soft sole, and it is necessary to step in deflection. During operation, the root 2 times a year is brushed from various garbage. This work is performed by a soft brush, but make sure not to damage the sheets of the tiles.