How to cover the roof of metal
Installation of metal tile refers to the category of work that require strict follow-up to the rules. Incorrect styling can cause a reduction in the life of the material.
Necessary materials and tools
The following tools will be needed for work:
- screwdriver;
- a hammer;
- long rail;
- marker;
- roulette;
- hacksaw with small teeth;
- cutting scissors electric;
- metal scissors manual;
- disk saw with carbide teeth;
- electrolzik.
It is impossible to use abrasive circles ("Bulgarian") to work with metal tile: high temperature burns with zinc and polymer coating, which leads to active corrosion and formation of rust.
The cause of damage to the metal tile may become the remaining sawdust on the surface. After completing it, they must be removed.
When installing metal tiles, it is necessary to use galvanized screws with EPDM with rubber gasket.
Screwing the screws is performed using a screwdriver or electric drill with revolt and reversal regulator.
Scratches handle the paint of the same color as the metal tile.
Preparation for installation work
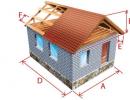
To avoid inconsistencies with the project, after installing the rafter, it is necessary to measure the roofing rods. Measuring diagonal, it will be possible to check the rectangle and plane of the roof.
If there are minor defects, they can be hidden using challenges on the ends.
When placing the metal tile, the roof slope should be more than 14 degrees.
The length of the sheets is determined depending on the length of the skate - the segment between the skate and the eaves, to which it is necessary to add 40 mm for the sink of sheets from the cornice. If the length of the skate is more than 7 meters, then the sheets need to be broken into two or more parts.
They must be laid with the allen material 150 mm. When installing long pieces, you can reduce the number of joints, however, the process will complicate significantly.
According to the requirements of GOST, metal tile should be stored in premises without heating, which ensure the protection of the material from adverse climatic factors: rain and direct sunlight.
Factory packaging profiles need to be laid on flat sites, while using a 20 cm thick with a 50 cm step as a stand.
If the storage period exceeds the month, then the sheets of metal tiles are better to unpack and put in the stack (height - up to 70 cm). Sheets in them are shifted using a rail.
Steam, thermal insulation and ventilation
Some errors in the roof device from metal tile may cause serious consequences. To not be, it is necessary to remember some of the features of a metal tire roof:
- as a result of daily fluctuations in temperature on the inner surface of the sheets, condensate may appear;
- increasing humidity in the underlined room is a consequence of evaporation that rose from the lower parts of the building.
These factors lead to the humming of the insulation and the reduction of its heat engineering characteristics. The roof can freeze, on the roof covering arise to the roof, the processes of rotting begins in wooden rafters and the crate, mold is formed, the internal decoration of the building may be damaged.
It is possible to avoid these unwanted consequences if:
- use a rather thick layer of insulation;
- apply waterproofing film or membrane to protect the insulation from the effect of condensate;
- use vapor barrier to protect the insulation from the moisture-rising moisture;
- take care of the natural ventilation of the underground space.
Proper to choose useful tips from our detailed article.
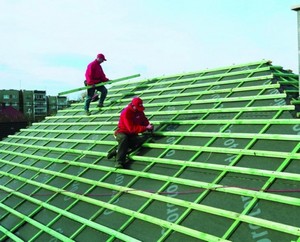
After choosing and purchasing metal products, you can start using it on the roof. Describes the process of the roof of the roof from the corrugated floor. The following instructions from the article can be covered with a roof without special problems.
Rolled waterproofing should be rolled along the rafters on the insulation between the skate and the eaves in the horizontal plane with the allen in 15 cm.
It is necessary to ensure that the indicator colored strip is turned outward. The film is placed with a 2-centimeter saving to provide a gap of 2 cm to the insulation. If these requirements are violated, the film can lose its protective properties.
A layer of vapor barrier: put the insulation of the Vangest. To ensure tightness, its pieces are connected using adhesive tape.
Special gap of 4 cm high, which separates metal tile from waterproofing, provides natural ventilation. It is created using the crate under metal tile and guarantees the circulation of air masses between the eaves and the skate.
When the metall tile of the sweepers, the metal tiles are designed with a size of up to 5 cm. In the skate seal, the release of special holes is envisaged.
Diselet and other roof details
 The lattice under metal tile is created using bars with a cross section of 5 x5 and 3.2 x10 cm boards.
First of all, 5 x5 cm bruises are nailed to the rafters from the skate to the eaves on the waterproofing film.
Fastening boards is made in compliance with specific distances:
- 30 cm - from the beginning of the first board until the middle of the second;
- between the average parts of the remaining boards located next door - 35 cm.
When the distance between the rafters of more than 1 meter, it is necessary to use the boards of greater thickness.
When the crate device must also take into account the step of metal tile.
In some places, the lamp must be solid. This applies to space next to the attic windows, chimneys and endowes. To create a solid crate to the sides of the skate plank, two additional boards nourish.
The end planks must also make the above ordinary crate to height, equal to the magnitude of the metal tile profile.
The lower rtands are fixed on a solid crate at the points of the internal jacks. This is done using self-tapping screws. At the docks of the slats make a nest, which is determined by the inclination of the roof - from 10 to 15 cm.
Then the pre-cropped metal tile sheets are stacked, the top plank of the endand is placed on top.
It is necessary to take it very carefully to the adjustment places: it is these points that are the most vulnerable places on the roof.
When installing, it is necessary to ensure that the metal tile ensures hermetically adjacent to the walls and places of chimney output.
To this end, on the roofing slope there is an internal apron, which is made on the basis of the lower layers of the adjoint:
- The bar is applied to the walls of the pipe.
- On the wall marked the top edge of the plank.
- According to the planned line, the shrub is pierced with the use of a grinder.
- The stroke is cleaned of dust and washed.
- The lower bar of the adjoining can be cut around the place.
- The lower bar is installed and secured with the help of screws.
In a similar sequence, an apron is installed on other walls, and 15-centimeter adhesives are provided, which exclude the possibility of leakage.
In the stroke inserted in the stroke should be sealed the edge. For the direction of water in the right direction (to eternume or endand), it is necessary to insert a tie under the lower part of the inner apron to insert a flat sheet with sides (curved edges). Using the hammer and pliers, the sides are flex.
Its installation is carried out similarly to the internal, but at the same time the upper edge should not be done in the stroke, but to attach to the wall.
When mounting the gutters of the drain pipes, the holders need to be installed on the bottom board of the crate with such a calculation so that the edge of the gutter is 2.5-3.0 cm below the edge of the metal tile sheet.
So you can reduce the load on them in the event of a break from the roof of the layers of snow.
After that, the gutters are inserted and fixed in the holders, the burdock of the cornice is attached to the crate. In this case, it is necessary to ensure that its lower edge overlap the edge of the gutter.
The end of the waterproofing membrane is displayed on top of the carnis film so that condensate can be drained from the waterproofing membrane in the chute.
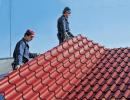
Crow the roof of metal tile
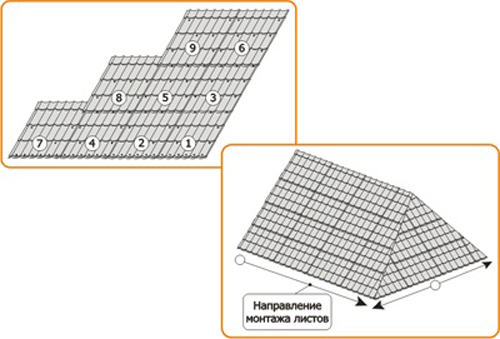
When laying the first sheet, it is aligned by the end of the roof, then the sink is fixed near the skate. Relative to the eaves takeaway is 4 cm.
Laying the second sheet of metal tile at the installation on the right to the left is made on the first, and in the case of installation on the left side, the right - led under it.
Sheets are fastened with the help of self-tapping screws, which are located in the upper part of overhearsow so that they are not fastened to the crate and can turn together with respect to the axis of the self-press, with which the first sheet is fixed near the roofing skate.
In the same way, the third sheet is installed. All three connected sheets are aligned strictly parallel to the eternity.
In the case of docking sheets in length, the order of work on laying changes: all sheets, starting from the first to the fourth, are connected and aligned at the end of the roof.
The lower part of the sheet is attached to the sole of the wave with the help of self-tapping screws, while one wave is passed. During operation, it is necessary to take into account the length of the wavelength of the sheet metal tile.
After that, it is embarrassed to screw the screws, which is carried out in a checker manner through the wave. To bore a side leaf, you need to screw the screws into the crest of the wave. At 1 square meter use 6-8 screws.
Installation of other elements of the roof of metal tile
The roof ends are close to end straps. They have a 5-centimeter overlap, if necessary, cut. Fastening is made using self-tapping screws.
At the same time, screws 28 mm long apply for the side mount, and for the top - 80-millimeters.
Self-tapping screws should be screwed at a distance of 50-60 cm.
After the release of the ventilating hole at the skate is a figured seal, and on it through the wave of a sheet of metal tile with 80 mm self-tapping screws are attached a round or flat skate bar. Their installation is made with the allen 10 cm.
In order for in the future there was an opportunity to move on the roof, a vertical protective lattice is mounted on it (at the cornice level).
To attach fencing lattice support, galvanized screws are used - M8 X60. They are screwed through a sheet of coating and gasket on the places of the wave of the wave in the support timber.
After that, the support is adjustable, taking into account the slope of the sheets of metal tiles, is fixed, and the roofing fence is hung on the support.
The sections are attached to the support using the M8 x55 and M10 x35 bolts, the 11-mm holes are pre-drilled in the upper crossbar.
After the installation is completed, the roof of the roof is thoroughly sealed.
For the availability of the antennas and pipes located on the roof, transitional bridges are mounted. Their mount is made in the same way as the fastening of the roofing fence.
To regulate the inclination of the platform in the upper and lower brackets, the necessary openings are selected. Fixation is performed using the M8 x 20 bolts.
Short outcome: how to properly cover the roof of the metal
- For long-term operation of the roof, the laying of metal tiles should be carried out in accordance with the rules.
- In advance, you should prepare all the tools and materials.
- To avoid incollects, you need to make accurate calculations.
- To protect the roof of metal tile, the presence of a layer of vapor barrier, thermal insulation and ventilation is required.
- Before laying sheets, you need to arrange a crate.
- When installing the crates, the timber and boards of certain sizes are used, the sheet pitch is also taken into account.
- In places of outlet of chimneys, the roof is provided for installation of an inner apron.
- Installation of sheets is made in a certain order, screws are used to secure them.
- After laying sheets, metal tiles are embarking on the installation of the rest of the elements.
Video Installation instructions Metal tile: