How to create your own hood. Setting up the HUD in CS GO: making the interface unique. Dimensions and appearance
Excellent visualization is one that gives the viewer more ideas in the shortest amount of time with the least use of signs/colors in a limited space.
In our business, of course, we use pixels instead of colors, but the idea is the same. We have a limited screen space on our monitor, and we hope to display as much information as possible on it, which at the same time would help us make the fastest and best decisions.
This article presents five simple HUD upgrade tips that will help you improve your HUD performance. But first, let's clear up a couple of things. Firstly, all this only applies to Holdem Manager and, secondly, this is not an explanation of HUD stats.
1) Increase the VPIP font size
One of the simplest and most effective improvements you can make is to increase the font size. VPIP(percentage of hands played).
Your HUD should help you identify opponents as quickly as possible, and the only stat that tells us the most important information about a player is his VPIP. No other statistic tells us so much.
If VPIP=10%, you have a nit.
If VPIP=50%, you have a fish in front of you.
To be sure of the reliability of this stat, we do not need anything other than the number of hands (sample size) per opponent.
Thus, it is necessary that this stat stands out from the rest. Sometimes some of your decisions will be based on this information alone, and this stat becomes reliable pretty quickly.
PFR is usually looked at in conjunction with VPIP, but I don't usually highlight this stat. If they are both the same size, they visually compete with each other, making them less effective.
You can also change the font size of other stats to emphasize or downplay them, but don't overdo it.
2) Set the layout to suit your HUD
This is often forgotten, but setting a more comfortable layout can greatly improve the readability and effectiveness of your HUD.
Opt for a clean, dark background. In my layout, the area around the table, like the table itself, is black or at least dark gray. When you look at the table, the only things that should grab your attention are the player information (stats), cards, chips (both pot and stack), the dealer button, and the action buttons.
Look for layouts that reduce the size of the table itself so that there is more space for statistics. I still think that the best layout of all time in this regard was the Mighty Mouse for PokerStars, but unfortunately it is no longer available.
If you are looking for the most suitable layout for you, visit www.pokerlayout.eu. They have layouts with dark backgrounds and decent space for statistics.
 In addition, as you can see in the picture, I advise you to use layouts that remove the chat and player avatars (if possible), as this frees up much more space for statistics.
3) Use different colors
Of course, you don't want your HUD to look like a Christmas tree. Therefore, use different colors only when necessary. Two approaches work well here:
1. The colors change depending on the value of the indicators (for example, red for high values, green for low values).
2. By color you distinguish the stat from other statistical indicators.
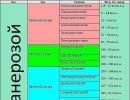
In fact, I use both approaches. In preflop stats, each line is a different color for me. This makes it easier for my eyes to navigate to the correct row. Columns mean positions.
Some players use different colors for each stat. I find this distracting and much less effective, but it might work for you.
In the post-flop statistics, all “normal” indicators are gray for me. And when they go beyond the "normal" values I set, I have only two colors - red and green. Thanks to this, I can very quickly detect the leaks of my opponents, since only important statistics are highlighted.
4) Use panels to group stats
The most common method of distributing stats is in one large panel under the player's nickname, which is also the most inefficient. In one big panel full of different values, it will take you much longer to find the right stat.
Instead, try using the functionality of Holdem Manager and group similar statistics. Then distribute these panels around the player icon depending on their importance.
Your brain will quickly grasp their location, and your eyes will automatically search for the right information in the right panel.
5) Other HM2 tricks to improve your HUD

Here are some HM2 features to help you distribute values in HUD panels as shown above:
1. Use Lucida Console Fixed Width Font. It will keep the columns in a row.
2. Enable abbreviations but remove the default label. Then…
3. Use spaces, dashes, slashes, and other symbols to align, space, and differentiate your stats.
4. Set the background of the HUD to black, then set the spacing font to black.
5. Do you need more space? Then enlarge the ledge and use the area outside the table window.
Tired of the standard HUD in CS GO? Do you want to set it up so that you can play with maximum convenience and not be distracted by eye-catching details? In this case, it's time to change the interface settings in CS GO! It's simple, fast, and there are a lot of options for changes.
- Dimensions and appearance
- HUD Location
- Radar settings
How to change the interface color in CS GO - no standard
Interface customization can be very flexible. Everything changes, from size to location. We will learn not only how to change the color of the interface. But for now, we're just setting it up.
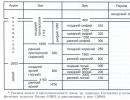
In total, the game offers 11 colors for the HUD:
- 0 - standard gray shade;
- 1 - neutral white;
- 2 - light blue;
- 3 - blue;
- 4 - lilac;
- 5 - red;
- 6 - orange;
- 7 - bright yellow;
- 8 - light green;
- 9 - turquoise;
- 10 - pink.
The number that indicates the color must be substituted into the console command below. And then the shade will become exactly what is required.
How to make the color change: commands for customization
There is an easy way to change the color of a hood. These are console commands. To change the color of the HUD through it, just enter the following command:
cl_hud_color*
Instead of an asterisk, you need to substitute the number of the color that we want. Thus, we change it without applying settings. This will solve the question of how to change the color of HP, armor, and in general everything at once.
It is noteworthy that in this case, you can separately change the color of the display of weapons! It's pleasing to the eye. To activate the command, you need to enter the command:
cl_loadout_colorweaponnames 1
The selected weapon with the skin will be signed in color font. Its hue will match the color of the skin's quality (for example, AWP | Dragon Lore will be labeled in red letters).
HUD settings in CS GO - change for yourself
But color is not the only option for making hood more comfortable and beautiful. You can change it as you like within the limits laid down by the developers. And for this there are special console commands that can make the interface really unique.
Dimensions and appearance
How to customize the HUD by changing the location of its familiar elements or slightly varying their appearance? Very simple - through the console using the commands below.
hud_scaling (from 0.5 to 0.95)– changes the size of the interface along with the radar. Less value - less all the details are thin. And vice versa. If you set the value to 0.95, you get a standard thin.
cl_hud_playercount_showcount (0 or 1)– the team changes the display of the panel with the number of players. A value of 0 shows each player's icons. On 1 - displays only the number in numbers.
cl_hud_healthammo_style (0 or 1)– changes the appearance of the health and armor panels. A value of 0 displays the scale and the numbers next to it. And 1 will leave only a number.
cl_showloadout (0 or 1)- changes the display of weapons in the lower left corner. At 0, the inventory will not be visible. At 1, icons of everything that is in the character's pockets will be placed on the screen.
Location
Directly through the console, you can change the location of some interface elements.
cl_hud_playercount_pos (0 or 1)– moves the panel with the number of players up or down, respectively.
cl_hud_bomb_under_radar (0 or 1)– changes the position of the bomb icon. The number 0 leaves it only next to the weapon. If set to 1, then the command copies the display of the bomb next to the weapon under the radar, as in CS 1.6.
Radar settings
The radar has a separate place, since its fine and most convenient setting is important for every player.
cl_hud_radar_scale (from 0.8 to 1.3)– depending on the value, reduces or enlarges the radar, stretching the mini-map image on it.
cl_radar_always_centered (0 or 1)– changes the behavior of the radar when the player moves. At 0, the map follows the movements. And at 1, it will not move.
cl_radar_icon_scale_min (0.4 to 1)– changes the size of the display of characters on the mini-map. The higher the value, the larger the dot.
cl_radar_rotate (0 or 1)– changes the behavior of the radar when the camera is rotated. At 0, the radar is stationary and always turned in the same direction. At 1, it turns to follow the player's movements.
cl_radar_scale (from 0.25 to 1)– controls the scale of the mini-map on the radar. The larger the variable, the higher the scaling. An important command - you can set the display of the entire map at once on a small radar and see everything that happens.
cl_radar_square_with_scoreboard (0 or 1)– allows you to see the mini-map with an open account. At 0, the function does not work, at 1, the radar becomes square and shows the entire map at once.
How to make thin?
HUD is a special indicator that is needed in order to display important information that occurs during the game, it is also very often called the user interface. It can be created for games like GTA, Counter Strike, poker, etc. Before creating your game interface, you need to clearly think over its theme, the name, which must match the theme, the sketch, which must have a fictional icon and interface, that is, all work must be carefully thought out. How to make your thin?
Interface Creation Rules
- Images and the mini-map are in no case moved to another location or resized;
- The interface itself is also not resizable;
- All elements that are in the interface do not overlap with each other;
- The silhouette and general drawing can be changed without affecting the size of the interface.
Instructions for creating an interface
- For the initial stage, we take a ready-made game interface template. It can be downloaded for each game on a special server;
- Then open the HUD_template.psd file, you can do this using Photoshop version CS2 or higher, it is this program that can allow you to use one object several times;
- The borders of the mini-map and some other elements are edited only once, since they no longer change;
- In order for the area that frames the portrait of the character to be able to change for different image formats, we create several layers of the same portrait, but with different formats: 4:3, 16:9 and 16:10.
- A template can have a large number of interface parts. To display in the desired format, select the desired option;
- In order to edit the desired layer, double-click on it with the left mouse button, then select the "Edit Content" command;
- After that, a new field pops up on the monitor, in which we add an image of a personal skin, after the end we save the finished version;
- In order for the user interface to work in the game without interruption, each created file is saved in PNG format;
- The finished script, if it works in Photoshop, is moved to a special folder in the game;
- After everything is moved to the game folder, specify the path and route to the desired file.
In order to test our personal interface, we send it to the server of the game for which it was made. To do this, there is a special store where we upload our interface, then give it a name and view it on a test map.
Before taking an advanced drug, you should learn in detail everything about the qualities of its implementation. Capsules Reksatal help to strengthen an erection when it should be done. In view of the brained composition, they can sometimes be taken in combination with alcoholic cocktails and some drugs.
It is pleasant to drink Reksatal with ease and then it is pleasant. The course represents the use of 1 cachet during the day. The product must be diluted with as much water as possible. The cycle of use is recommended to adhere to within 30 days. If necessary, it is permissible to do it again, bypassing thirty to sixty days.
Capsules do not force intolerable effects, withdrawal syndromes and acclimatization. Their use guarantees an instant and impressive fact for several days of repeated spending without any secondary actions. Certification certificates of conformity indicate the high quality of the medicinal product.
It is necessary to adopt a medication even with a brief desire. In the interests of the greatest effectiveness, it is important to carry out the full course of healing. To every package of Rexatal, a thorough application instruction is added, that you need to lovingly study and execute all recipes in a row during the healing cycle.
Real people -
obvious effects!
"Old age is revealed. The conclusion is known to almost all uncles - inflammation of the prostate. There was no sexual intercourse with my wife for more than 6 months, and healing did not highlight the lack of achievements. I replaced the doctor, he personally advised me on REXATAL. After 2 weeks of consumption, I was not able to trust - potency finally returned to me. For the first time in all the time I found authority. At the moment, I am satisfying my spouse better than in my youth!
At the moment, I'm much for sex in any setting!
“I think that numerous representatives of the stronger sex experience this, sooner or later after alcoholic drinks the riser is so-so, almost impassive. It decently bothered me - it wasn’t suddenly that sex with girls broke down at the zenith of amusement! I don’t even care that there were troubles before.” .